| Author |
Message |
Motomazzo
Samba Member

Joined: June 02, 2009
Posts: 792
Location: Texas

|
 Posted: Thu Apr 22, 2010 4:16 pm Post subject: My '66 V-DUB Build Thread - Body-Off Project Posted: Thu Apr 22, 2010 4:16 pm Post subject: My '66 V-DUB Build Thread - Body-Off Project |
 |
|
Alright, so....
I started this thing almost one year ago exactly. I never started a build thread. I got pretty far last year before I had some other financial obligations. Anyhoo, I just got back on it and hope to get this thing done in the next several months. I thought I'd start my thread, get it up-to-date, and keep posting in it for anyone who is interested. So here we go....
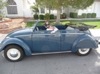
This is how it started. This was my Mom's car when she was 16. Then in 1992, we fixed it up for my Brother to drive in High School. He parked it in 1995 and it's been sitting out at the folk's place since then. I finally got the "bug" last year and took it off their hands. I was going to get it running and road-worthy...which I did. But the plan was to drive it around for a while before really working on it. Well....three days later, I had the body off, 
Here's Memorial Day last year....washing her down after towing it from the folks' place:
Then the gloves came off.....
My 3-Legged Shop Cat Inspecting My Work - I HATE cats...this one is cool.
At this point, I was feeling pretty committed
Miscellaneous "Before Chassis Pics"
New Pans for sure....
Dang!! Just bought the two new rear tires two days before...Doh!!!
Dad's Handiwork from years ago to keep the motor mount bolts from turning. I had to chuckle and appreciate that...
Pans coming out...
My new "stick with wheels". Working under a tent. Summer in Texas! I'm no dummy. Only 80 bucks at Wally-World. Made the sun bearable.
Down inside the tunnel...
More Pan Work...
Took The Front End Off....
Beam and Trailing arms were in pretty good shape...very little corrosion.
See ya, drum brakes!! No, I didn't throw them away!!
Undercoating partially on, partially off. AHHHHRRRRRGGGGGGG!!!
Stripping the Undercoating...
Stripping Down the Back-End....
Many of these pictures I took so I could remember how to put everything back together!!
Got tired of removing undercoating....moved on to narrowing the front beam.
Here I stripped the components off the beam after cleaning...
Installing the adjusters...
Welded....
Welded components back on...
Shortened and Dimpled the torsion bar pack....
Front Beam Installed - Frame Head and Beam POR'd...
Prepped Trailing Arms and EMPI Dropped Spindles for POR...
Trailing Arms Installed, EMPI Front Discs Installed as well.....
Decided I wanted Red Calipers. Really wanted Airkewld, but couldn't afford them.
Prepping the Chassis for POR, I decided to address the Tunnel Corrosion the best I could. I poured a full quart of Rustoleum Red Oxide Primer in the tunnel and tilted the chassis back and forth, front to back to seal up along the tunnel walls. Might not do much, but it made me feel better. After a full year of being open, it's definately dry!!!
Before:
After:
Stripped the tunnel for POR Prep....
Installed the new pans and POR'd everything. Note the Rustoleum inside the tunnel....Makes me feel good!
Adding Seam Sealer...
Painted over all the seam sealer. Wanted a dang-good seal!!
POR'd my shift tube as well...
Random Side Note...this is the grease stick I made to remove grease from the front beam. Fender washer screwed to the end. Worked great to remove the big stuff...
Received my freshly overhauled transaxle. Had them build me a 3.88 Freeway Flyer..
Painting the transaxle. Ooooohh. Pretty.....
Stopped and built a body dolly. Got tired of seeing my body in the weeds.
Went back to narrowing my Tie Rods. I wrote a whole article on my methodology for this in a thread a while back. I searched and there wasn't much detailed info on this....so I did it myself and posted all my measurements for a 4" beam, FWIW.
With the front wheels straight, and the steering box dimensions set, I worked at shortening the tie rods in the middle a little at the time till I got what I wanted. Yes, I shortened in the middle. This was easier to me than finding/buying a tap and rethreading an end. In this photo, they are not welded. Just held together with the solid sleeve I made for each in the middle.
Now the fun part!! Here's how I welded them together. Sleeve in the middle. Slot to bond sleeve to tie rod body. Beveled seam. If that comes apart, it was meant to be!!
Here's a photo with the sleeve next to the joint. It was installed, then welded. Same for both tie rods.
Here are both tie rods completed. I ground the welds and the seam is invisible.
Sooo....that's about where I am now. I will post more as stuff happens. Let me know what you think so far!!
Moto |
|
| Back to top |
|
 |
jmw1982
Samba Member
Joined: May 19, 2008
Posts: 298
Location: Weymouth, MA
|
| Posted: Thu Apr 22, 2010 5:13 pm Post subject: |
|
|
nice work!
_________________
________________________________________
'60 Beetle Indigo Blue |
|
| Back to top |
|
|
zombie
Samba Member
Joined: June 17, 2004
Posts: 1177
Location: Pothole City, CT
|
| Posted: Thu Apr 22, 2010 7:15 pm Post subject: |
|
|
nice build.
what happened to the cat's fourth leg?
_________________
I run two fuel filters in my engine bay. |
|
| Back to top |
|
|
Detroit73super
Samba Member

Joined: October 03, 2009
Posts: 611
Location: Detroit
|
|
| Back to top |
|
|
Danahur
Samba Member
Joined: June 28, 2008
Posts: 35
Location: Brasil - RS Caxias do Sul
|
|
| Back to top |
|
|
Motomazzo
Samba Member
Joined: June 02, 2009
Posts: 792
Location: Texas
|
| Posted: Fri Apr 23, 2010 4:37 am Post subject: |
|
|
| Thanks for all the nice words!! I'm really getting excited about it. FINALLY decided exactly where I'm going with the overall theme of the car so that helps out and get's me pumped! Pulled the calipers back off....sent the front and rears calipers to the powdercoater to be done gloss black. Have my wheels on order (stock 15" smoothies....having the rears widened). Plan is to finish the chassis completely, including engine, then hit the body, then interior last. Just got the body back from the sodablaster. I'll post some more pics hopefully today. Peace, y'all!! |
|
| Back to top |
|
|
redeye65
Samba Member

Joined: March 24, 2010
Posts: 147
Location: Corona CA 951
|
| Posted: Fri Apr 23, 2010 10:03 pm Post subject: |
|
|
| great post! Thanks for taking the time to post all the great photos and steps you have taken during this restoration. Staying tuned.... |
|
| Back to top |
|
|
Motomazzo
Samba Member
Joined: June 02, 2009
Posts: 792
Location: Texas
|
| Posted: Sat Apr 24, 2010 5:58 am Post subject: |
|
|
Hey Thanks!! Yeah, it's a lot of work posting all the pics...sheeze!! About 1/4 of the way through I thought about stopping.....so tedious...I got that stabbing feeling between my shoulder blades when you've been sitting at a computer too long. But I figured if I could just get "caught up" on my pics, it would be much easier to post as I went. I've got a few more pics to post, but my laptop finally gave up the ghost to a malware virus yesterday. I'll have to wait till Monday - Tuesday of next week to post more. Thanks again for the interest. This build thread should move pretty quickly. I MUST complete the car for a daily driver. My wife is actually pushing me to get it done! That's pretty sweet!! The only hold up is me.....and my "perfectionism". I slow me down  |
|
| Back to top |
|
|
jmsmilin
Samba's Most Posted

Joined: November 10, 2005
Posts: 3302
Location: Out on Pa-troll.
|
| Posted: Sat Apr 24, 2010 6:28 am Post subject: |
|
|
looking good
_________________
Der Schmutzige Süden.
(o\ ! /o) | o \/ o | (o)=|=(o) [o\|_|_|/o] \m/ |
|
| Back to top |
|
|
hpw
Samba Member
Joined: July 17, 2006
Posts: 3010
Location: memphis
|
|
| Back to top |
|
|
Motomazzo
Samba Member
Joined: June 02, 2009
Posts: 792
Location: Texas
|
| Posted: Sat Apr 24, 2010 9:56 am Post subject: |
|
|
| zombie wrote: |
nice build.
what happened to the cat's fourth leg? |
Hey Zombie......I just noticed your question about the cat. So, when he was a kitten at my Mo-in-Law's house, he was playing under a bed, got his paw wrapped up in the rubber edging of the mattress cover, then started twisting his body round and round like an alligator try to get out, I think. Anyway, by the time he was noticed it was too late. I had to cut him free and could barely get the scissors between the rubber band and his paw. I assumed the tissue was already dead since he had been that way overnight. My M-I-L and wife left for a vacation and left me with the cat. I nursed it for a week with antibiotics and pain-killers and finally the paw died. We had two options: Put him to sleep or have the leg amputated. My M-I-L could not afford the procedure, so we paid for it. I dropped him off and picked him up. He had been using the leg long enough to miss it. He kept stumbling in the box I picked him up in, trying to use the leg he was missing. I felt SO SORRY for him. Anyway, we bonded. I refuse to keep a cat in the house, so I told my wife we could keep him, but he'd have to be an outside cat. Well, turns out, he's totally cool. Hangs out in my shop and follows me around like I'm his Daddy. He keeps me entertained when I'm taking a breather out in the shop. He's all the time trying to do stuff he can't do with three legs. It's pretty funny. |
|
| Back to top |
|
|
6DEODAND9
Samba Member
Joined: October 11, 2009
Posts: 16
|
| Posted: Sat Apr 24, 2010 12:35 pm Post subject: |
|
|
| AWESOME WORK...it looks fantastic! My first was a 1966 so I'm very interested in how this turns out. Cool cat story. Alot of guys would've taken him out back and put him down the cheap way. I'm glad you two are buds...*sniff sniff* |
|
| Back to top |
|
|
lovethatconvertible
Samba Member
Joined: August 22, 2008
Posts: 1434
Location: Las Vegas N. V.
|
| Posted: Sat Apr 24, 2010 12:42 pm Post subject: |
|
|
Now that's a story, cats are Cool. Oh Yea, Now Get Back To Work on That Bug  |
|
| Back to top |
|
|
Motomazzo
Samba Member
Joined: June 02, 2009
Posts: 792
Location: Texas
|
| Posted: Sat Apr 24, 2010 7:57 pm Post subject: |
|
|
Alright, enough about the cat!! Roget that!
So, I got the body back from the Soda Blaster the other day. Finally got some pics. I'm really pleased with how it turned out. Pretty straight body overall. I have some cancer in all the normal places. Heater channels will have to be replaced (looking forward to that...not) and some sheet metal around the lower door posts, etc. I'll be super-glad I trued all that stuff up though when it's done. Here are some pics of the body. One or two of them are pretty crappy pics....and my shop desperately needs to be cleaned up. But I'm juggling a lot of projects at once here. I'm doing my best!
Moto
Stay tuned!!!
Moto |
|
| Back to top |
|
|
Skaper
Samba Member
Joined: August 08, 2007
Posts: 92
Location: Portland Oregon
|
| Posted: Sat Apr 24, 2010 10:35 pm Post subject: |
|
|
| Damn! Nice work! |
|
| Back to top |
|
|
hpw
Samba Member
Joined: July 17, 2006
Posts: 3010
Location: memphis
|
|
| Back to top |
|
|
Motomazzo
Samba Member
Joined: June 02, 2009
Posts: 792
Location: Texas
|
| Posted: Sun Apr 25, 2010 4:29 am Post subject: |
|
|
Thanks Skaper!!
HPW - I was originally given a ballpark estimate of between 700 and 1200 bones, based on how much paint was on the car and how long it took to remove it, obviously. I just had a look at the receipt -- $1220.47. When he called and told me the car was ready and to tell me the final damage, I have to admit I was a little surprised. I was really hoping for the 700-800 range. BUT, when I dropped the car off, I got the "big eyes" and started digging my hole. I went for an inside and outside blast. Had them remove all the undercoating from the body and all the fenders. He talked me into switching to "mineral media" to get to the bottom of the rust in a couple small places on the car. And I know the car had the OG Ruby Red Paint, then it was painted Gold, then my Dad painted it a two-tone silver and blue back in the early 80's, then he painted it the teal color you see in my first photos back in 1992.....with lots and lots of clear.....so I know it was a PITA to blast. The owner said in some places it came off real nice and he said in others it was as challenging as anything he's ever done. But I would do it again in a heartbeat. Shameless Ad plug here, but A to Z Soda Blasting in Justin, TX.....Awesome guys that do great, honest work. I highly recommend them! Oh, the other thing…..The owner, Ken, gave me fair warning that the more I did myself , the less expensive (pro rata) it would be for me. I started out stripping the top of one fender then life caught up to me (I travel a lot). I gave them the full job. I could have saved myself a LOT of money giving them a car that was mostly stripped, so definitely take that into consideration if you are thinking about having your car soda blasted. Most shops work by the hour, so the less there is to blast, the less your final bill will be!!
Moto |
|
| Back to top |
|
|
artie325
Samba Member

Joined: July 25, 2005
Posts: 187
Location: Hamburg, NY
|
| Posted: Tue Apr 27, 2010 5:55 pm Post subject: |
|
|
| Your work on the pan is really nice! I like how you narrowed your tie rods. I narrowed my beam and tie rods myself a few years back and used a tap to add more threads. I stopped a snap-on guy driving down my street and picked one up for $10.00. I was surprised how easy it was to re-tap. Some advice for people willing to do this...tap your tie rods before you cut the ends so you have threads already there to guide you. |
|
| Back to top |
|
|
iaccy
Samba Member

Joined: September 24, 2007
Posts: 1380
Location: CT
|
|
| Back to top |
|
|
Motomazzo
Samba Member
Joined: June 02, 2009
Posts: 792
Location: Texas
|
| Posted: Tue Apr 27, 2010 8:06 pm Post subject: |
|
|
Thanks guys. Much appreciated. This is my first attempt at a restore and I've had a few setbacks and made a few mistakes here and there. Positive feedback is nice to hear. I've run into a few issues with my disc brakes (see Beetle thread) and I need to get that solved, wheels back from being widened, then powdercoated so I can finish up the chassis. Dropped off my stock 1300 at the VW shop today. Almost no core, but they are going to use what few parts they can to build up a 1641 to put behind the freeway flyer. As soon as the chassis is done complete with engine, it's on to some serious body work and paint!! I'm getting there!! Wife keeps telling me I’ve got to get this thing on the road, so I guess I’m a real lucky guy. She’s ready to cruise the local town here and grab a snow cone in it with me!! Life is good! (She just doesn’t know there will be no food or drink in my Dub yet, LOL. Unless it’s me of course. I reserve the right to dump a Super Big Gulf on my own pans. I protected them and welded them in dammit!!)
Moto |
|
| Back to top |
|
|
|


