| Author |
Message |
sky44
Samba Member
Joined: April 12, 2017
Posts: 41

|
 Posted: Wed Apr 12, 2017 5:34 pm Post subject: 67 beetle restore (WIP) Posted: Wed Apr 12, 2017 5:34 pm Post subject: 67 beetle restore (WIP) |
 |
|
Hello All, figured I'd start a thread about this rebuild to share my progress.
This car belonged to my wifes' father who daily drove it until he passed away ~20 years ago. The car has been sitting ever since so I'm rebuilding it so she can enjoy it for years to come.
I've started tearing it down and have some pictures of the progress:
My face says it all...
Off topic but we also have this buggy that needs to be restored. Havent had a chance to dig into that project yet 
This was a motor we had sitting in the yard but im not sure the condition.
Pulled the motor... had to remove the dual carb setup to clear the body
Separated the body and pan:
Started some dustless blasting on the pan but quickly ran out of blast media... have a few hundred pounds on order.
Last edited by sky44 on Tue Apr 18, 2017 3:05 pm; edited 15 times in total |
|
| Back to top |
|
 |
sky44
Samba Member
Joined: April 12, 2017
Posts: 41
|
| Posted: Wed Apr 12, 2017 5:36 pm Post subject: Re: 67 beetle restore |
|
|
| Reserved for future post |
|
| Back to top |
|
|
67rustavenger
Samba Member

Joined: February 24, 2015
Posts: 11119
Location: Oregon
|
| Posted: Wed Apr 12, 2017 6:51 pm Post subject: Re: 67 beetle restore (56k modem beware... Lots of pics) |
|
|
WOW! Thanks for the effort at saving another 67 from the crusher.
But WOW, that's a lot of rust. And I thought that my rusty 67 was a complete loss. It's pristine compared your your project. I gotta get to work on that car this summer.
Love the pic of your dog with the scared look on it's face. Then there's the scared look on your face pic. I'd be scared too 
I like the "Dustless Blaster" stuff you have done. Always wanted to give that a try. I just can't afford it.
I wish you well on this project.
Good Luck.
_________________
I have learned over the years.
Cheap parts are gonna disappoint you.
Buy Once, Cry Once!
There's never enough time to do it right the first time. But there's always enough time to do it thrice.
GFY's Xevin and VW_Jimbo!
2003 Astrovan? GFYS again, Xevin!
Don't let your bad ideas remain, ideas! |
|
| Back to top |
|
|
sky44
Samba Member
Joined: April 12, 2017
Posts: 41
|
| Posted: Wed Apr 12, 2017 8:26 pm Post subject: Re: 67 beetle restore (56k modem beware... Lots of pics) |
|
|
Thanks! Yeah this car absolutely has its share of rust on it.
Our dustless blaster is pretty much a 5k psi pressure washer and a siphon kit for the sand injection. its been working well thus far but have a bunch more to do!
here are some of the parts I blasted drying out:
and after some paint:
Started soaking some of the parts a little too difficult to blast:
should be ready for paint in a few days. |
|
| Back to top |
|
|
sky44
Samba Member
Joined: April 12, 2017
Posts: 41
|
| Posted: Sat Apr 15, 2017 6:06 pm Post subject: Re: 67 beetle restore (WIP) |
|
|
Got the rest of the pan blasted and painted.
|
|
| Back to top |
|
|
sky44
Samba Member
Joined: April 12, 2017
Posts: 41
|
| Posted: Tue Apr 18, 2017 2:12 pm Post subject: Re: 67 beetle restore (WIP) |
|
|
More pics from the sandblasting \ painting
|
|
| Back to top |
|
|
sky44
Samba Member
Joined: April 12, 2017
Posts: 41
|
| Posted: Wed May 31, 2017 11:37 am Post subject: Re: 67 beetle restore (WIP) |
|
|
New SS fuel line installed... What a pita.
Say hello to Ms.Kitty, Shes a PIRATE!
Started installing the rear suspension. Any good ideas as to how I can get tension on these torsion bars? since there is no weight over the pan...
|
|
| Back to top |
|
|
tonys1pr
Samba Member
Joined: September 03, 2015
Posts: 44
Location: Detroit, Michigan
|
| Posted: Thu Jun 01, 2017 10:11 am Post subject: Re: 67 beetle restore (WIP) |
|
|
I recently reinstalled my spring plates on the chassis minus the body. After several frustrating hours of trying to use ratchet straps and jacks with additional weight on the body. I gave up and ordered the correct tool for the job.
http://www2.cip1.com/ProductDetails.asp?ProductCode=ACC-C10-7047
Had to wait an extra couple of days for the tool to arrive, which gave me enough time to repaint the spring plates after they got scratched trying to install them without the tool.
Make sure you correctly index your spring plates to the correct angle, I used a digital angle finder, as you only want to be doing this once...
Remember to use longer bolts to get the spring plate covers started as the new bushes will need some compressing to make them fit correctly |
|
| Back to top |
|
|
sky44
Samba Member
Joined: April 12, 2017
Posts: 41
|
| Posted: Thu Jun 01, 2017 12:19 pm Post subject: Re: 67 beetle restore (WIP) |
|
|
| tonys1pr wrote: |
I recently reinstalled my spring plates on the chassis minus the body. After several frustrating hours of trying to use ratchet straps and jacks with additional weight on the body. I gave up and ordered the correct tool for the job.
http://www2.cip1.com/ProductDetails.asp?ProductCode=ACC-C10-7047
Had to wait an extra couple of days for the tool to arrive, which gave me enough time to repaint the spring plates after they got scratched trying to install them without the tool.
Make sure you correctly index your spring plates to the correct angle, I used a digital angle finder, as you only want to be doing this once...
Remember to use longer bolts to get the spring plate covers started as the new bushes will need some compressing to make them fit correctly |
Awesome! That's exactly the tool I need. Just ordered it so hopefully will have these installed shortly.
Thank you for your help, I was afraid of scratching the fresh paint.
Good call on the longer bolts to get it started. I didn't even think about that. |
|
| Back to top |
|
|
Joseph DR
Samba Member
Joined: December 20, 2004
Posts: 180
Location: Texas
|
| Posted: Thu Jun 01, 2017 8:58 pm Post subject: Re: 67 beetle restore (WIP) |
|
|
Man alive! That's a lot of rust!
God speed my good sir.
_________________
1964 Beetle |
|
| Back to top |
|
|
Pruneman99
Samba Member
Joined: February 22, 2012
Posts: 5013
Location: Oceanside
|
| Posted: Thu Jun 01, 2017 9:48 pm Post subject: Re: 67 beetle restore (WIP) |
|
|
That pan turned out pretty good but the body looks like something dragged off the ocean floor. Holy cow. If you use that blaster on the body, you might just end up with a shift nob and a length of seatbelt left over.
I hope you have a good welder and a ton of fabrication skills. Here I was worried about a bit of rust in my passenger side drip rail.
You must be a glutton for punishment. I wish you the best bringing that one back from what would be considered to far gone for most people. If that one can be saved, they all must have a chance! |
|
| Back to top |
|
|
63Ragtop NZ
Samba Member
Joined: December 04, 2007
Posts: 895
Location: West Auckland
|
| Posted: Thu Jun 01, 2017 10:52 pm Post subject: Re: 67 beetle restore (WIP) |
|
|
Yeah, amazing work on the pan, sure it's from the same car??
any tips on replacing the fuel pipe?
good luck with the body I would be tempted to junk it and find another, but I understand to value of having something from the old man.

better get to it!

_________________
If you can't join them, beat them! |
|
| Back to top |
|
|
sky44
Samba Member
Joined: April 12, 2017
Posts: 41
|
| Posted: Fri Jun 02, 2017 11:13 am Post subject: Re: 67 beetle restore (WIP) |
|
|
| Joseph DR wrote: |
Man alive! That's a lot of rust!
God speed my good sir. |
Gotta love the rust! I think if the car sat another 5-10 years it would have been too far gone. Hell, maybe even 5-10 months ha!
| Pruneman99 wrote: |
That pan turned out pretty good but the body looks like something dragged off the ocean floor. Holy cow. If you use that blaster on the body, you might just end up with a shift nob and a length of seatbelt left over.
I hope you have a good welder and a ton of fabrication skills. Here I was worried about a bit of rust in my passenger side drip rail.
You must be a glutton for punishment. I wish you the best bringing that one back from what would be considered to far gone for most people. If that one can be saved, they all must have a chance! |
Haha. Yeah the body has seen its fair share of salt water. I do plan on blasting the body once I get some of the larger pieces of rust cut out so I can really get in there.
I have some welding experience but not a welder by any means. Havent found a project I couldnt complete yet and I dont plan on this VW being the first. Although, I feel that it will never truly be COMPLETE.
I do like a good challenge but this is the biggest restoration I have undertaken solo. Which is why the progress is slow. But its progress none the less!
| 63Ragtop NZ wrote: |
Yeah, amazing work on the pan, sure it's from the same car??
any tips on replacing the fuel pipe?
good luck with the body I would be tempted to junk it and find another, but I understand to value of having something from the old man.
better get to it!
|
Thanks man! The pan is coming along but theres still so much to get done...
I actually followed this guide here for the fuel line replacement:
https://www.thesamba.com/vw/forum/viewtopic.php?t=380724
It had plenty of good info for getting the line replaced.
Yes the body is in pretty bad shape and would be easier to find a new one but I think it will mean more to the wife that the car is as "original" as possible.
Your post actually made me get up and get some work done last night.
| 63Ragtop NZ wrote: |
better get to it!
|
So I installed the shift rod bushing and the shift rod last night.
|
|
| Back to top |
|
|
sky44
Samba Member
Joined: April 12, 2017
Posts: 41
|
| Posted: Fri Jun 02, 2017 1:02 pm Post subject: Re: 67 beetle restore (WIP) |
|
|
Going to try and get the transaxle ready for re-install this weekend and try to get some seam sealer put on.
Any tips on which brand I should go with? Its going to be on epoxy primer for the body but the pan is POR15. |
|
| Back to top |
|
|
sky44
Samba Member
Joined: April 12, 2017
Posts: 41
|
| Posted: Fri Jun 02, 2017 1:59 pm Post subject: Re: 67 beetle restore (WIP) |
|
|
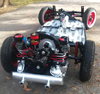
On a side note, saw this guy while driving around today. Makes me want to get mine done even more now!
|
|
| Back to top |
|
|
thomas.
Samba Member

Joined: July 31, 2010
Posts: 1361
Location: South West (Pa.)
|
| Posted: Sat Jun 03, 2017 2:10 am Post subject: Re: 67 beetle restore (WIP) |
|
|
| Regarding the seam sealer. I used a tube purchased from Summit racing made by Sem. I also bought a tube from Eastwood but can't remember the brand name. They were both excellent products that worked great. I would leave a link but I'm having computer trouble being on a tablet with WiFi. |
|
| Back to top |
|
|
sky44
Samba Member
Joined: April 12, 2017
Posts: 41
|
| Posted: Mon Nov 06, 2017 10:49 pm Post subject: Re: 67 beetle restore (WIP) |
|
|
| thomas. wrote: |
| Regarding the seam sealer. I used a tube purchased from Summit racing made by Sem. I also bought a tube from Eastwood but can't remember the brand name. They were both excellent products that worked great. I would leave a link but I'm having computer trouble being on a tablet with WiFi. |
No worries, I actually went with a 3M sealer from Napa.
Heres some more pics:
Got the new master installed along with the fuel line grommet.
Rear fuel line grommet.
Rear suspension re-assembled with poly bushings.
Got the mounts attached to the trans.
|
|
| Back to top |
|
|
sky44
Samba Member
Joined: April 12, 2017
Posts: 41
|
| Posted: Wed Nov 08, 2017 12:16 am Post subject: Re: 67 beetle restore (WIP) |
|
|
Waiting for parts so I started tearing down the front beam.
Shocks are actually still good...
Looks like the steering box is leaking..
Started cleaning off the rust
|
|
| Back to top |
|
|
joey1320
Samba Member
Joined: September 12, 2006
Posts: 2338
Location: Cleveland, OH
|
| Posted: Wed Nov 08, 2017 7:00 am Post subject: Re: 67 beetle restore (WIP) |
|
|
Great work on the pan. You definitely have your work cut out with the body.
Can you offer more info regarding your blasting setup? Really interested in making one myself.
_________________
1971 Super - Sold
1984 Puma GTC - Sold
1971 Campmobile |
|
| Back to top |
|
|
jzjames
Samba Member
Joined: September 27, 2007
Posts: 1921
Location: Windy Point, WA
|
| Posted: Wed Nov 08, 2017 12:15 pm Post subject: Re: 67 beetle restore (WIP) |
|
|
| Hawaiian salt air + overnight condensation = that lacy rust. |
|
| Back to top |
|
|
|


