| Author |
Message |
furgo
Samba Member

Joined: September 06, 2016
Posts: 944
Location: Southern Germany

|
 Posted: Sat Oct 21, 2017 3:35 pm Post subject: Molded C-hose DIY replacement Posted: Sat Oct 21, 2017 3:35 pm Post subject: Molded C-hose DIY replacement |
 |
|
I've been going over my vacuum lines and so far I've been able to replace all of them with direct equivalents of the same size.
However, when it comes to the molded C-hose (#022 201 919), it gets trickier. There are currently two options:
• If it's salvageable, do a quick repair of the cracked ends
• If not, get a silicone one from Gee Bee
This is a DIY third option, which is essentially "cut and paste your own hose". The idea is not mine, but I've not seen it shown in any forum so far, so I thought I'd share it here.
While there isn't that much choice in getting shaped molded rubber hoses, there is quite a lot of offer in silicone hose. You can generally get a fairly broad spread of diameters and shapes, and the idea is to combine these.
Essentially, the C-hose is a U-bend (180°) section plus a 45° bend section. So you can:
1. Get one of each, with an 18 mm inner diameter, or the closest you can get. Mine had an arm length of 100 mm.
2. Get 2" 1/2 of aluminum pipe, with an outer diameter of 18 mm
3. Use your original C-hose to compare with and cut the sections to size. Use a hose cutter (even then, silicone hose is a bit tricky to cut straight).
4. Join the two sections with the aluminum pipe
At this point, you're done. You can use clamps at each end and at each side of the joint and that's it.
I added a couple of optional steps to mine:
5. I used some RTV to seal the joint: essentially I spread some Permatex Ultra Black (use whatever brand you prefer here) across the perimeter of the aluminum tube at its middle and then I joined the ends.
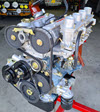
6. This is strictly personal preference. It is essentially for looks and does not add anything in particular function-wise (other than preventing the silicone surface from being a dust magnet): I wasn't quite happy with the super-shiny silicone look, so I effectively mated it. What I did was to use wire harness tape (PET fleece) and wrapped it all around it. And that's the end result:
Final notes:
• You'll notice that the bend radius of the 180° section is smaller than the original. I couldn't find one with a bigger radius, but it works fine once installed. It has enough clearance not to interfere with the decel valve, and that's what counts. You might be able to find that section with a bigger radius, though. If you do, go for it  . .
• In terms of diameters, as mentioned the spec is 18mm ID. I used 19 mm ID, as the next step down was 16 mm for the seller I found. Even though the hoses I used can be stretched 1-3 mm, I did not want to overdo it. In hindsight, I could have probably used 16 mm and then spare myself the use of clamps.
• Even though it fits fine and I'm happy with the end result, I'm still not entirely satisfied with silicone. I'm trying another option with rubber and I will report back if it works out 
_________________
'79 Westy, P22 interior, FI 2.0 l Federal, GE engine (hydraulic lifters)
Decode your M-Plate |
|
| Back to top |
|
 |
KentABQ 
Samba Member

Joined: September 11, 2016
Posts: 2481
Location: Albuquerque NM
|
| Posted: Sat Oct 21, 2017 6:48 pm Post subject: Re: Molded C-hose DIY replacement |
|
|
That's a great solution to an NLA problem. Nicely done, furgo!
_________________
-Kent-
1976 Riviera, 1.8l FI chrome yellow VAN - "Chloe"
"I must say, how can you be in a bad mood driving this vehicle full of vibrant color.
Cars of today are so bland in comparison. It's like driving a celebration!" ---WildIdea
Bus ownership via emoticons:
         ---williamM ---williamM |
|
| Back to top |
|
|
busdaddy
Samba Member

Joined: February 12, 2004
Posts: 52778
Location: Surrey B.C. Canada, but thinking of Ukraine
|
| Posted: Sat Oct 21, 2017 6:52 pm Post subject: Re: Molded C-hose DIY replacement |
|
|
Nice work!, unless it's super loose clamps aren't really needed on vacuum lines, if fact it's better to have a place to blow apart in the event of a backfire and save the stress on the AFM.
Maybe some of that expandable woven wire sleeve like a Chinese finger puzzle would be better than the tape? I use the hockey tape on many 1920's/30's restorations, but it has to be shellaced to resist engine oil and heat, otherwise it turns into a gooey mess days before the customers next big show.
_________________
Rust NEVER sleeps and stock never goes out of style.
Please don't PM technical questions, ask your problem in public so everyone can play along. If you think it's too stupid post it here
Stop dead photo links! Post your photos to The Samba Gallery!
Слава Україні! |
|
| Back to top |
|
|
SGKent
Samba Member
Joined: October 30, 2007
Posts: 42521
Location: at the beach

|
| Posted: Sat Oct 21, 2017 6:59 pm Post subject: Re: Molded C-hose DIY replacement |
|
|
don't know if this is the same one or not but this one is for a manual trans. They work perfect and many folks here get them from him.
https://www.thesamba.com/vw/classifieds/detail.php?id=1220031
.
_________________
"Most people don't know what they're doing, and a lot of them are really good at it." - George Carlin |
|
| Back to top |
|
|
furgo
Samba Member
Joined: September 06, 2016
Posts: 944
Location: Southern Germany
|
| Posted: Sat Oct 21, 2017 11:52 pm Post subject: Re: Molded C-hose DIY replacement |
|
|
| busdaddy wrote: |
| Nice work!, unless it's super loose clamps aren't really needed on vacuum lines, if fact it's better to have a place to blow apart in the event of a backfire and save the stress on the AFM. |
Thanks! And really good point.
However, in my particular case I think one of the issues are the tolerances in ID of the hoses. The end that goes into the S-boot fits snugly, but the end with the U shape goes is a bit of a lose fit to the decel valve. I'll measure it, but it seems that that section has a slightly bigger diameter than advertised.
Ideally, I would have gotten 18 mm ID hose, which would be the usual VW practice of fitting it to a 1mm bigger port, but I couldn't find any. I might have to clamp at least the lose end.
In any case, that'd be the only vacuum line I'd have to clamp. At least on my bus, when I've had a backfire, the big hose from S-boot to crankcase breather and the vinyl S-hose from decel valve to brake booster were always the first ones to go. So I think it might be ok to clamp just the one.
| busdaddy wrote: |
| Maybe some of that expandable woven wire sleeve like a Chinese finger puzzle would be better than the tape? |
If this is the one you mean, I had thought about it too, but I wasn't sure how good a fit (i.e. how expandable) it would be, and also how well it would wrap around the sharp U bend. I will test it for my next experiment, though! There is also an unrelated thread with a suggestion from Ray Greenwood to coat the sheating with chemical-resistant RTV. I've not tried it myself, but quoting the relevant bit:
| raygreenwood wrote: |
.......is to take the woven flex wrap.....and insert a dowel inside that does not overly expand the sleeve but expands it a little.....like say 10%. Lube the dowel very lightly with silicone dielectric grease snd wipe off the excess. Once its installed inside the tube....wipe the outside braided surface lightly with acetone to removing any excess lube.
Then get a tight latex or nitrile glove on....and smoothly slather the whole braided tube with Permatex Ultra gray. Make sure you get all the excess ofc and fill all the holes in the braid. When its dry...remove the dowel.
You now have a moderately expandable anti-abrasion sheathing that is waterproof and dustproof for the wires.....and is very chemical resistant and good to about 500F. |
The reasons I used the PET wire harness tape were because I happened to have some at hand and because its temperature resistance. At 105° (220 F) I thought it would be enough, as the decel valve hose would not be likely to ever see that temp.
Regarding chemicals, I do not know how resistant is PET against oil and fuel. Since it is not mentioned in the datasheet of the one I used, I assumed the answer is "not much". But then I thought if it ever gets damaged would be enough to remove the affected bit and retape again.
It is the same one as the link on the original post, as far as I can tell. The only difference being, this link is for the single hose and the other one is for the whole set. I do not know if there is a difference in manual vs. automatic transmission parts.
As mentioned, this post is only about a third alternative for those who want to build it themselves. If you're looking for a reportedly well made, plug and play replacement, then yes, you should probably get the Gee Bee hose.
_________________
'79 Westy, P22 interior, FI 2.0 l Federal, GE engine (hydraulic lifters)
Decode your M-Plate |
|
| Back to top |
|
|
mr. lang
Samba Member
Joined: June 05, 2012
Posts: 308
Location: Germany
|
| Posted: Mon Oct 23, 2017 3:21 am Post subject: Re: Molded C-hose DIY replacement |
|
|
David, you could peel the woven mesh off of a flexible fuel line having the same diameter you need. The one on my hose to the type 1 oil bath cleaner comes off all the time, so this could work.
You can push it together, which will give it roughly double the inner diameter, so easy to slide on.
The finish would look like the hose to the right, that you posted.
Can you apply some heat to get the bigger radius?
_________________
1966 Bus | 1969 Bug | 1976 Passat LX two-door | 1984 Golf 2 C (daily driver)
There are three kinds of people: those who can count and those who can't
Und läuft ... |
|
| Back to top |
|
|
furgo
Samba Member
Joined: September 06, 2016
Posts: 944
Location: Southern Germany
|
| Posted: Mon Oct 23, 2017 5:25 am Post subject: Re: Molded C-hose DIY replacement |
|
|
| mr. lang wrote: |
| David, you could peel the woven mesh off of a flexible fuel line having the same diameter you need. The one on my hose to the type 1 oil bath cleaner comes off all the time, so this could work. |
Good idea, I hadn't thought of that. I'll try that on my next experiment with using a rubber fuel hose instead of silicone.
| mr. lang wrote: |
| Can you apply some heat to get the bigger radius? |
Myself, not in a controlled manner, I don't think so. But perhaps someone with the right tools could.
_________________
'79 Westy, P22 interior, FI 2.0 l Federal, GE engine (hydraulic lifters)
Decode your M-Plate |
|
| Back to top |
|
|
|


