| Author |
Message |
hopkin 
Samba Member

Joined: June 25, 2012
Posts: 2551
Location: Ottawa, Ontario

|
 Posted: Sun Dec 22, 2019 8:59 pm Post subject: Re: Kamei Front Spoiler / Lip / Air Dam Info and Installation Posted: Sun Dec 22, 2019 8:59 pm Post subject: Re: Kamei Front Spoiler / Lip / Air Dam Info and Installation |
 |
|
| AlmostHeavenWV_VW wrote: |
...
Found some photos of hopkin's car (he has his kamei fastened to the fenders). Looks like the kamei is right up against the fenders in the pics... |
The outer parts of the spoiler are fastened to the fenders, however there is a sculpted spacer between the spoiler and the metal. The spacer has the form of the spoiler and fender, depending on the side. There is about 1/4 inch gap between the spoiler and fender.
It's hard to tell in the pictures, put the spoiler does not touch the body of the car. It is mounted to the bumper, and then the two outer points, with spacers.
_________________
1971 Super Beetle (past)
1971 Super Beetle (past)
1974 SunBug (past)
1972 914 (past)
1991 Honda Civic (Original Owner)
1996 'Open Air' Mexican Beetle (current)
2015 Golf (past)
2017 Dune Edition (daughter's car) |
|
| Back to top |
|
 |
AlmostHeavenWV_VW
Samba Member
Joined: October 12, 2017
Posts: 1968
Location: WV
|
| Posted: Mon Dec 23, 2019 6:34 am Post subject: Re: Kamei Front Spoiler / Lip / Air Dam Info and Installation |
|
|
| hopkin wrote: |
| AlmostHeavenWV_VW wrote: |
...
Found some photos of hopkin's car (he has his kamei fastened to the fenders). Looks like the kamei is right up against the fenders in the pics... |
The outer parts of the spoiler are fastened to the fenders, however there is a sculpted spacer between the spoiler and the metal. The spacer has the form of the spoiler and fender, depending on the side. There is about 1/4 inch gap between the spoiler and fender.
It's hard to tell in the pictures, put the spoiler does not touch the body of the car. It is mounted to the bumper, and then the two outer points, with spacers. |
Interesting Hopkin. Did these spacers come with your Kamei? Do they have a part number on them?
Sorry I got confused. I was seeing the front bumper turn signal unit in your photo.
Yes, two small plastic/rubber formed washers come with the genuine Kamei kits for mounting to the front of the fenders.
Thanks for bringing that up, forgot that detail.
If others reading here do not have those, a reasonable substitute could be either a small rubber grommet or stack of rubber washers placed between the fender and spoiler.
_________________
1973 Standard Beetle
1600DP AK case
Solex 34PICT3 Carb
Bosch DVDA 205AJ Distributor |
|
| Back to top |
|
|
tisius
Samba Member

Joined: July 11, 2011
Posts: 1570
Location: Rotterdam,NL (+Chicago,IL)
|
| Posted: Thu Mar 26, 2020 2:13 pm Post subject: Re: Kamei Front Spoiler / Lip / Air Dam Info and Installation |
|
|
Original Kamei.
You can see how the spoiler mounts to the bumper with bolts. No additional brackets or spacers present, no screws through the fenders. Pretty sturdy.
(the car is a European non-impact bumper one, the bumpers are stainless steel (aftermarket), and it has lower front shock springs)
_________________
drive it like you just robbed the bank
you don't have to be crazy to be into VW's, but it sure helps!!
.... if it ain't dutch, it ain't much! |
|
| Back to top |
|
|
offtherailz1
Samba Member
Joined: May 28, 2014
Posts: 167
Location: Bedfordshire, England
|
| Posted: Wed Aug 12, 2020 1:52 am Post subject: Re: Kamei Front Spoiler / Lip / Air Dam Info and Installation |
|
|
Seb at The German Junkies gets hold of genuine Kamei stuff. He orders batches and they make them for him. Or at least they did, I got one for my 03, it’s still in its packaging with instructions and sticker, to be fitted soon.
http://www.thegermanjunkies.com/t1-accessory/4572192049 |
|
| Back to top |
|
|
superbeetle1302s
Samba Member
Joined: March 13, 2012
Posts: 6
|
| Posted: Wed Jun 18, 2025 6:29 am Post subject: Re: Kamei Front Spoiler / Lip / Air Dam Info and Installation |
|
|
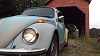
I'm sharing some images from Bogota, Colombia, of my spoiler installed on an American-version SB 1303... I had to install it on the lower outside of the bumper.
I don't have a cordless drill, so I had to remove the bumper and do it in my apartment.
|
|
| Back to top |
|
|
vamram
Samba Member

Joined: March 08, 2012
Posts: 8000
Location: NOVA
|
| Posted: Wed Jun 18, 2025 7:18 am Post subject: Re: Kamei Front Spoiler / Lip / Air Dam Info and Installation |
|
|
Fantastic!!

_________________
"Men are qualified for civil liberty in exact proportion to their disposition
to put moral chains upon their own appetites. -Edmund Burke
“If something cannot go on forever, it will stop.”
Stop Russian-Soviet Aggression!!
'74 Super 9/16 - present, in refurb process.
'73 Super - 6/18 - Present - Daily Driver!
'75 Super Le Grande...languishing since 2022.
Click to view image
Save the Supers!! |
|
| Back to top |
|
|
DUNGBTL
Samba Member
Joined: October 17, 2022
Posts: 511
Location: Ashland, OR
|
| Posted: Wed Jun 18, 2025 6:31 pm Post subject: Re: Kamei Front Spoiler / Lip / Air Dam Info and Installation |
|
|
^
Looks great! 
Here’s how I did mine…
| DUNGBTL wrote: |
Kamei Spoiler
I bought a repo Kamei spoiler off of EBay 2 yrs ago just after dragging the DUNGBTL home. It’s been hanging out in the shop ever since, literally collecting dust. Here’s two yrs worth dust and debris from working on the DUNGBTL…
I inspected the piece after receiving but never tried to mount it. It’s very well made and finished. Surprisingly light and stiff. The stiffness isn’t too surprising as the compound curvature lends to increased stiffness. Made entirely out of fiberglass. Attaches to the bumper by three fasteners across the bumper center section and by ‘clamping’ either side between the R&L lower bumper bracket.
The plan was to create a duct to funnel the air directly into the radiator. A duct that allows the air from its opening to be channeled directly into the radiator. Duct to be attached to the inside and not have any attachments visible on the front face.
Porsche used balsa wood and fiberglass construction in the past on their race cars to obtain stiffness with lightness, primarily on deck lids, hood, and other body panels. I was going to do the same but found that .100” thick MDF is cheaper and easier to fabricate. It is heavier than balsa, but at .100” thickness and the amount used, the weight penalty is negligible. The MDF provides an armature to which I can cover with fiberglass to strengthen the joints and weather proof.
Many template iterations ensued along with hours of fit-up…not easy as there’s not a lot of room to work between bumper and apron.
I found an artist clipboard made out of MDF at the local ACE which had the right dimensions. It was cheaper than buying a .100” MDF panel online.
Duct construction was started by ‘tacking’ the lower panel to the inside of the spoiler. The lower panel is fastened to the apron flange. It was clamped in place to capture that position. Fiberglass mat and resin is used to make the attachment to the spoiler.
The two sides were bonded to the spoiler and lower duct panel using JB Weld.
…the top panel was bonded likewise to the sides.
After the duct ‘box’ was formed and bonded to the spoiler, the whole mess, bumper and all, was removed from the car and the duct was glassed in for added joint strength and weather proofing.
After remounting and leveling, the intake opening was laid out. Sliding the square against the lower edge of the spoiler and marking across the top of the ‘ruler’ captured the curvature of the spoiler bottom edge.
2” hole saw created the 1” bottom radius…1” hole saw was used for the upper radii.
I think it looks somewhat like the mouth of a Baleen whale!
The duct and spoiler will be finished in satin black. I’ll use SEM Trim Black for the outside. I’ve used this product on other projects and found it to be very durable. It’ll make the spoiler easy to repaint after it gets chipped up by rocks, etc.
Lots of finish work to do now!
Cheers,
J. |
https://www.thesamba.com/vw/forum/viewtopic.php?t=...;start=200 |
|
| Back to top |
|
|
vamram
Samba Member
Joined: March 08, 2012
Posts: 8000
Location: NOVA
|
| Posted: Fri Jun 20, 2025 5:13 am Post subject: Re: Kamei Front Spoiler / Lip / Air Dam Info and Installation |
|
|
| DUNGBTL wrote: |
^
Looks great!
Here’s how I did mine…
The duct and spoiler will be finished in satin black. I’ll use SEM Trim Black for the outside. I’ve used this product on other projects and found it to be very durable. It’ll make the spoiler easy to repaint after it gets chipped up by rocks, etc.
Lots of finish work to do now!
Cheers,
J. |
Wow that is amazing. Now I have to add this to my ever-growing to-do list for Supers!
_________________
"Men are qualified for civil liberty in exact proportion to their disposition
to put moral chains upon their own appetites. -Edmund Burke
“If something cannot go on forever, it will stop.”
Stop Russian-Soviet Aggression!!
'74 Super 9/16 - present, in refurb process.
'73 Super - 6/18 - Present - Daily Driver!
'75 Super Le Grande...languishing since 2022.
Click to view image
Save the Supers!! |
|
| Back to top |
|
|
16CVs
Samba Member

Joined: February 22, 2004
Posts: 4233
Location: Redwood City, California
|
| Posted: Fri Jul 25, 2025 12:00 am Post subject: Re: Kamei Front Spoiler / Lip / Air Dam Info and Installation |
|
|
I had a ABS Kamei spoiler on my 69 for years, bought it at Action 40 years ago and just slipped it in place an drove with no fasteners until I sold the car with it in place. It may not of really helped but it looked way cool.
Stacy
_________________
1987 Syncro Westfalia Triple knob (bastard)
1989 Syncro Tristar Triple knob "Swedish"
2013 Jetta Hybrid a true "Zwitter"
Samba member # 14980
Call anytime number 650 722 4914 .
Keep Your van running and upkept tastefully for the love of the hobby.
Don't let your van end up in an "abortions" thread. |
|
| Back to top |
|
|
|


