| Author |
Message |
mdege
Samba Member

Joined: January 16, 2018
Posts: 940
Location: Niederkruechten, Germany

|
 Posted: Tue Oct 02, 2018 12:10 pm Post subject: Re: Restoration of a former '65 firetruck (21F) Posted: Tue Oct 02, 2018 12:10 pm Post subject: Re: Restoration of a former '65 firetruck (21F) |
 |
|
I am overdue with reporting what I have done. There wasn't much to show, because I was painting parts and getting ready for the next steps.
Today I finally installed the passenger side rocker. First I welded the B-pillar end to the rocker under the cargo doors and then I also welded the rocker panel behind cargo doors to the rest.
Then some last checks
Then I welded the outer rocker to the car.
Cleaned the welds and primer-ed everything.
_________________
- Michael
1965 21F: Restoration of a former '65 firetruck
1963 Typ3 Notchback project
1988 Multivan Magnum 112i
1984 Standard: My son wanted a bug for his first car |
|
| Back to top |
|
 |
mdege
Samba Member
Joined: January 16, 2018
Posts: 940
Location: Niederkruechten, Germany
|
| Posted: Sun Oct 07, 2018 10:17 am Post subject: Re: Restoration of a former '65 firetruck (21F) |
|
|
More progress this week. I finally installed the cross members. I used the CAD drawings from forum to note down the exact positions. The drawing was a great help.
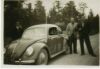
And today I tipped the bus on it's side for the first time
Being able to work on the bus on it's side certainly certainly beats, how I used to work on it. This picture must have been taken around 1993
I had to work on it while it was sitting on the street.
_________________
- Michael
1965 21F: Restoration of a former '65 firetruck
1963 Typ3 Notchback project
1988 Multivan Magnum 112i
1984 Standard: My son wanted a bug for his first car
Last edited by mdege on Sun Oct 07, 2018 11:38 am; edited 1 time in total |
|
| Back to top |
|
|
junichi
Samba Member
Joined: September 12, 2005
Posts: 749
Location: brentwood bay, bc
|
| Posted: Sun Oct 07, 2018 10:56 am Post subject: Re: Restoration of a former '65 firetruck (21F) |
|
|
Great story and great work so far. I will be watching : )
_________________
1964 Kombi- http://www.thesamba.com/vw/forum/viewtopic.php?t=640048
Sold: 1985 Transporter Doka,1978 Westfalia, 1975 bay x 2, 1986 syncro vanagon, 1965 beetle, 1980 vanagon, 1967 deluxe bus, 1988 golf |
|
| Back to top |
|
|
mdege
Samba Member
Joined: January 16, 2018
Posts: 940
Location: Niederkruechten, Germany
|
| Posted: Thu Oct 18, 2018 10:25 am Post subject: Re: Restoration of a former '65 firetruck (21F) |
|
|
More progress.
I did a lot of scraping off of old undercoating, but didn't take any pictures of that. 
I did finish the main frame, closed the last hole on that
Then I installed the lower cross members and outriggers:
Then I cleaned the right main frame rail on the inside and replaced the metal tabs which hold the main wiring loom.
I also painted all of the new pieces. No dedicated pictures again, sorry.
To day I installed the left rocker. I was kind of worried how this is going to work out.
I am really satisfied with the result no too much warpage. A little filler will take care of it.
And I am really happy that I invested in the spot welder, that make life so much easier.
_________________
- Michael
1965 21F: Restoration of a former '65 firetruck
1963 Typ3 Notchback project
1988 Multivan Magnum 112i
1984 Standard: My son wanted a bug for his first car |
|
| Back to top |
|
|
Jimb0w
Samba Member
Joined: September 08, 2016
Posts: 36
Location: France, Clermont-Ferrand
|
| Posted: Thu Oct 25, 2018 5:28 am Post subject: Re: Restoration of a former '65 firetruck (21F) |
|
|
| what's the model of the spot welder you use ? |
|
| Back to top |
|
|
mdege
Samba Member
Joined: January 16, 2018
Posts: 940
Location: Niederkruechten, Germany
|
| Posted: Thu Oct 25, 2018 11:05 am Post subject: Re: Restoration of a former '65 firetruck (21F) |
|
|
It is a Telwin. I bought it used on a platform like Craigslist (eBay Kleinanzeigen). It turned out, that it was missing the controller. I ended up building my own controller. Problem is, that I need 400V 18A. I installed one special outlet which is capable of 400V 25A.
If you get a used one make sure that it is complete and that you have enough power to use it.
_________________
- Michael
1965 21F: Restoration of a former '65 firetruck
1963 Typ3 Notchback project
1988 Multivan Magnum 112i
1984 Standard: My son wanted a bug for his first car |
|
| Back to top |
|
|
mdege
Samba Member
Joined: January 16, 2018
Posts: 940
Location: Niederkruechten, Germany
|
| Posted: Sun Nov 18, 2018 12:45 pm Post subject: Re: Restoration of a former '65 firetruck (21F) |
|
|
The days have gotten short and the temperatures cold. And I haven't been able to do much on the bus.
here's what I have done since the last post:
replaced this piece, which was 5 mm too short.
cleaned up the insides of the main rails:
and painted them (no picture)
refitted the rear sections of the doglegs:
Sandblasted and painted the belly pan:
Sandblasting with just one compressor was a pain, therefore I build a second one from parts that I salvaged from two broken ones:
Now sandblasting works much better with two compressors running in parallel. And I stated sandblasting more parts. Like these front brake backing plates. (already started painting them)
I also cleaned up the passenger side door lock and replaced the door handle with a part which I had salvaged from a California bus back in the 90ies.
Today I started cleaning up the spring plates. I started sanding them down by hand. Man, what a pain! I am uncertain if I should sandblast them. I am not really sure I I should reuse them at all because they are heavily pitted around the area where the reduction boxes are mounted.
Any suggestions regarding the spring plates?
_________________
- Michael
1965 21F: Restoration of a former '65 firetruck
1963 Typ3 Notchback project
1988 Multivan Magnum 112i
1984 Standard: My son wanted a bug for his first car |
|
| Back to top |
|
|
BarryL 
Samba Member

Joined: November 01, 2004
Posts: 14274
Location: Casa de Oro, California
|
| Posted: Sun Nov 18, 2018 7:09 pm Post subject: Re: Restoration of a former '65 firetruck (21F) |
|
|
| mdege wrote: |
| Any suggestions regarding the spring plates? |
I'd say blast away but not the splines or rubber bushing areas. There's a lot of steel there. |
|
| Back to top |
|
|
mdege
Samba Member
Joined: January 16, 2018
Posts: 940
Location: Niederkruechten, Germany
|
| Posted: Sun Nov 25, 2018 1:02 pm Post subject: Re: Restoration of a former '65 firetruck (21F) |
|
|
BarryL: I did blast the parts. And it turns out, that cavities are approximately 0.5 mm deep and the spring plates are or used to be 5.2mm thick. That means the part are weakened by 10%. I really hope the engineers at VW added enough extra material
Here are some pictures:
I haven't heard, that one of these spring plates has broken. But, I definitely don't want to have this happen to me.
Today I finished making a new main wiring harness. For some reason nobody makes the European version. And the wiring harness you can buy are really expensive. Just adding the material cost I end up at about a quarter of the price of an off the shelf harness. And this way I was also able to add extra wires.
I also started to take the reduction boxes off of my trany. Sorry no pictures yet. I had to give up and order a puller to pull off the upper outer bearing.
_________________
- Michael
1965 21F: Restoration of a former '65 firetruck
1963 Typ3 Notchback project
1988 Multivan Magnum 112i
1984 Standard: My son wanted a bug for his first car |
|
| Back to top |
|
|
mdege
Samba Member
Joined: January 16, 2018
Posts: 940
Location: Niederkruechten, Germany
|
| Posted: Tue Dec 25, 2018 10:50 am Post subject: Re: Restoration of a former '65 firetruck (21F) |
|
|
Merry Christmas to all.
I have been lazy about updating the tread and not too much has happened either on the bus. But, I will show what I have been up to.
First of all I finished the spring plates:
Then I pulled apart the RGBs and cleaned and sandblasted the housings:
And painted them:
Yesterday I blasted a few more parts and I will paint them during the next few days
Well not a lot of progress.
_________________
- Michael
1965 21F: Restoration of a former '65 firetruck
1963 Typ3 Notchback project
1988 Multivan Magnum 112i
1984 Standard: My son wanted a bug for his first car |
|
| Back to top |
|
|
mandraks
Samba Member

Joined: November 28, 2004
Posts: 7050
Location: Lawrenceville, Ga
|
| Posted: Tue Dec 25, 2018 10:52 am Post subject: Re: Restoration of a former '65 firetruck (21F) |
|
|
put a bow on it., Merry Christmas
_________________
regards
Uli
----------------------------------------
'53 3-Fold Oval, L35 Metallic Blue, looking for a narrow hatch panel |
|
| Back to top |
|
|
mdege
Samba Member
Joined: January 16, 2018
Posts: 940
Location: Niederkruechten, Germany
|
| Posted: Sun Jan 13, 2019 12:34 pm Post subject: Re: Restoration of a former '65 firetruck (21F) |
|
|
I am trying to get my transaxle back together again. I have almot all parts I need I am only missing the new screws which I ordered more than a week ago  . .
And so far I have not been able to get the closed axle boots over the big end of the axle tube. I have stretched the boot using a plastic bottle and compressed air, I heated using a hair dryer. But, I just don't have enough strength in my hands to get it on. I need to come up with a new idea. If all fails, I'll the NOS split axle boots that I have in my parts stash.
The thread https://www.thesamba.com/vw/forum/viewtopic.php?t=712619 reminded me, that I still have to rebuild the heater silencers. Mika from Finland makes really impressive replacement parts and he is also working on a split bus. In his gallery I saw, that he totally dismantled the silencers.
I ordered a set of flex tubes from him. I am glad I can go with the original silencers and don't have to use the bay window plastic parts after all.
My silencers are slightly different from the ones Mika has on his bus. Mine seem to be the old style with the 50mm on the flex tube side with added adapter to 62mm for the later style flex tubes. One of my silencers is worse than the other on and the adapter was really dust.
I started making a new new adapter:
_________________
- Michael
1965 21F: Restoration of a former '65 firetruck
1963 Typ3 Notchback project
1988 Multivan Magnum 112i
1984 Standard: My son wanted a bug for his first car |
|
| Back to top |
|
|
jeremyrockjock
Samba Towbar Builder

Joined: January 01, 2002
Posts: 5008
Location: Richmond, Verjinya
|
| Posted: Sun Jan 13, 2019 5:46 pm Post subject: Re: Restoration of a former '65 firetruck (21F) |
|
|
I love the work you are doing. Looks great
_________________
Why buy what you can build.
Step away from the fiberglass and no one gets hurt!! |
|
| Back to top |
|
|
swiss_bulli
Samba Member
Joined: February 17, 2017
Posts: 123
Location: Switzerland
|
| Posted: Sun Jan 13, 2019 10:48 pm Post subject: Re: Restoration of a former '65 firetruck (21F) |
|
|
| mdege wrote: |
| Mika from Finland makes really impressive replacement parts and he is also working on a split bus. In his gallery I saw, that he totally dismantled the silencers. |
Great work so far. My progress also slowed down due to Winter conditions.
Im thinking of restoring my silencers as well. Not sure with what I need to replace the inner stuff (e.g. fibers). Could you please post the link to Mikas gallery? I couldnt find him and it sounded like he did also the inner parts. Thanks! |
|
| Back to top |
|
|
mdege
Samba Member
Joined: January 16, 2018
Posts: 940
Location: Niederkruechten, Germany
|
|
| Back to top |
|
|
mdege
Samba Member
Joined: January 16, 2018
Posts: 940
Location: Niederkruechten, Germany
|
| Posted: Tue Jan 15, 2019 1:06 pm Post subject: Re: Restoration of a former '65 firetruck (21F) |
|
|
Today I sandblasted the first of the silencers. I will need to patch a few little places. I'll add picture later.
And I also managed to install the one-piece axle boots. What a pain! The first side I tried to expand the rubber by pulling it over a squashed PET bottle. I then inflated the bottle with compressed air. That expands it nicely but I have no idea how to make use of it to pull the boot over the large end of the axle tube.
I finally ended up turning the boot inside out.
Then I heated the boot with a normal hairdryer. This helped a bit, but it is still a lot of force needed to get the large side of the boot over the axle tube.
I kept on applying heat
Then I pulled the boot down as far as I could possibly get it by hand. Then I used two large screwdrivers to pry the small end of the boot over the end of the tube. It took a few tries. Couldn't take any pictures of the process, needed both hands and more to keep the thing from popping back off.
Once it is on the tube I needed to turn it right side out again, that is easy.
_________________
- Michael
1965 21F: Restoration of a former '65 firetruck
1963 Typ3 Notchback project
1988 Multivan Magnum 112i
1984 Standard: My son wanted a bug for his first car |
|
| Back to top |
|
|
virtanen
Samba Member
Joined: January 08, 2006
Posts: 1462
Location: Finland
|
|
| Back to top |
|
|
mdege
Samba Member
Joined: January 16, 2018
Posts: 940
Location: Niederkruechten, Germany
|
|
| Back to top |
|
|
Tizian
Samba Member
Joined: February 18, 2015
Posts: 384
Location: Hamburg, Germany
|
| Posted: Wed Jan 16, 2019 1:08 pm Post subject: Re: Restoration of a former '65 firetruck (21F) |
|
|
Michael,
tolle Arbeit - Respekt! Weiter so!
Grüße aus Hamburg
Olli |
|
| Back to top |
|
|
BulliBill
Samba Member

Joined: July 09, 2004
Posts: 4574
Location: St Charles, MO
|
| Posted: Wed Jan 16, 2019 1:40 pm Post subject: Re: Restoration of a former '65 firetruck (21F) |
|
|
| virtanen wrote: |
They are very easy to install by 2 big screw drivers, only 2 seconds work 
Maybe I will need to make a presentation how to make it. |
Yes Mika! A video of you explaining that and showing how you do it would be a great help to all of us out here. I totally want to see your quick procedure. Is it helpful to use some sort of lubricant while pulling the robber boot over that bell on the axle tube? I don't think a video exists explaining it. Thanks!
Bill
_________________
I'm looking for these license plate frames for my fleet:
Coeur D'Alene - Lake Shore Volkswagen
Mission VW - San Fernando
Thornton VW - Stockton
Thanks for any help!
Last edited by BulliBill on Wed Jan 16, 2019 2:11 pm; edited 1 time in total |
|
| Back to top |
|
|
|


