| Author |
Message |
south_island_surf
Samba Member

Joined: September 23, 2004
Posts: 149
Location: Victoria, BC, Canada

|
 Posted: Tue Feb 23, 2021 9:10 pm Post subject: Re: '65 Single Cab (and rotisserie) build Posted: Tue Feb 23, 2021 9:10 pm Post subject: Re: '65 Single Cab (and rotisserie) build |
 |
|
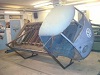
Yep, 4' high x 12' wide.
Here's how the truck sits lately, since I built a little wedge so I could roll it onto the ramp:
_________________
Art
My '65 single cab project:
http://www.thesamba.com/vw/forum/viewtopic.php?t=491474 |
|
| Back to top |
|
 |
Two Glove Boxes
Samba Member

Joined: March 03, 2005
Posts: 976
Location: Texas
|
|
| Back to top |
|
|
south_island_surf
Samba Member
Joined: September 23, 2004
Posts: 149
Location: Victoria, BC, Canada
|
| Posted: Tue Feb 23, 2021 12:18 am Post subject: Re: '65 Single Cab (and rotisserie) build |
|
|
Update - not back to work on the single cab, but getting through the list of home projects. The shop is getting put into order, I got my air system installed with a bunch of copper runs to help the water condense and collect before it gets to the tools; got a bunch of organizing done; but still have a few things to do on my property before I can focus on the truck.
In the meantime, I started a YouTube channel to chronicle my projects. Shameless plug here because this community is so nice and supportive! If you like project build videos of all kinds, check it out and consider subscribing. The content will definitely skew VW in the near future!
Thanks,
Art
https://www.youtube.com/channel/UCXp-SS_yC0YEfJEVcLK81HA
_________________
Art
My '65 single cab project:
http://www.thesamba.com/vw/forum/viewtopic.php?t=491474 |
|
| Back to top |
|
|
BarryL 
Samba Member

Joined: November 01, 2004
Posts: 15241
Location: Casa de Oro, California
|
| Posted: Thu Sep 28, 2017 9:20 am Post subject: Re: '65 Single Cab (and rotisserie) build |
|
|
| Righteous; just don't kickout into the bus nose. |
|
| Back to top |
|
|
south_island_surf
Samba Member
Joined: September 23, 2004
Posts: 149
Location: Victoria, BC, Canada
|
| Posted: Wed Sep 27, 2017 9:59 pm Post subject: Re: '65 Single Cab (and rotisserie) build |
|
|
This is how things currently sit. Moved into the new place October 2016, built the shelves to get all the crap up and out of the way. Then built the halfpipe, my midlife crisis. Got it finished a week before my 40th birthday in December.
When I was drawing the plans for the shop, I made a scale cut-out of the truck to make sure it would fit with workbenches and the ramp. The shop is 28' by 38', though with the ramp, the remaining floor space is 28' x 26'.
Once the rains come this fall, and I can no longer work on landscaping, I hope to get the shop in order and get back to work on the truck. Getting back on The Samba the past couple days has been getting me stoked.
_________________
Art
My '65 single cab project:
http://www.thesamba.com/vw/forum/viewtopic.php?t=491474 |
|
| Back to top |
|
|
south_island_surf
Samba Member
Joined: September 23, 2004
Posts: 149
Location: Victoria, BC, Canada
|
| Posted: Tue Sep 26, 2017 12:22 pm Post subject: Re: '65 Single Cab (and rotisserie) build |
|
|
Sorry guys, it's been way too long.
My wife and I bought a piece of property in the summer of 2015, and I've been working on it non-stop since then. We moved into the new house just under a year ago, and despite spending most of my free time working on the house and land, I still have a mountain of stuff to do.
The good news is I built my dream shop, but it's in absolute shambles... Sawdust, scrap lumber, and tools everywhere. It's pretty much a storage locker for all the outside projects I have on the go. I'll post pictures later, and hopefully the shame of doing so will be a good motivator. I really hope to get it organized and ready for getting back to the single cab this winter.
Here's a shot (summer 2016) of the flatdeck loading up the single cab for the short trip to the new place.
_________________
Art
My '65 single cab project:
http://www.thesamba.com/vw/forum/viewtopic.php?t=491474 |
|
| Back to top |
|
|
MicBergsma
Samba Member

Joined: October 25, 2015
Posts: 223
Location: Maui Hawaii
|
|
| Back to top |
|
|
junichi
Samba Member
Joined: September 12, 2005
Posts: 776
Location: brentwood bay, bc
|
| Posted: Sun Oct 25, 2015 11:42 am Post subject: |
|
|
Any updates? Just found this thread..I am in Victoria as well... SC is looking great and awesome metal working skills here.
_________________
1964 Kombi- http://www.thesamba.com/vw/forum/viewtopic.php?t=640048
Sold: 1985 Transporter Doka,1978 Westfalia, 1975 bay x 2, 1986 syncro vanagon, 1965 beetle, 1980 vanagon, 1967 deluxe bus, 1988 golf |
|
| Back to top |
|
|
flemcadiddlehopper
Samba Member

Joined: December 05, 2011
Posts: 2345
Location: Kelowna, BC. Canada.
|
| Posted: Fri Oct 23, 2015 7:32 am Post subject: |
|
|
How the hell did you line up the captive nut piece for the safaris to ensure proper placement?
Gordo.
_________________
Everybody Dies....Some Never Live.
Retrograde Garage. Vintage Aircooled, and others. |
|
| Back to top |
|
|
Huetti_1989
Samba Member
Joined: February 13, 2011
Posts: 1332
Location: Austria
|
| Posted: Mon Oct 13, 2014 2:09 pm Post subject: |
|
|
this looks solid  |
|
| Back to top |
|
|
south_island_surf
Samba Member
Joined: September 23, 2004
Posts: 149
Location: Victoria, BC, Canada
|
| Posted: Mon Oct 13, 2014 2:00 pm Post subject: |
|
|
Rest of the patches in:
Found some rust holes hiding in the passenger rocker:
First round of welding them up:
Round two, grinding and chasing pinholes:
Done:
_________________
Art
My '65 single cab project:
http://www.thesamba.com/vw/forum/viewtopic.php?t=491474 |
|
| Back to top |
|
|
south_island_surf
Samba Member
Joined: September 23, 2004
Posts: 149
Location: Victoria, BC, Canada
|
| Posted: Sat Oct 11, 2014 4:22 pm Post subject: |
|
|
Overall, my truck's nose is in great shape. Looks like it took one bump on the passenger side. This is where I found a patch of pretty thick filler. There was one hole from an old screw-in dent puller, but they stopped pretty short with that effort before going to the bondo. Here's the extent of the dents, and round one of four with the stud puller. I had cut out that patch at the bottom a couple years ago:
There are about three spots where the metal is so stretched and creased that I'd need to hammer and dolly it, but I can't reach. I don't want to cut the spots out, so I'm going to live with some filler. It will be a lot less than what I took out. The light makes them look deeper than they are... very hard to tell from the photos, but I'm pretty happy with the results. Anyway, patch welded in, ground, and leftover pinholes filled:
Grinding the bottom edge was fun:
Passenger wheel well:
Bad spots cut out, areas surrounding the holes wire-wheeled to clean metal for welding, rust converter sprayed in:
Two little patches. Need to chase a couple more pinholes, but I'm spent for today. I'll get them when I patch the other holes.
_________________
Art
My '65 single cab project:
http://www.thesamba.com/vw/forum/viewtopic.php?t=491474 |
|
| Back to top |
|
|
south_island_surf
Samba Member
Joined: September 23, 2004
Posts: 149
Location: Victoria, BC, Canada
|
| Posted: Wed Oct 08, 2014 10:21 pm Post subject: |
|
|
Thanks, Gordo.
Started this round with my front valance. It had several pushed-in spots all along the bottom edge. I started with pliers to get it somewhat straight, then went over it with a hammer and dolly.
Found some rust holes and welded them up:
Much better:
There was a pretty long crease above my passenger door. I wire-wheeled the paint off and went at it with my stud puller.
Round one:
Round two:
Better... I'd like to try a shrinking disk on it:
I peeled off the front heater tube cover, and was impressed to find this:
Then the long one. Bummer:
Finished up this garage session with a little change of pace. Played with my sandblasting cabinet:
_________________
Art
My '65 single cab project:
http://www.thesamba.com/vw/forum/viewtopic.php?t=491474 |
|
| Back to top |
|
|
flemcadiddlehopper
Samba Member
Joined: December 05, 2011
Posts: 2345
Location: Kelowna, BC. Canada.
|
| Posted: Thu Sep 18, 2014 6:18 pm Post subject: |
|
|
Wow, it has been awhile since I have been lurking around this site, and longer since I've seen your build updates.
You've been busy, nice work on the safaris, I will be talking to you when I go to do mine.
Very impressive attention to detail...quality craftsmanship.
I found a word in the dictionary that is the closest description of what we do with a passion. to "restore" something, we are bringing it back to it's original state, which is not really what we are doing. We are making things better than they were originally. So, "retrograde" fits better. To go back in time with these treasure.
Gordo.
_________________
Everybody Dies....Some Never Live.
Retrograde Garage. Vintage Aircooled, and others. |
|
| Back to top |
|
|
south_island_surf
Samba Member
Joined: September 23, 2004
Posts: 149
Location: Victoria, BC, Canada
|
| Posted: Wed Sep 17, 2014 8:20 pm Post subject: |
|
|
Thanks, dfusion! Although, maybe not so awesome... When I tacked in my safari support tabs, I had them propped to what I thought was "full open". Upon looking at the photos, I got a sinking feeling something was wrong. In most of the photos of safaris I'd seen, they were only partially open. I searched around and saw a few photos of fully horizontal open ones. Crap. I had fully welded them in, too!
After carefully grinding the welds with a die grinder cutting disk, resetting them, and tacking them:
They're fully welded (again), and the windows, seals, and hardware back in the bubble wrap and packing peanuts (again).
_________________
Art
My '65 single cab project:
http://www.thesamba.com/vw/forum/viewtopic.php?t=491474 |
|
| Back to top |
|
|
dfusion001
Samba Member
Joined: January 13, 2011
Posts: 233
Location: Orlando
|
| Posted: Mon Sep 08, 2014 9:34 am Post subject: |
|
|
| AWESOME WORK MAN! I love to see this kind of fabbing skills with attention to detail. I love this build and also following, very inspirational. |
|
| Back to top |
|
|
south_island_surf
Samba Member
Joined: September 23, 2004
Posts: 149
Location: Victoria, BC, Canada
|
| Posted: Sun Sep 07, 2014 8:01 pm Post subject: |
|
|
Hey everyone! It's been too long, but I'm back at it.
Ground through PO's bondo on the windshield frames and found some cancer:
Cut the worst part out, trimmed up a little filler piece and welded it in. I'm going to let the pitting slide (filler vs. cut and weld), but I did weld up some small holes:
I received my Wolfgang safaris last year sometime, and started the install. My bus has the stamped recess for the hinges, which put the windows too high in the openings. Actually, just the passenger side, and only really bad on the outside edge:
I decided if I was going to make a spacer, might as well weld on some captive nuts and make it stronger than the included screws. I found some square tubing that had a good thickness to it, so I cut strips out of it:
Welded on the nuts, and punched holes to plug weld. There are 7 screw holes per hinge, I decided to leave the middle one without a nut. It's way easier to get the sheet metal screw in than the machine threads, so leaving one hole for a screw to get it started works better when installing them without a helper:
Had to use a dremel to widen out the holes for the nuts to slip into... Needed to fit the nut and also the little blobs of weld. Held it tight with some screws and plug welded the holes. After some grinding:
Yay! Tabs are welded in. The windows are now back in the bubble wrap and boxed for who knows when final assembly will take place.
_________________
Art
My '65 single cab project:
http://www.thesamba.com/vw/forum/viewtopic.php?t=491474 |
|
| Back to top |
|
|
nice dad
Samba Member

Joined: July 25, 2013
Posts: 318
Location: Kula, Maui
|
| Posted: Sun Dec 01, 2013 10:59 am Post subject: |
|
|
Wow, awesome job! Keep up the good work!
I have some welding to do myself, however I really want to get mine on the road asap.
Thanks!
_________________
1967 Single Cab |
|
| Back to top |
|
|
south_island_surf
Samba Member
Joined: September 23, 2004
Posts: 149
Location: Victoria, BC, Canada
|
| Posted: Thu Nov 28, 2013 7:24 pm Post subject: |
|
|
It's hard to replace your MIG gas when you work the same hours as the suppliers. Got some this week and got back to it.
One more wheel well patch:
Outrigger patch:
_________________
Art
My '65 single cab project:
http://www.thesamba.com/vw/forum/viewtopic.php?t=491474 |
|
| Back to top |
|
|
south_island_surf
Samba Member
Joined: September 23, 2004
Posts: 149
Location: Victoria, BC, Canada
|
| Posted: Thu Oct 17, 2013 5:32 pm Post subject: |
|
|
| glideking wrote: |
| Sandblasting was fun, right? Now you can enjoy the fact that your gas pedal is original. Great progress. Good tips for when I get to my floor. |
Super fun! Very satisfying. Your thread is awesome, you need to patent your grinder guard for grinding welds. I'll be using that idea for sure when it comes time to do my load bed. Obviously your rotisserie is way-cool, too.
Slowly fitting more pieces of the puzzle.
I welded up those tabs, then shot the side that's hidden with some black Tremclad I had in the garage. No picture.
Tacked in:
Forgot to form the drain before welding it in! Oh, well. Did it in place:
Examples of what you can use to bang away at sheet metal to form it:
Cleaned up. The drain looks funny with the camera flash, but it turned out pretty good. Not happy with the gap between the B pillar and rocker... I'll weld it up and score it with a thin cutting disk to mimic the factory line.
_________________
Art
My '65 single cab project:
http://www.thesamba.com/vw/forum/viewtopic.php?t=491474 |
|
| Back to top |
|
|
|


