| Author |
Message |
kiwighia68
Samba Member

Joined: October 20, 2013
Posts: 2938
Location: Auckland, New Zealand

|
 Posted: Sun Aug 03, 2025 1:33 pm Post subject: Re: 1969 Karmann Ghia restomod Posted: Sun Aug 03, 2025 1:33 pm Post subject: Re: 1969 Karmann Ghia restomod |
 |
|
I enjoyed reading your earlier posts about hunting downn and solving those engine leaks. My '68 Ghia is currently in the workshop to trace and cure the causes of the leaks on mine.
Thanks for your detailed exposition.
_________________
Festina lente - hasten slowly
1968 Ghia named Emiko
Resto completed Dec 2015 |
|
| Back to top |
|
 |
kimkinzie
Samba Member
Joined: December 12, 2021
Posts: 149
Location: Maui, HI
|
| Posted: Thu Jul 31, 2025 3:01 pm Post subject: Re: 1969 Karmann Ghia restomod |
|
|
HINT : I am merely reconnaissance, not enforcement [[[ MPD ]]], nor prosecution
"the quieter you are, the more you can hear", the base tenet of #infosec
I keep secrets, within my 'ohana [[[ .mil ]]]
_________________
'69 Ghia |
|
| Back to top |
|
|
kimkinzie
Samba Member
Joined: December 12, 2021
Posts: 149
Location: Maui, HI
|
| Posted: Thu Jul 31, 2025 2:54 pm Post subject: Re: 1969 Karmann Ghia restomod |
|
|
| kimkinzie wrote: |
also : 1-2 had some accelerant poured into the Weber 44 intakes. Butterfly valves had been pryed open, Venturi tubes hammered with some type of blunt instrument
hint : you forgot to replace the small star-shapped stops beneath the bronze wingnuts
|
lightning does strike twice, I assume .. across 90 days <pause> ., hmmm
_________________
'69 Ghia |
|
| Back to top |
|
|
kimkinzie
Samba Member
Joined: December 12, 2021
Posts: 149
Location: Maui, HI
|
| Posted: Thu Jul 31, 2025 2:36 pm Post subject: Re: 1969 Karmann Ghia restomod |
|
|
Why don't I feel like divulging the details of the fuelling system??? maybe because there is a serious set of tuners on Maui that think they know better than me wrt linkage, jetting, tuning, diagnossis, and plain old common sense. Here is some of the local boys handiwork:
diagnosis: July 2025 ... doesn't understand that this leads to RPM rev'ing to 3k+. Easy visual.
also : 1-2 had some accelerant poured into the Weber 44 intakes. Butterfly valves had been pryed open, Venturi tubes hammered with some type of blunt instrument
hint : you forgot to replace the small star-shapped stops beneath the bronze wingnuts
hint : sheer stupidity
diagnosis : July 2025 1-2 cylinders, May 2025 cooked the 3-4 cylinders, same moto, same accelerant, same <moron>
HINT : jealousy is <EARNED>, judgement is for <morons>
_________________
'69 Ghia
Last edited by kimkinzie on Thu Jul 31, 2025 3:19 pm; edited 1 time in total |
|
| Back to top |
|
|
kimkinzie
Samba Member
Joined: December 12, 2021
Posts: 149
Location: Maui, HI
|
| Posted: Sun Jul 20, 2025 2:14 pm Post subject: Re: 1969 Karmann Ghia restomod |
|
|
Koru (Maori) - new beginnings
Rolled over the odometer, unsure whether this is the 100,00 or 200,000 mark.
backup / priming / switchable fuel pumps
I hate cranking the engine for minutes in oder to get fuel to the carburetors, especially for a manual pump. It is the fatal flaw of the fuel supply system in the VW - therefore I build a switchable fuel supply that can be used to prime the small resevoir in the Weber carburetors. It allows for the inclusion of an electronic pump that can be used as the primary in a situation where the manual pump fails and/or is unable to bulld sufficient pressure to get fuel from the front-mounted tank. A fuel cutoff switch was added for the automatic pump which kicks in for a few seconds when the ignition key is turned, and will cut off the voltage if it senses that the engine is no longer running (by tapping into the same terminal used to measure RPM from coil). Maybe someday I'll write up the technical details of how this all works ... (like a charm).
_________________
'69 Ghia |
|
| Back to top |
|
|
kimkinzie
Samba Member
Joined: December 12, 2021
Posts: 149
Location: Maui, HI
|
| Posted: Tue Dec 12, 2023 11:57 am Post subject: Re: 1969 Karmann Ghia restomod |
|
|
Fuel Pressure Regulator
The new fuel pump required adjustments - it would properly hold line pressure once the engine was turned off, however, the additional heat soak from the carburetors allowed it to spike to the 6 psi level. This would overwhelm the needle and seat and causing fuel to drip and evaporate on the cooling metal, stinking up the garage. Ideally, I would prefer to purchase a genuine Malpassi fuel regulator from Redline, but was hindered by the delivery times and lack of mounting point for the bracket. Instead, a cheap Mr. Gasket inline unit was available from the local auto parts store to test.
| sputnick60 wrote: |
| While we're at it, I'm calling out of that fuel filter right next to those spark plug leads. Yes I see it's clamped but it's also unsupported. If your preference is living wild and exciting, I get it. |
Using the last remaining 6AN braided hose allowed me to push the filter out further and utilize the metal shelf besides #3-#4 cylinders to place the new regulator. This created a nice gap for the spark plug leads. To spice things up, I tested the failure mode by leaving one of the clamps loose while cranking the engine - spilled gasoline that immediately found it's way through a small hole in the rubber and onto the garage floor. Exciting stuff...
_________________
'69 Ghia |
|
| Back to top |
|
|
sputnick60
Samba Moderator

Joined: July 22, 2007
Posts: 4116
Location: In Molinya Orbit
|
|
| Back to top |
|
|
jeffrey8164
Samba Member
Joined: January 06, 2018
Posts: 4151
Location: Georgia
|
| Posted: Sat Dec 09, 2023 3:46 pm Post subject: Re: 1969 Karmann Ghia restomod |
|
|
Looking good man.
I’m calling you out on your spark plug wires though. I have to.
You’ve got way too much detail work going on to ignore them.
Here is a link to the fan shroud plugs that hold the wires.
https://www.westcoastmetric.com/i-22964776-113-451a.html?q=Spark+plug+wire+holder
😎
_________________
Volkswagen!
Turning owners into mechanics since 1938.
“Let he that is without oil throw the first rod”
(Compression 8.7:1) |
|
| Back to top |
|
|
kimkinzie
Samba Member
Joined: December 12, 2021
Posts: 149
Location: Maui, HI
|
| Posted: Fri Dec 08, 2023 4:28 pm Post subject: Re: 1969 Karmann Ghia restomod |
|
|
The original owner who completed the body restoration did a marvelous job on the metal work and many aesthetic decisions that work very well together. The only thing externally that I considered a bit odd was the exhaust system, in particular the angle at which the mufflers were welded into place. A hole wore through the stressed metal past the merged header and started to sound more like a stinger exhaust.
I took advantage of the Black Friday sale at Cip1 to purchase a replacement dual QuietPack muffler - with a bonus of no Internet sales tax and free shipping. Removing the temporary coating was a breeze with CitriStrip before applying a couple coats of flat black high-heat Rustoleum spray paint. This is a rather small detail, but for me it helps to finish the look from the back and side views.
_________________
'69 Ghia |
|
| Back to top |
|
|
kimkinzie
Samba Member
Joined: December 12, 2021
Posts: 149
Location: Maui, HI
|
| Posted: Fri Dec 01, 2023 6:14 pm Post subject: Re: 1969 Karmann Ghia restomod |
|
|
Tin Clearance
This Karmann has a CBPerformance full-flow oil pump. When the pulley tin broke apart right around the oil dip stick, it caused a horrid noise from engine compartment as it started to rub on the crankshaft pulley. A replacement was ordered, but ran into problems with clearance again. No amount of pounding on the metal could deform it sufficiently to avoid contact. The solution was finally to get a 7/8" stepper bit and just cut/drill away the area where the full-flow return interferes with the engine tin.
Fuel Pump
The car began to have problems on cold start, often requiring excessive amount of cranking and pedal pumping to get gas to the carburetors. I purchased a new Brosol alternator-style pump and 100mm pushrod. Installation was a breeze, and startups are now virtually instantaneous.
_________________
'69 Ghia |
|
| Back to top |
|
|
kimkinzie
Samba Member
Joined: December 12, 2021
Posts: 149
Location: Maui, HI
|
| Posted: Fri Dec 01, 2023 5:56 pm Post subject: Re: 1969 Karmann Ghia restomod |
|
|
Down the Rabbit Hole
I've noticed over time that the push rod tubes have seemed a bit 'wet' and discolored due to some latent oil leak beneath the engine. Unfortunately, no effort was taken to track down the exact source of the leak (perhaps also because of the difference in surface corrosion) before I ordered a set of Jaycee replacement tubes.
Installation went fine using a set of expandable wire clamps cinched tight on either set of the spring, with a zip tie to maintain compression during the placement of the assembly into the engine block. In order to set up the initial shortened tube length, it was helpful to use a 12 inch clamp. This made is very easy to align both ends before cutting the zip tie and having the silicone seals seated against the metal mating surfaces. The metal clamps were removed using a small 8mm nut driver before repeating the assembly process.
Since the rocker arm assembly needed to be removed in order to extract the push rods, I decided to check on the side-to-side tolerance of the individual rocker arms, and found that there was significant slack that could the source of residual valve train noise. A set of .010" and .030" shims were ordered to tighten up the tolerances. The picture below shows a feeler gauge of .030" that easily sides into place. I also was able to determine that these are 1:1.1 ratio rockers.
RESULT: time to start a sequel to "Beverly Hillbillies", we struck oil. It covered the passenger side heat exchanger, with oil slinging out the back and onto the muffler. Stunk like crazy, too...
What ensued was a series of guesses, blunders, and tail-chasing attempting to find the source of the leak. The following remedies were tried over a number of days in succession to fix the problem:
1.) rocker arm rubber gaskets - these seem to be missing in the picture above, however, these are blind taps that do not go all the way through the back of the head. No effect.
2.) silicone gasket seating - the end of the 1/2" socket wrench was used to 'wiggle' the push rod gaskets for a tighter fit. Little change noted.
3.) rely on Samba wisdom, from another thread:
| vwracerdave wrote: |
Oil is getting past the lower head stud nuts and washers inside the valve cover, and leaking out the back.
Remove rockers. Remove one head nut and washer, clean with carb cleaner. Put a tiny bit of RTV on the washer and put on the head. Torque the head nut to spec. Repeat the other 3 head nuts one at a time. Install rockers and adjust valves. Let set overnight for RTV to cure. |
BINGO! This turns out to be the exact diagnosis for my problem all along. The installation of the Jaycee push rod tubes only exaggerated the existing problem. Pulling off the head stud reveals another prime choice from the engine builder: household silicone sealant that didn't stand a chance to begin with. This isn't the first time I encountered this stuff used inappropriately.
Rather than use RTV, I rely on Hylomar Blue, a non-hardening temperature-resistant sealant that has been used in the past to seal against fuel leaks on the carburetor. They claim that it is capable of sealing up to .25mm gaps. I've also read on the forums that "Curil T" would also be appropriate in this circumstance. The surfaces were cleaned, Hylomar applied and allowed to dry for a bit before assembly began. I also added a couple of small o-rings to center the head stud in the opening. Final torque was applied after allowing the mating surfaces to cure.
This change made a big difference. In the foreground of the picture below, you can see where the oil left a stain on the aluminum casting where it was leaking from above and beneath the bolt heads. I finally got smart (way late in the process) by using rescue tape wrapped around the push rod tube to determine where leaking oil was coming from and to verify fixes/changes to the system. It was useful to be able to distinguish from a.) leak from above b.) leak beneath push rod seals c.) valve cover gasket issues.
_________________
'69 Ghia
Last edited by kimkinzie on Fri Dec 01, 2023 8:40 pm; edited 1 time in total |
|
| Back to top |
|
|
kimkinzie
Samba Member
Joined: December 12, 2021
Posts: 149
Location: Maui, HI
|
| Posted: Tue Oct 31, 2023 11:42 am Post subject: Re: 1969 Karmann Ghia restomod |
|
|
Thanks so much for your kind thoughts and words of encouragement, @Buggeee.
Owning an air-cooled vehicle comes with an education in ~nuance~ .. finding exactly which screw adjustment, bolt tightening, or reshaping of metal flange is required to "move the needle" towards improvement. The forums are great for getting advice on standards and measurements, but touch is developed by an individual over time. I'm slowly learning ...
_________________
'69 Ghia |
|
| Back to top |
|
|
Buggeee
Samba Member

Joined: December 22, 2016
Posts: 4934
Location: Stuck in Ohio
|
|
| Back to top |
|
|
kimkinzie
Samba Member
Joined: December 12, 2021
Posts: 149
Location: Maui, HI
|
| Posted: Sun Oct 29, 2023 5:43 pm Post subject: Re: 1969 Karmann Ghia restomod |
|
|
Balancing Act
There is a lot of lore about reading spark plugs to be able to diagnose an engine's running condition. This was what I was working with about a year ago before work on the intake manifolds, gaskets, and carburetor tuning. Sad .. just sad.
Since then, I've come to appreciate just how much linkage geometry affects hesitations and stumbles along the RPM curve. In order to ensure consistency between individual cylinders, a tool I've found indispensable is a hand-held laser temperature monitor. It most certainly helps to compare the exhaust flange temperatures - this has been used to pinpoint a tight valve on #4. Below are the results of the many months of fine tuning. Much improved.
_________________
'69 Ghia |
|
| Back to top |
|
|
kimkinzie
Samba Member
Joined: December 12, 2021
Posts: 149
Location: Maui, HI
|
| Posted: Sun Oct 29, 2023 5:04 pm Post subject: Re: 1969 Karmann Ghia restomod |
|
|
A while back I ordered up new ball joints for the front suspension, since most of the boots were found to be split wide open. Originally, the idea was to do all the work without having to remove the swing arms by using a "C"-clamp ball joint press from the local O'Reilly rental department. The uppers pressed out without much fuss, but lowers required a bit more finesse: the ball stem was first pushed out the bottom of the cup holding the ball joint in place. Once removed, the remainder of the sleeve could be eliminated with the help of a large socket as shown here on the passenger's side:
Pressing the new ball joints into place proved by a joke, stressing the limits of my 1/2" socket wrench. I started to worry that all the twisting force could throw the front-to-back alignment off, so I gave up the goal of doing all the work without any disassembly. Loosened the grub screws and nuts and hauled the trailing arms down to the local machine shop to have all the ball joints pressed in. Re-assembly was straightforward with the arms greased and torsion tube refilled after new set of sealing gaskets was put in place.
I noticed that the sway bar was being rendered completely ineffective by the way that the rubber bushes beneath the clamps were positioned passenger's side as seen in the first picture in this post. All torsional resistance/leverage was lost, and caused the wheel to rub the outer fender during hard left turns. An updated set of clamps and urethane bushings proved to be a good fix for the standard-sized sway bar.
Camber Adjustment
Once the brake calipers were mounted, the concentric bolts on the upper arms were twisted until correct zero degree camber was dialed in. The iPhone app "Measure" has a built in level mode. Pressing one vertical edge of the phone against the flat side of the brake rotor (and avoiding any button interference), the screen turns green when perfectly vertical, along with haptic feedback. The string method was used to get proper toe in. Taking the car for a spin made me wonder what took me so long to get this fix done - road feel coming through the steering wheel is sharp and satisfying.
_________________
'69 Ghia
Last edited by kimkinzie on Mon Oct 30, 2023 11:17 am; edited 2 times in total |
|
| Back to top |
|
|
Buggeee
Samba Member
Joined: December 22, 2016
Posts: 4934
Location: Stuck in Ohio
|
|
| Back to top |
|
|
kimkinzie
Samba Member
Joined: December 12, 2021
Posts: 149
Location: Maui, HI
|
| Posted: Wed Apr 19, 2023 9:19 pm Post subject: Re: 1969 Karmann Ghia restomod |
|
|
Short Shifter
After my old school EMPI shifter started acting up, I looked for alternatives and ordered up an upgrade from Bug Tech in Germany. It took about two weeks for the order to be processed, and another for international shipping. The build quality is outstanding, and gives you complete control over the tension in the throws on both the horizontal and vertical planes, in addition to being able to fine tune the depth of the shift ball. The lockout mechanism for reverse is the spring-loaded plate on the passenger side.
The throws are shortened by raising the pivot point of the shift lever. The other big difference I noted is that there is a certain 'notch' as you row through the neutral position compared to the smoother EMPI throws. It literally takes about 5 minutes to bolt in/out using the provided hex allen key. Conveniently enough, it can be installed on top of the existing interior carpet without having to do a lot of trimming. It should be noted however, that it does allow for air to enter the cabin though the exposed shift linkage.
I originally saw this setup on a Youtube video posted by one of Jay Leno's mechanics. Fast forward to the 16:20 mark to get an idea of their custom air-cooled setup:
Link
_________________
'69 Ghia |
|
| Back to top |
|
|
kimkinzie
Samba Member
Joined: December 12, 2021
Posts: 149
Location: Maui, HI
|
| Posted: Wed Apr 19, 2023 5:38 pm Post subject: Re: 1969 Karmann Ghia restomod |
|
|
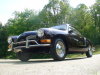
C&H sugar mill as backdrop. Last images before front running lights go on
_________________
'69 Ghia |
|
| Back to top |
|
|
kimkinzie
Samba Member
Joined: December 12, 2021
Posts: 149
Location: Maui, HI
|
| Posted: Wed Apr 19, 2023 5:28 pm Post subject: Re: 1969 Karmann Ghia restomod |
|
|
Phenolic Gaskets
After monitoring the newly installed phenolic spacers, it seems there was always a bit of fuel weeping at the sealing surface to the intake runners. I tried to order some Hylomar Blue, but the shipment was taking forever to arrive. A trip down to the local Autozone gave me two alternatives - I chose the orange 'direct replacement' from Permatex.
The old paper gaskets were also thrown away, a thin coating applied to both sides of the spacers with a paint roller, and the goopy mess was pressed back into place. I let the material settle overnight, and re-torqued the anchor bolts in the morning. It is possible to clean up the non-hardening blue gasket material using 91% rubbing alcohol and rubbing briskly.
_________________
'69 Ghia |
|
| Back to top |
|
|
kimkinzie
Samba Member
Joined: December 12, 2021
Posts: 149
Location: Maui, HI
|
| Posted: Fri Mar 31, 2023 10:28 am Post subject: Re: 1969 Karmann Ghia restomod |
|
|
| kingkarmann wrote: |
I wonder if the Valvoline is easier to come by than Brad Penn? |
Quite honestly, once you get outside of California, the regulations of hazardous materials always seem more laissez-faire. Valvoline is available off the shelf from local Napa and O'Reilly Auto stores in Hawaii, along with weirder stuff like Pentosin for ZF transmissions. From the looks of things, it seems Brad Penn oil is distributed mostly in the central portion of the USA: https://penngrade1.com/where-to-buy/
_________________
'69 Ghia |
|
| Back to top |
|
|
|


