| Author |
Message |
dingerjunkie
Samba Member
Joined: July 25, 2024
Posts: 78
Location: Liberty Hill, TX

|
 Posted: Mon Nov 04, 2024 6:32 pm Post subject: Starting Over - Son's 71 Ghia Coupe Posted: Mon Nov 04, 2024 6:32 pm Post subject: Starting Over - Son's 71 Ghia Coupe |
 |
|
Hello all. As promised, I'm starting a new thread based on a direction-change in the project my son and I are taking on.
The original "two into one" thread can be read here... https://www.thesamba.com/vw/forum/viewtopic.php?t=794269
So, we're restoring a formerly auto-stick 1971 Ghia Coupe. Motor and transaxle were completely missing at time of purchase, and the chassis had a clutch tube, so we're converting over to a traditional manual.
For the motor, we'll be building a 1679 with a counterweighted crank, AA drop-in 88's, dual HPMX carbs and a dual-quiet-pack exhaust. Thanks to Will at Cal-Look performance here in Texas for the guidance on the build.
The big focus for us will be the body and chassis for the time being. I've shared pics before, but I'll be adding more here for a starting reference:
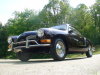
...of course, we kept the Porsche two-liters for the keeper-car...
I started cutting away the brackets/mounts in the engine compartment that were originally there for the AutoStick components and air cleaner, which opened up the area nicely:
Yes, there is battery acid damage, and I'm likely to completely replace the left-side tray area. This is as much for a clean mount point for the rubber around the motor on that side.
what I'm not sure about is the rear center. I'm thinking of just welding in cut plate on that left edge. Thoughts?
I was warned in the last thread that many of the blisters I was seeing on the rocker, the nose and the edge of the decklid meant complete rust-through. Fortunately, the nose, the doors, the quarters and the decklid showed clean after I sanded through to check...
the ugly rust on the front left was completely surface...
Now, I think this car had a significant front end crush at some point, and here are the clues. First, the headlight points don't match...one has a "lip" and one is "flush"...
There are also some ugly "scar welds" halfway up the passenger side, just inboard of the front hood latch point, and possibly at the driver-side transition from the nose to the left fender...
There are two or three pencil-diameter rust-throughs on the rocker panels, and I've already ordered replacements for cut-out and weld-in.
Significant pitting on the roof prior to previous paint jobs, but they should be easily re-filled, and nothing went through, fortunately...
The real concern/question I have is inside the rear quarters, behind the wheel well on either side of the engine compartment. No rust-through, but a LOT of surface corrosion I'd like to handle without disassembly. Should I just sandblast and vacuum out? wire brush on an extension? How have people cleaned that area up in their respective projects?
So, now I'm thinking about timing/sequence. I'm pretty sure I wish to repair up the rockers prior to separating the body from the chassis. This is mostly out of concerns for rigidity of the body off of the frame. Once separated, we're ready to weld in new pans and service everything suspension-wise.
Expect updates as I have more info. |
|
| Back to top |
|
 |
Rome
Samba Member
Joined: June 02, 2004
Posts: 10545
Location: Pearl River, NY
|
| Posted: Fri Nov 15, 2024 9:48 pm Post subject: Re: Starting Over - Son's 71 Ghia Coupe |
|
|
| Quote: |
| Yes, there is battery acid damage, and I'm likely to completely replace the left-side tray area. This is as much for a clean mount point for the rubber around the motor on that side. What I'm not sure about is the rear center. I'm thinking of just welding in cut plate on that left edge. Thoughts? |
Such a flat panel can work. GabFab makes a replacement panel with the rectangular indentation to make the appearance closer to the factory panel, but a flat piece is easy to cut using a large piece of paper for the overall outline tracing. The GabFab pieces have the correct "large indent" shape for Ghias thru late 1963. The smaller indent on your car started in early 1964. If you eliminate the indent entirely via a flat panel, it won't be very noticeable and won't be a size mismatch to the right side panel. https://www.thesamba.com/vw/classifieds/detail.php?id=1157244
Don't cut all the way outwards to the 90 degree upward ledge. You want to keep that because it has the 2 tabs along the bottom for holding the bottom of the side insulation panels.
Plan on relocating the car battery to under the rear seat's right bay such as on a Beetle. This will allow eliminating your original factory battery hold-down brackets and make room for your dual carbs.
When you make your patch panel, keep the diagonal panel joint line. It'll be mirror-image of the right side diagonal, which is the factory design for joining the tail panel to the side panels. |
|
| Back to top |
|
|
Rome
Samba Member
Joined: June 02, 2004
Posts: 10545
Location: Pearl River, NY
|
| Posted: Fri Nov 15, 2024 10:03 pm Post subject: Re: Starting Over - Son's 71 Ghia Coupe |
|
|
| Quote: |
| Now, I think this car had a significant front end crush at some point, and here are the clues. First, the headlight points don't match...one has a "lip" and one is "flush"... |
The lip around the headlamp opening, such as what you still have on the driver's side, is needed to hold the rubber seal to the body. It fits between your chrome headlamp ring and the front face of the fender, and must have that lip for support. For your passenger side, you have 2 choices: Cut out the probably rotten and smashed headlamp bowl and fit a new one IF it also contains the seal lip. Or keep the original bowl, rework the opening to get rid of previous sloppy patchwork; and weld in a thin sheetmetal ring to form a new lip. Use the driver's side lip as guide... |
|
| Back to top |
|
|
dingerjunkie
Samba Member
Joined: July 25, 2024
Posts: 78
Location: Liberty Hill, TX
|
| Posted: Sat Nov 16, 2024 12:08 pm Post subject: Re: Starting Over - Son's 71 Ghia Coupe |
|
|
Progress update for you all, including some replies to your responses (thank you for chiming in)...
Body now separated from the chassis and on a rolling, hinged dolly.
Whichever PO welded in repair patches to the pans ended up welding them to the bottom of the cross-piece for the rear seats, rather than just to the pan. This led to me carefully cutting in front of that crosspiece after all fasteners had been removed and the seal had separated.
The car definitely took a hard hit in front of the passenger front wheel at some point. I'm guessing it was bad enough to compromise everything all the way into the fuel tank area. there is a straight cut from the top-center of the wheel well, all the way through to the fuel tank juncture. While this is only seen as a body filler crack on the exterior, the interior of the wheel well and fuel tank area is an ugly scar.
the next seam is front-center by the latch, tying in at center-nose from what I can surmise before sanding off paint and body filler. It is tough to follow the bottom seam in the spare tire area, but it can be seen on the far passenger side. This was a full section replacement, top-to-bottom, with a matching section from another vehicle, as there is still even a VW manufacturing tag riveted into the replacement section.
Both headlight bowls have only surface rust, though the headlight adjuster on passenger-side has rusted/frozen screws to cut out. I'll be carefully welding on that thin ridge to support the seal and match the driver-side.
Now my son and I have a huge amount of stripping, sanding, cleaning and research to do before any reconstruction work starts.
One more bummer of a question. The vehicle came with zero switches/gauges in the dash. Center hole on the '71 is 4.25 inches or 108mm. I'm seeing a few GPS-driven combo speedo/tachs at 110mm, but nothing at 108. Thinking of using a newer combo, then matching newer fuel and voltmeter gauges. Honestly, gauge cluster may need a complete re-think, and I'd like to get opinions from the peanut gallery.
Thanks everyone. |
|
| Back to top |
|
|
Rome
Samba Member
Joined: June 02, 2004
Posts: 10545
Location: Pearl River, NY
|
| Posted: Sat Nov 16, 2024 1:25 pm Post subject: Re: Starting Over - Son's 71 Ghia Coupe |
|
|
| Quote: |
| gauge cluster may need a complete re-think, and I'd like to get opinions from the peanut gallery. |
Easiest would be to fit most of the original style gauges- the big speedometer in center, then a fuel gauge at upper left. Used gauges are not that expensive and should be easy to find. A few here in tS classifieds. For the upper right, try to find a tachometer. If you can't find one of the exact hole diameter, you could buy a non-working original clock, gut the insides, and fit in an aftermarket tach mechanism.
Or, you can make a '60 thru '65 look gauge arrangement by welding in a panel. You then can use a Beetle speedometer on the left. For the right large gauge, buy a Porsche 914 tach which has white numbers on black background. If you find a mid '70's standard Beetle speedometer, its numbers and face are nearly an exact match. Bonus with that speedometer is that it has an integrated fuel gauge so that you really only need an insert panel for the 2 large gauges.
Third- make a filler panel and install various aftermarket gauges... |
|
| Back to top |
|
|
dingerjunkie
Samba Member
Joined: July 25, 2024
Posts: 78
Location: Liberty Hill, TX
|
| Posted: Sat Nov 30, 2024 6:53 pm Post subject: Re: Starting Over - Son's 71 Ghia Coupe |
|
|
I'll have two updates to the thread for the group today. they're being posted separately because they'll cover two different areas/questions/plans.
So...the first update. I've power-washed the chassis. Mechanically, everything looks better than I expected. All rubber is cracking, so I'll be re-bushing everything, etc.
Before cutting away the old pans, I wanted to strip the dampening/insulation off of the frame itself. Damn. I've gone as far as a wide chisel and hammer to get under this stiff, bonded stuff. How in the hell have people fully stripped and cleaned this stuff off to bare metal?
|
|
| Back to top |
|
|
dingerjunkie
Samba Member
Joined: July 25, 2024
Posts: 78
Location: Liberty Hill, TX
|
| Posted: Sat Nov 30, 2024 7:18 pm Post subject: Re: Starting Over - Son's 71 Ghia Coupe |
|
|
Update #2 for the weekend...more "body forensics"
I took the fresh air grilles, screens and catches off the front and found evidence that makes me believe the front end may be put together from two different donors.
First, I got aggressive with a power washer, causing all kinds of "undercoating" to flake out, as well as shaking loose any of the blue paint that had been sprayed inside and outside the car. The under-color for the rear engine bay, underside, and interior is white. The rear decklid was originally red (or had a really good re-spray in an earlier life).
The front-end, once past the seam weld I showed earlier, is either yellow or red. When I pulled the fresh air trim and shot from the front, I had "ketchup and mustard" staring back at me...
I can see a transition from red to yellow in the hood catch and around the seam where the hood seal should be.
This tells me that the sprayed-over origin badge is likely from the sourced repair metal, as it is forward of the Frankenstein weld on the passenger fender.
I just checked the body serial tag in the yellow section on the other side. it matched to a '59-60 number range. It is definitely only the interior section, because the outer metal is NOT lowlight, but properly cut for '71 lights.
So, someone crunched the front-end bad enough to have to replace the front clip almost all the way over to the headlight, doing enough internal damage to have to weld in about 1/2 of the inner structure, including the internals for the fresh-air plumbing on the driver-side. Damn. The rest of the car (minus the decklid) is all white underneath for primary color, so I'm assuming that is original body.
The other obvious piece from that front picture is how the person engaging in reconstructive surgery cut a stupid corner. The lip on the passenger side headlight bucket is not protruding because someone tried to weld it in by passing it through from the inside. The tab to hang the light is a point of spot-weld. This is why you can see the stupid "crest" to the passenger side over the headlight. I'm going to have to get a headlight section and a new bucket, then smooth that crest/ridge out to match the properly-smooth driver's side.
Not scared...figured I'd find worse, but the low quality of the repair is shocking. I forget how people likely chose these because they were cheap relative to other "sporty" two-seaters, and that may explain the bargain-basement repair. But really...damn...I'm shocked someone thought this was good enough. |
|
| Back to top |
|
|
DrakeB
Samba Member

Joined: July 26, 2010
Posts: 245
Location: Here, obviously
|
| Posted: Sat Nov 30, 2024 7:25 pm Post subject: Re: Starting Over - Son's 71 Ghia Coupe |
|
|
| dingerjunkie wrote: |
Damn. I've gone as far as a wide chisel and hammer to get under this stiff, bonded stuff. How in the hell have people fully stripped and cleaned this stuff off to bare metal?
|
That material is similar to tar board. As it gets older it tends to harden up. Your best bet is a stiff sharp putty knife or chisel and to chip away little by little until it is completely gone unless you want to go to Plan B.
Plan B. It can be loosened up with an electric heat gun and using a chisel or a large stiff putty knife blade to scrape it away, but it usually leaves a smeary mess behind that could only be cleaned up with a very strong solvent. That mess usually laughs at most solvents, but gasoline wiped the mess out rather fast. If you must go that route use in a well ventilated environment away from open flames, neighbors, pets, and kids, etc
_________________
Bondo? Bondo? We don't need no stinking Bondo!
How is it 'NOS' if it has been modified?
The Thread Killer. |
|
| Back to top |
|
|
Teeroy 
Samba Member

Joined: April 20, 2003
Posts: 3842
Location: Eastern WA
|
| Posted: Sat Nov 30, 2024 8:59 pm Post subject: Re: Starting Over - Son's 71 Ghia Coupe |
|
|
That's a 72 VIN on the blue plate, you add the 14 before the stamped into plate number
_________________
Pres. Rivercity VW Club www.rcvwclub.org
Founder Derr Wheat Panzers (DWP)
ARR #3
www.autosportsnorthwest.org |
|
| Back to top |
|
|
sputnick60
Samba Moderator

Joined: July 22, 2007
Posts: 4115
Location: In Molinya Orbit
|
|
| Back to top |
|
|
jeffrey8164
Samba Member
Joined: January 06, 2018
Posts: 4149
Location: Georgia
|
| Posted: Sun Dec 01, 2024 12:39 pm Post subject: Re: Starting Over - Son's 71 Ghia Coupe |
|
|
Heat helps but in the end I had my pan water blasted.
_________________
Volkswagen!
Turning owners into mechanics since 1938.
“Let he that is without oil throw the first rod”
(Compression 8.7:1) |
|
| Back to top |
|
|
dingerjunkie
Samba Member
Joined: July 25, 2024
Posts: 78
Location: Liberty Hill, TX
|
| Posted: Sat Dec 28, 2024 7:19 pm Post subject: Re: Starting Over - Son's 71 Ghia Coupe |
|
|
Hello All. Hope everyone had a great Christmas, is having a great Hanukah or is just enjoying the Holiday season.
I've been working the chassis of the '71. Pans are off, pan lips are ground smooth, tar board & leftover sticky residue is off the tunnel. I'll post pictures of all that when I get the suspension/beam off & clean the underside of the frame as well.
In the mean time, I did want to throw some sunshine towards a patron-saint of this project...Will at Cal Look Performance in Sanger, Texas.
As agreed back at Austin's VW Harvest 2024, he came through on all of the parts we'd need to build a motor to Alex's specs, plus a serviced IRS transaxle, in exchange for the '72 'Vert Ghia dragster we swapped him. Two Saturdays ago, I made the half-day run to Sanger from Liberty Hill to pick everything up, right down to brand-new magnesium cases. I'll give a parts breakdown, with pictures of all the goodies, in a later post.
While I was there, I just had to take a couple of pics of his "shop car" daily driver beetle...inspiring, to say the least.
Will is a seriously good guy, and he is all about building the community.
I've determined that anything I need that is available through Cal Look will be purchased there, as I like to see my money going to those really servicing the scene. We will also be going to see him run the Ghia Dragster at "Texas vs the World" at Xtreme Raceway Park in 2025, if not sooner, in the upcoming season.
Showing you pictures of parts boxes wouldn't be fun, but I can throw a few pics of the IRS Transaxle. Alex and I just looked up the serial number, and we're dealing with an AT trans, '74 or later by the numbers, built for the 1303s and Cabrios from '73 on. Ratios are 3.80 / 2.06 / 1.26 / 0.93 : 3.875, which means we have a taller, mild overdrive "freeway flyer" which will work with the higher cruise speeds the Ghia will see around these parts.
Anyway, that's the update for now. Here's to a Happy New Year and a better 2025 for us all. Looking forward to giving you updates as Alex and I progress. |
|
| Back to top |
|
|
dingerjunkie
Samba Member
Joined: July 25, 2024
Posts: 78
Location: Liberty Hill, TX
|
| Posted: Sun Jan 12, 2025 6:25 pm Post subject: Re: Starting Over - Son's 71 Ghia Coupe |
|
|
...okay...I need HELP!
Dealing with a super-frustrating fastener issue, and I don't know how to resolve it.
This picture should help with explaining:
So the sleeve that goes into the original rubber bushings is frozen tight onto the socket-bolt pivot for the IRS arm. The sleeve, correctly, is too large to pass through the large washers to the right, or through the pivot housing.
When I get it our far enough to hit the washers, the threads are free of the frame, and it just spins. Anything I try to get purchase with (like narrow vise-grips) won't grip well enough and, if anything, would put mor pressure into the pivot bolt.
How the hell to I get that damn sleeve unfrozen from the pivot bolt? |
|
| Back to top |
|
|
vw356
Samba Member
Joined: January 09, 2004
Posts: 304
Location: Cullman,Alabama
|
| Posted: Sun Jan 12, 2025 7:09 pm Post subject: Re: Starting Over - Son's 71 Ghia Coupe |
|
|
One option is to cut the cup with a cut off wheel in a way so that it can be re-welded after you get the sleeve off of the pivot bolt. I would try heating the sleeve to remove it after you get the cup cut and remove the entire problem area.
Best of luck.
_________________
Current projects:
1950's Volkswagens!
51,52,54's,55,56's,57,58's,'60's And then a bunch of '60's, but the '50's are my favorites.. |
|
| Back to top |
|
|
dingerjunkie
Samba Member
Joined: July 25, 2024
Posts: 78
Location: Liberty Hill, TX
|
| Posted: Sun Jan 12, 2025 7:28 pm Post subject: Re: Starting Over - Son's 71 Ghia Coupe |
|
|
Got it sorted. I just needed to calm down and think. The mistake was trying to lever the sleeve from "inside" the large washers.
I greased the pivot bolt at the sleeve edge, then threaded it all the way back in.
This also pushed the washers tight against the bushing, with a large gap in the outside section of the pivot housing.
I put the channel-locks, loose, outside the washers and inside the pivot housing...then started backing the bolt out.
The grease, combined with the jammed washers holding the sleeve in place forced sleeve off the pivot bolt.
Of course, the other side came right out... |
|
| Back to top |
|
|
Evil_Fiz
Samba Member

Joined: May 06, 2011
Posts: 1111
Location: Jacksonville, FL
|
| Posted: Mon Jan 13, 2025 12:54 pm Post subject: Re: Starting Over - Son's 71 Ghia Coupe |
|
|
Don't make the same monumental BOOBOO I did and destroy the outer metal sleeves on the bushings when you try to remove them from the trailing arm. If you plan to use urethane bushings, you will need the outer sloeves to hold the urethane inserts. I had to buy a set of rubber bushings then destroy them so I could use the outer sleves. The easy way to get the rubber insert off the outer sleve is to heat the outer sleve with a torch until the rubber breaks loose and can be pulled out.
-----
Emil
_________________
“…It's not just about what's interesting. It's also about what's helpful, and it's helpful even if it helps just one other guy working on a Ghia.”
kiwighia68
See my build on TheSamba at:
The K_R_A_K_E_N_N : a 70 Ghia Convertible reinterpreted |
|
| Back to top |
|
|
dingerjunkie
Samba Member
Joined: July 25, 2024
Posts: 78
Location: Liberty Hill, TX
|
| Posted: Sat Apr 12, 2025 3:53 pm Post subject: Re: Starting Over - Son's 71 Ghia Coupe |
|
|
hello everyone...it's been a while...
Progress is being made, and I'm overdue to give an update.
Of course, I also have one question that's bugging the snot out of me, but I'll keep that for the end of the update.
So, quite a bit has been taken care of:
Pans have come off
Frame has been scraped clean, wire-wheeled, and all old body sealer was removed with a needle-scaler (it was all over the place)
After pan-lip was taped off, entire frame was rust-treated, primed and painted
Internal of tunnel was treated with Eastwood Internal Frame Coating
Original fuel line was cleaned out, leak/pressure tested and found to be good, so I don't need to worry about a replacement (little victories...)
Front beam was completely stripped, cleaned, inspected, primed & painted in Tractor Supply's grey tractor paint
Same treatment for trailing arms.
Spindles were wire-wheeled, dipped in evapo-rust, primed and painted in black chassis paint
new tie rods installed and steering box rebuild by me
sway bar sanded, painted and reinstalled with new bushings
All is reassembled, with paint stripped between steering box, beam and chassis to ensure good ground for the horn
being the maintenance nerd I am, every ball joint in the front end was tapped for a zerk fitting, and everything has been properly greased
Rear spring plates and swingarms received equal attention with the grey tractor paint
New bushes for swing arms and spring plates being installed.
...and here are the pictures of that progress so far...


And now for the question...
I don't recall a significant amount of deflection between the spring plates and the connection point to the rear swing arms, but I'm seeing quite a bit as I go to complete reinstall. The front pivot bush is right, and the position for the swingarm looks correct, but the spring plate is either bowed way out or way in when pressed into place by the pivot plate, as you can see in these photos...


I'm concerned that I can't keep the spring plate in the "slot" between the torsion housing and the end cap if I wish to line up with the swingarm.
As an option, I picked up some replacement chrome outer pivot plates on a whim, and I noticed they don't sit flush against the torsion bar housing like the stock plates. This would solve the alignment problem (which I still don't get), but it would also allow "over-travel" of the spring plate until it hit the pass-through for the plate bolt.

Would this outward positioning still be close enough to ensure a snug-enough fit of the torsion bar splines between the chassis and the spring plate? Would I run into over-extension problems with my stock-length shocks I intend to install?
I'm rather confused/concerned, and guidance would be appreciated. |
|
| Back to top |
|
|
dingerjunkie
Samba Member
Joined: July 25, 2024
Posts: 78
Location: Liberty Hill, TX
|
| Posted: Sun Apr 13, 2025 6:42 am Post subject: Re: Starting Over - Son's 71 Ghia Coupe |
|
|
Okay...very confused now. The spring plates, on the car whe I got it, are "single plate", but the jbugs video I just watched showed "two arm" plate that mount on both sides of the swingam.
What could these be off of, and what parts should I be looking for? |
|
| Back to top |
|
|
Ian Godfrey
Samba Member
Joined: September 25, 2006
Posts: 1205
Location: Melbourne Australia
|
| Posted: Sun Apr 13, 2025 4:53 pm Post subject: Re: Starting Over - Son's 71 Ghia Coupe |
|
|
great work on the details on the pan and I like the grease nipples on all the ball joints, a great idea.
Around 69 - 70 some Ghia's had double spring plates and some had single.
the single plate goes on the inside of the trailing arm, and the double goes both sides and uses a different cover and different bolt holes in the trailing arm. You just need a matching set.  |
|
| Back to top |
|
|
dingerjunkie
Samba Member
Joined: July 25, 2024
Posts: 78
Location: Liberty Hill, TX
|
| Posted: Sun Apr 13, 2025 6:34 pm Post subject: Re: Starting Over - Son's 71 Ghia Coupe |
|
|
| Ian Godfrey wrote: |
great work on the details on the pan and I like the grease nipples on all the ball joints, a great idea.
Around 69 - 70 some Ghia's had double spring plates and some had single.
the single plate goes on the inside of the trailing arm, and the double goes both sides and uses a different cover and different bolt holes in the trailing arm. You just need a matching set. |
Thank you very much for the clarification. I was about to drop $$ on doubles, so that answer saves me time and money. |
|
| Back to top |
|
|
|


