| Author |
Message |
COVeeDubb
Samba Member
Joined: April 28, 2010
Posts: 36
Location: Colorado Springs

|
 Posted: Thu Jul 17, 2014 2:55 pm Post subject: Stuck going back together Posted: Thu Jul 17, 2014 2:55 pm Post subject: Stuck going back together |
 |
|
I pulled my engine and transmission about 3 plus years ago for an overhaul / rebuild. I am now going back together. Prior to removal I snapped a bunch of photos but have since lost them thanks to the awesome lightning storms in Colorado.
I have patched things together most of the way but now have some things that I need assistance with getting back together.
I am a much more visual person so if you are able to snap a pic of what it is supposed to look like, that would be far more helpful. But hey, beggars can't be choosers right....
The first is I am not sure what hose goes here...
Same story here, what line goes here....
And what goes lines go on the canister...
Under the intake tubes on the left side. Under these are the grounds for the injectors but i'm not sure what plugs in here...
What line goes to the tbody here....
Next is the coil. From what i can gather i have this arranged correctly. In this pic you can see an additional connector. There is a spare spade on the coil on the top side perhaps for that?
This is on the right side by the battery. The line comes from the tin that feeds down to the alternator/starter but i am not sure where this end connects...
I am not sure where this bolts up...
This is what i believe is the connector for the above pic...
Lastly is the fuel pressure regulator that I am not sure where it goes...
Why yes, this is a little embarrassing, but I am stuck and want to get this thing down the road. It has been way too long. Also if you see anything that i totally hooked up wrong or is backwards please feel free to correct me.
Much thanks
Matt[/img]
_________________
1975 Bay Window |
|
| Back to top |
|
 |
Big Papi
Samba Member

Joined: January 06, 2012
Posts: 242
Location: Oregon
|
|
| Back to top |
|
|
Tcash
Samba Member

Joined: July 20, 2011
Posts: 12843
Location: San Jose, California, USA
|
|
| Back to top |
|
|
my59
Samba Member

Joined: August 13, 2003
Posts: 4016
Location: connecting the dots
|
| Posted: Thu Jul 17, 2014 7:36 pm Post subject: |
|
|
Fuel pressure regulator- passenger side of engine in vertical tin- over in hole a few inches above to the left of the end of the hard line where the injectors are. There is a nut you need to fasten to tin from the other side, and then you connect the nipple on the nut end to the return for the tank, Short bit of FI fuel line goes to the end of the hard line by injector #1.
Use FI fuel clamps on the gas soft lines
Vacuum line shown connects as per vacuum diagram.
_________________
my59: Well son, my grandfather died before I got to drive it, so does that answer your question?
our79: sunroof bus w/camper interior and 2.0 FI
Other:'12 Jetta, '77 Benz 300D, and a 74 MG Midget. |
|
| Back to top |
|
|
SGKent 
Samba Member
Joined: October 30, 2007
Posts: 42958
Location: at the beach in Northern Wokistan
|
| Posted: Thu Jul 17, 2014 7:49 pm Post subject: |
|
|
can I make a suggestion? In this thread just ask one question at a time now that have not been answered. My head spun trying to look at all the photos then I decided to go cook dinner and watch TV. If you ask one item at a time now someone is bound to know the answer.
The first one is the 1975+/- = 1977 nipple on the fan shroud which blows air thru the carbon vapor canister.
|
|
| Back to top |
|
|
Tcash
Samba Member
Joined: July 20, 2011
Posts: 12843
Location: San Jose, California, USA
|
|
| Back to top |
|
|
busdaddy
Samba Member

Joined: February 12, 2004
Posts: 53222
Location: Surrey B.C. Canada, but thinking of Ukraine
|
| Posted: Thu Jul 17, 2014 8:42 pm Post subject: |
|
|
| SGKent wrote: |
| can I make a suggestion? In this thread just ask one question at a time now that have not been answered. My head spun trying to look at all the photos then I decided to go cook dinner and watch TV. If you ask one item at a time now someone is bound to know the answer. |
My thoughts exactly, nothing wrong with questions but make the answering less complicated 
So...what have you got under control and what's still outstanding?
_________________
Rust NEVER sleeps and stock never goes out of style.
Please don't PM technical questions, ask your problem in public so everyone can play along. If you think it's too stupid post it here
Stop dead photo links! Post your photos to The Samba Gallery!
Слава Україні! |
|
| Back to top |
|
|
COVeeDubb
Samba Member
Joined: April 28, 2010
Posts: 36
Location: Colorado Springs
|
| Posted: Wed Jul 23, 2014 9:14 pm Post subject: |
|
|
Alrighty. Updates, updates
First of all thanks for all of the replies.
Ok the things that remain :
I am a little stuck on the fuel pressure regulator. I have a photo of how I currently have the fuel line that comes through the tin. I have it going directly to the hard line on the injector. From what I gathered I need to remove the soft line, go into the regulator, then go from the regulator to the hard line. Please review the photo to confirm my suspicion. Or if you have a pic of how yours looks, please post...
_________________
1975 Bay Window |
|
| Back to top |
|
|
COVeeDubb
Samba Member
Joined: April 28, 2010
Posts: 36
Location: Colorado Springs
|
| Posted: Wed Jul 23, 2014 9:20 pm Post subject: |
|
|
Next thing...
This is a pic of the original connector that I asked about. Someone asked what color, so it is red and I believe it goes to the battery connection, but I am not certain.
In the same photo is another connector that I am not sure where it goes...
_________________
1975 Bay Window |
|
| Back to top |
|
|
COVeeDubb
Samba Member
Joined: April 28, 2010
Posts: 36
Location: Colorado Springs
|
| Posted: Wed Jul 23, 2014 9:24 pm Post subject: |
|
|
Next....
Everything on the coil checks out with exception to the one in the photos. It is a white wire with green....
_________________
1975 Bay Window |
|
| Back to top |
|
|
SGKent
Samba Member
Joined: October 30, 2007
Posts: 42958
Location: at the beach in Northern Wokistan
|
| Posted: Wed Jul 23, 2014 9:24 pm Post subject: |
|
|
the fuel pressure regulator bolts to the back of the tin. Test it first to be sure it holds a vacuum. The nipple that goes straight goes under the bus ten takes a return line to the tank. That line can be standard pressure line although I used high pressure line because if something ever plugged the inlet it would see 100 psi.
the inlet line goes to the right side fuel rail.
A vacuum line also goes to it. That vacuum one is the one that comes from the plenum and tee's to the decal valve.
_________________
 Canned Water - the new California approved parts cleaner (except in a drought in which case rub it with sand). Canned Water - the new California approved parts cleaner (except in a drought in which case rub it with sand).
George Carlin:
"Most people don't know what they're doing, and a lot of them are really good at it."
Skills@EuroCarsPlus:
"never time to do it right but always time to do it twice" |
|
| Back to top |
|
|
COVeeDubb
Samba Member
Joined: April 28, 2010
Posts: 36
Location: Colorado Springs
|
| Posted: Wed Jul 23, 2014 9:25 pm Post subject: |
|
|
I'm still clueless on this joker and what connects to it....
_________________
1975 Bay Window |
|
| Back to top |
|
|
COVeeDubb
Samba Member
Joined: April 28, 2010
Posts: 36
Location: Colorado Springs
|
| Posted: Wed Jul 23, 2014 9:28 pm Post subject: |
|
|
Lastly I was curious about the engine seal. Is there any technique with installation of this? Like starting it in the front then working it around, etc?
Thank you again.
Matt
_________________
1975 Bay Window |
|
| Back to top |
|
|
Tcash
Samba Member
Joined: July 20, 2011
Posts: 12843
Location: San Jose, California, USA
|
|
| Back to top |
|
|
SGKent
Samba Member
Joined: October 30, 2007
Posts: 42958
Location: at the beach in Northern Wokistan
|
| Posted: Wed Jul 23, 2014 9:34 pm Post subject: |
|
|
| COVeeDubb wrote: |
Next....
Everything on the coil checks out with exception to the one in the photos. It is a white wire with green....
|
re your wiring - Been here? http://www.thesamba.com/vw/archives/info/wiringt2.php
Best two things thing you can do are:
Take the file(s) for your bus to a shop that can print larger paper (not necessarily a poster). Have them print two copies of your wiring in color. Keep one as a reference and the other goes into the garage while you are working on this to make notes on and to view.
The other is get some lacquer thinner or carb cleaner and put a SMALL amount on a rag or old terry cloth and wipe the wire. You'll be surprised how the color comes true to what it was when it left the factory - then you can find it on the print out and low and behold it will make a lot more sense.
I think that what you call green and white is the oil sender.
_________________
Canned Water - the new California approved parts cleaner (except in a drought in which case rub it with sand).
George Carlin:
"Most people don't know what they're doing, and a lot of them are really good at it."
Skills@EuroCarsPlus:
"never time to do it right but always time to do it twice"
Last edited by SGKent on Wed Jul 23, 2014 9:37 pm; edited 1 time in total |
|
| Back to top |
|
|
SGKent
Samba Member
Joined: October 30, 2007
Posts: 42958
Location: at the beach in Northern Wokistan
|
| Posted: Wed Jul 23, 2014 9:35 pm Post subject: |
|
|
| COVeeDubb wrote: |
Lastly I was curious about the engine seal. Is there any technique with installation of this? Like starting it in the front then working it around, etc?
Thank you again.
Matt |
patience grasshopper, patience
the seam is at the back. Side with a coating goes out.
_________________
Canned Water - the new California approved parts cleaner (except in a drought in which case rub it with sand).
George Carlin:
"Most people don't know what they're doing, and a lot of them are really good at it."
Skills@EuroCarsPlus:
"never time to do it right but always time to do it twice" |
|
| Back to top |
|
|
COVeeDubb
Samba Member
Joined: April 28, 2010
Posts: 36
Location: Colorado Springs
|
| Posted: Wed Jul 23, 2014 9:38 pm Post subject: |
|
|
| SGKent wrote: |
| I think that what you call green and white is the oil sender. |
But I've already got the solid blue wire on the oil sender....
_________________
1975 Bay Window |
|
| Back to top |
|
|
richparker
Samba Member

Joined: November 24, 2011
Posts: 7785
Location: Durango, CO
|
|
| Back to top |
|
|
busdaddy
Samba Member
Joined: February 12, 2004
Posts: 53222
Location: Surrey B.C. Canada, but thinking of Ukraine
|
| Posted: Wed Jul 23, 2014 9:51 pm Post subject: |
|
|
The grey/green or white/green by the coil is diagnostic, it went on #1 but is useless now. Same with that round black plug with 3 holes.
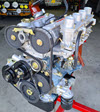
The thermostatic valve on the top of the case is uncommon, I've seen it on a few in the past but can't recall if it was on genuine bus motors or 411/412 or Porsche, is your bus automatic?
What kind of fuel line is that you are using, looks sketchy 
_________________
Rust NEVER sleeps and stock never goes out of style.
Please don't PM technical questions, ask your problem in public so everyone can play along. If you think it's too stupid post it here
Stop dead photo links! Post your photos to The Samba Gallery!
Слава Україні! |
|
| Back to top |
|
|
germansupplyscott
Samba Member

Joined: May 22, 2004
Posts: 7286
Location: toronto
|
| Posted: Thu Jul 24, 2014 9:09 am Post subject: |
|
|
| busdaddy wrote: |
| The thermostatic valve on the top of the case is uncommon, I've seen it on a few in the past but can't recall if it was on genuine bus motors or 411/412 or Porsche, is your bus automatic? |
'75 automatic bus only. maybe CA '74 injected (which was auto trans also) but i am not sure on that.
_________________
SL |
|
| Back to top |
|
|
|


