| Author |
Message |
BradleyGTE
Samba Member
Joined: May 20, 2025
Posts: 10
Location: Canada

|
 Posted: Tue May 20, 2025 3:22 pm Post subject: Bradley GTE Electric - Build thread and VW-related questions Posted: Tue May 20, 2025 3:22 pm Post subject: Bradley GTE Electric - Build thread and VW-related questions |
 |
|
Hi everyone,
I'm a car novice, and I could use some help on the VW side of things.
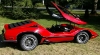
I bought a 1980-ish Bradley GTE Electric based on what seems to be a 1970 VW IRS chassis based on the VIN.
I've confidently heard they only made 50, 51, or 126 of them total. Some low number I guess. Who knows how many ever got finished.
Structure-wise they are the same as the Bradley GT2, except maybe one minor difference at the rear to create a battery tray. The only things different are the bespoke electric driveline and gauges.
The Bradley forums are basically a ghost town, and I'm not a Facebook person.
...
My GTE was professionally built by a custom car shop, from the Bradley kit, for an electrical engineering professor. It was only driven a couple hundred miles, and then due to a family medical crisis, parked for 13 years.
The second owner bought it in 1996, changed the batteries and controller, made some custom mods to it (Ghia front discs apparently) and drove it, even commuted in it until he moved in 2003. It's been garage parked as far as I can tell for the last 22 years.
...
Bradley-wise, I'm probably fine-ish. I have pretty good documentation.
EV-wise, I'm probably okay, it's not my first EV. I removed 1000 lbs of lead-acid batteries and I'll get around to putting in something more modern.
But VW-wise, or even just general car maintenance-wise, I'm pretty clueless. I could use some help.
I'm not familiar with Beetles at all. I'm barely even familiar with car systems. I do have the Haynes manual for the VW/Ghia, but even that sometimes is over my head.
I'll have a few specific questions, but also, I don't even know what I don't know. Some obvious things to some of you about operating/maintaining an old car I will be oblivious to. I'm all ears for any general advice.
Oh, and I'm generally thrifty. I don't like sinking money into things.
...
My short term goals are "get it rolling, get it legal" so it's not imprisoned in my garage. It doesn't need a huge battery pack, it can roll around on a spare 12v starter battery at walking speed I presume. |
|
| Back to top |
|
 |
BradleyGTE
Samba Member
Joined: May 20, 2025
Posts: 10
Location: Canada
|
| Posted: Tue May 20, 2025 4:21 pm Post subject: Re: Bradley GTE Electric - Build thread and VW-related questions |
|
|
Motor:
First up, I needed to see if the motor worked.
I slapped some jumper cables on it, and it spun. DC motors are amazing.
The motor that's in there is a bespoke Bradley DC motor. Or rather, a nice, high-end forklift motor with a Bradley emblem on it:
The clutch and clutch spring things were removed, so I put those back together (not even really understanding which way they went and in what order, the Haynes presumes you have more knowledge than I do).
Motor is 170lbs, for anyone who cares.
It mounts right in place of the engine:
...
...
I don't know how to drive stick.
Like, I know the theory, but, I've never actually moved a gear shifter. After some practice I discovered where reverse is (back and left, no lockout or having to push the stick inwards, maybe just have to go to 1st gear first?). I managed to move through the gears.
This isn't necessary. Most EV conversions with modern battery voltages can basically stay in 3rd gear all the time unless they're climbing hills. They have endless torque from zero.
The driveline appears to function (up on jackstands). The tranny seems to have some oil coating on it. The driver's side upper CV is wet with something oily, the passenger's side lower CV is similarly wet.
---
Next up is brakes.
The rear passenger drum brake was dragging. Probably a stuck handbrake cable.
Bought a 36mm socket and brought out the big uggadugga gun.
Disassembled the wheel, loosened the shoe adjustors, got it spinning. But the pedal doesn't make it stop. Maybe seized cylinders, maybe swollen flex-line, maybe rotted hardlines, maybe seized MC? I'm working through it.
I added brake fluid, it was low but not dry (will bleed later).
Any "make sure you do X, Y, Z" stuff?
Do I need wheel bearings, new CVs, that kind of stuff?
---
Steering:
The steering is quite sloppy. Seems like I can rotate the wheel maybe 20 degrees before it does anything on either end. So then I checked up front:
Link
That's at least part of it.
Is it VW? (I have no idea what Ghia or other parts might have been subbed in over time).
Something to look into tightening up, to rebuild, or to throw away and replace?
---
Misc:
- I am an idiot and cannot figure out how to adjust the seat. Previous owner insists it's adjustable but it's been 22 years, somewhere under the front edge of the seat. There's no rod or lever I can see. Just upholstery and maybe a rail at the back.
Is this a normal VW handbrake? What are the two lever/knob things on either side of it for, what do they do? Is that the seat adjust? They don't seem to do anything:
- Is this a normal VW shifter?:
---
I had so many more questions but they've slipped my mind for now. |
|
| Back to top |
|
|
Letterman7
Samba Member
Joined: March 14, 2004
Posts: 3230
Location: Downingtown, PA
|
| Posted: Tue May 20, 2025 6:30 pm Post subject: Re: Bradley GTE Electric - Build thread and VW-related questions |
|
|
Looks like a Kaylor EV conversion. Interesting. Ok, first, VW's are pretty basic beasts. Let's start with the seats: If the factory rails are still there, chances are they are adjustable. You'll just have to dig around the front and sides to see if there is a lever. On many kits, seats are fixed in place.
The shifter and knobs: knobs on the outside of the handbrake are for the heater ducts, which you no longer have. The shifter mechanics look odd - I don't know what that metal bracket and spring is. Maybe a contact plate for the motor?
Brakes/drums etc...: When diving into a new project, I just replace everything - literally everything - brake related. It's gonna cost, but at least you know that everything is fresh if you plan on driving this a couple times a week. I don't trust anything with brake fluid in it that's been sitting.
Transaxle boots: yes, it's transmission fluid soaking those, or appears to be. They crack as they age, so plan on replacing those and replacing the transmission oil. It's not a hard job. There are "split" boots that make things a little easier. |
|
| Back to top |
|
|
EVfun 
Samba Member

Joined: April 01, 2012
Posts: 6152
Location: Seattle
|
| Posted: Wed May 21, 2025 11:33 am Post subject: Re: Bradley GTE Electric - Build thread and VW-related questions |
|
|
You don't have to know how to drive a stick shift to drive an EV with a stick shift. You can take off, and come to a complete stop, without using the clutch. The only time you will need to use it is to shift from 2nd gear to 3rd gear, and since the motor just freewheels when the throttle is released that doesn't require any grace. You will want to use 2nd gear around town and 3rd gear when it feels like 2nd is running out of the ability to accelerate. My EV buggy used a Prestolite MTC-4001 motor and Curtis 1221B controller with a 120 volt battery pack. That combo ran out of steam at about 40 mph in 2nd, third was good for about 65 mph, and 4th... well I hit 80 mph once.
_________________
| Wildthings wrote: |
| As a general rule, cheap parts are the most expensive parts you can buy. |
|
|
| Back to top |
|
|
MrGoodtunes
Samba Member
Joined: May 14, 2012
Posts: 1021
Location: South Florida
|
| Posted: Wed May 21, 2025 3:16 pm Post subject: Re: Bradley GTE Electric - Build thread and VW-related questions |
|
|
| BradleyGTE wrote: |
... I don't know how to drive stick.
Like, I know the theory, but, I've never actually moved a gear shifter. After some practice I discovered where reverse is (back and left, no lockout or having to push the stick inwards, maybe just have to go to 1st gear first? ...
- Is this a normal VW shifter?:
|
No, not stock; but yes, a normal aftermarket unit. To get into reverse from 1st, best to pull back into neutral before you pull left and further back. No need to push down as in stock shifter:
BTW - That spring-loaded screw-threaded little bolt in your picture allows you to adjust so as to have a good feel for pulling against that spring in order to get reverse as opposed to going straight into 2nd. A pic with info regarding this is here:
https://www.thesamba.com/vw/forum/viewtopic.php?p=9579336&highlight=#9579336 |
|
| Back to top |
|
|
BradleyGTE
Samba Member
Joined: May 20, 2025
Posts: 10
Location: Canada
|
| Posted: Thu May 22, 2025 10:55 am Post subject: Re: Bradley GTE Electric - Build thread and VW-related questions |
|
|
| Letterman7 wrote: |
| Looks like a Kaylor EV conversion. |
Never heard of them. Looks like they sold some conversion kits in the 70s-90s?
Basically, the DIY EV meta until, oh, 2012 or so was to take a forklift motor and slap it in a car. So, they'll all look the same. VW conversions are probably the most popular, and some whole shops basically still only do that. They stock parts to convert Beetles still.
This was a conversion from "factory", Bradley designed it this way.
| Quote: |
| If the factory rails are still there, chances are they are adjustable. You'll just have to dig around the front and sides to see if there is a lever. On many kits, seats are fixed in place. |
I'll take pictures. Then you can either say "I confirm the thing you need is missing" or "You are an idiot and the thing you need is right there and you didn't notice it."
| Quote: |
| The shifter and knobs: knobs on the outside of the handbrake are for the heater ducts, which you no longer have. |
Heater duct controls, on the handbrake? I would never in a million years have figured that out.
The duct story is interesting on this car. I have notes from the original owner who instructed the shop that built it (in Iowa) to NOT put the ductwork in. And fabrication notes that they didn't.
But the 2nd owner lived in the Pacific Northwest, and said the windshield would fog up all the time, so he added ducts, maybe the original ones it was supposed to have. And some kind of electric heater. But he only installed the defrosting vents at the windshield, not ones for the occupants. And to access it, it's waaaaaaaay in front of the front footwell.
I wonder if the cables are still attached and if I can repurpose the levers for something useful.
| Quote: |
| Brakes/drums etc...: When diving into a new project, I just replace everything - literally everything - brake related. It's gonna cost, but at least you know that everything is fresh if you plan on driving this a couple times a week. I don't trust anything with brake fluid in it that's been sitting. |
I went to bleed the brakes yesterday.
The pedal built pressure, as it always does. I barely got any fluid out, maybe a teaspoon. So I was pushing more firmly. Then it popped, and foot went to the floor, and there wasn't a lot of pressure after that. Dozens of pumps, no fluid came out, no leaks I can see.
I suspect what just happened is the seals on the Master Cylinder just shredded and it's slipping past the piston back and forth?
So now I maybe need a new MC, unless there's a rebuild kit, and the inner walls aren't too galled up.
Might be a good time to just switch to a Prius iBooster, there's probably room for it down there. It has a failsafe mode if it can't talk to a brain, it just defaults to working at a normal amount of brake boost.
*sigh*
I JUST WANT IT DRIVING. I DON'T WANT TO RESTORE ANOTHER CAR. THAT'S WHY I BOUGHT THIS CAR, IT WAS SUPPOSED TO BE MY SHORTEST PATH TO ACTUALLY DRIVING AN EV.
| MrGoodtunes wrote: |
| No, not stock; but yes, a normal aftermarket unit. To get into reverse from 1st, best to pull back into neutral before you pull left and further back. No need to push down as in stock shifter: |
This is the kind of advice I was really hoping to get here. Someone who can just take a glance and knows what I've got.
| Quote: |
| BTW - That spring-loaded screw-threaded little bolt in your picture allows you to adjust so as to have a good feel for pulling against that spring in order to get reverse as opposed to going straight into 2nd. A pic with info regarding this is here |
*applause*
Again, exactly the advice I needed. Someone who recalled there was a thread about it and could point me to exactly what I needed to know. Thank you for making my life a lot simpler.
[...]
Edited to add: Where should I shop for parts in Canada? We've currently got a 25% reciprocal tariff on US autoparts. Anyone ever heard of Canadians having a preferred shop? For US suppliers I hear good things about JBugs, anywhere else I should keep an eye on? |
|
| Back to top |
|
|
KAmes
Samba Member

Joined: February 16, 2014
Posts: 911
Location: Illinois
|
| Posted: Sat May 24, 2025 5:48 am Post subject: Re: Bradley GTE Electric - Build thread and VW-related questions |
|
|
| BradleyGTE wrote: |
Edited to add: Where should I shop for parts in Canada? We've currently got a 25% reciprocal tariff on US autoparts. Anyone ever heard of Canadians having a preferred shop? For US suppliers I hear good things about JBugs, anywhere else I should keep an eye on? |
I use cip1 quite a bit in the US, they run separate US and Canadian sites. https://www.cip1.ca/
That looks like a fun project! |
|
| Back to top |
|
|
BradleyGTE
Samba Member
Joined: May 20, 2025
Posts: 10
Location: Canada
|
| Posted: Sat May 24, 2025 12:33 pm Post subject: Re: Bradley GTE Electric - Build thread and VW-related questions |
|
|
A pretty specific question...
The Master Cylinder might be wrecked (more on that later).
This car has Ghia front discs (uncertain which year), and normal 1970 rear drums.
What replacement Master Cylinder should I get?
Someone told me that MCs that were built for front/rear drums, or front/rear discs, or front discs/rear drums will have different... I dunno, stuff in them to balance things correctly. Otherwise I might need a proportioning valve or a residual valve or something.
Is that true?
Basically, what should I buy, even if the previous one was incorrect? |
|
| Back to top |
|
|
BradleyGTE
Samba Member
Joined: May 20, 2025
Posts: 10
Location: Canada
|
| Posted: Sat May 24, 2025 5:02 pm Post subject: Re: Bradley GTE Electric - Build thread and VW-related questions |
|
|
More Brake work:
- To get to the master cylinder, I had to take off the cabin air intake, which was some corrogated tubing hoseclamped to.... galvanized water heater chimney pipe? This was part of the 2nd owner's modifications. If it works it works.
- Previous owner upgraded to front discs from a Karmen Ghia. Not sure what was involved in that, but, I suspect he re-routed (and mis-routed) the brake reservoir hoses to be under the tie rods, where it squeezes them and has abraded them nearly all the way through. Glad I dug in and caught this. Eventually I would've just... not had brake fluid.
- To get the master cylinder off, you have to disconnect it from the brake pedal in the footwell. This photo is deceptively spacious. What I'm showing is the farthest I can reach into the footwell, even with a screwdriver. I can't get my shoulders between the side of the car and the steering wheel, and I can't get my chest between the steering wheel and seat. So, having the turning stock in my ear was the farthest I could reach.
- I have to get the pushrod (red) slid sideways off its pin (yellow), but the return spring (blue) is blocking it. I am worried if I ever get that spring un-wound on that pin, I will never, ever, ever get it back on there with tension. Certainly not with only with the fingerips of only one hand. This isn't what the manual says it should be. It doesn't mention removing the spring. So instead I just unbolt (green) the master cylinder directly, barely.
- Blech.
- Well this needed doing anyways.
- I guess it comes apart and there's probably a couple pieces inside that make the brakes work? I've never done that before but as long as it's not a million little pieces, I'll just take it slow and be fine.
"I'LL JUST BUY AN EXISTING EV" I SAID. "THAT WAY I DON'T HAVE TO BUILD AN ENTIRE CAR" I SAID. "THIS WILL BE THE SHORTEST AND EASIEST PATH TO ME DRIVING AN EV" I SAID.
rage intensifies
- A couple places with some galling, but cup seals don't look wrecked.
- Honestly nothing too bad. Dirty, some rust, but nothing damaged.
- Let's clean and check the bore:
Honestly, the camera makes it look worse than it is. Feels smooth to my fingertip. Maybe a little pitting (or crust) on the ceiling on the left side there.
Maybe a little dip in the ultrasonic and a bottle brush in a drill could rescue it.
Or ~$65 for a new one to Canada.
I expected to find shredded seals and massive rust.
My current thoughts on why it stopped building pressure are that it sucked rust and crud in through the basins where the fluid reservoir enters, and once I'd started bleeding it jammed them up , or, maybe got air in it and it was squishing air. Tempted to clean it up and reassemble and see whether it holds pressure or if it feels like stepping on lightbulbs.
...
As above, the one thing I don't know is, since the 2nd owner upgraded to front discs, instead of drums front/rear, if this is even the correct master cylinder anymore, or whether I should be using an MC from a Ghia that was designed for Front Discs/Rear Drums. |
|
| Back to top |
|
|
BradleyGTE
Samba Member
Joined: May 20, 2025
Posts: 10
Location: Canada
|
| Posted: Fri May 30, 2025 4:05 pm Post subject: Re: Bradley GTE Electric - Build thread and VW-related questions |
|
|
Found a 1970 Beetle at the junkyard.
I grabbed a few bits and pieces. The dust cover plugs for the wheel backing plates. I'll grab an e-brake cable bracket since one of mine is broken.
I'm considering buying the rims ($33 each). Tires are trashed and free.
Not because I like these rims, but because I'm considering keeping a set of snow tires (I'm in Canada). Is that a dumb idea? Are these some weird non-Beetle rims someone slapped on so that it could roll to the yard?
Anything else I should consider grabbing when I go back for round 2? |
|
| Back to top |
|
|
Q-Dog
Samba Member

Joined: April 05, 2010
Posts: 8847
Location: Sunset, Louisiana
|
| Posted: Sat May 31, 2025 6:00 am Post subject: Re: Bradley GTE Electric - Build thread and VW-related questions |
|
|
That is a super beetle, so it is not a 1970 model. For the most part, everything from the A pillar back is the same as a standard Beetle. The rims look like original Beetle wheels, but some supers had different backspacing than standard Beetles, so pay attention to the backspacing if you are trying to match other stock wheels.
The thing hanging under the rear fender suggests this may have been an autostickshift, which should not matter to you unless you need the transmission.
_________________
Brian
'69 Dune Buggy
'69 Beetle Convertible
'70 Beetle |
|
| Back to top |
|
|
BradleyGTE
Samba Member
Joined: May 20, 2025
Posts: 10
Location: Canada
|
| Posted: Sat May 31, 2025 10:33 am Post subject: Re: Bradley GTE Electric - Build thread and VW-related questions |
|
|
| Q-Dog wrote: |
| That is a super beetle, so it is not a 1970 model. [...] The rims look like original Beetle wheels, but some supers had different backspacing than standard Beetles, so pay attention to the backspacing if you are trying to match other stock wheels. |
I looked this up and it said the super beetles have larger offsets, by about an inch. I thought this would be great, because the Bradley looks like it's wearing it's grandpa's trousers, but then I figured out that a higher offset means it narrows the track width, the opposite of what I want.
I grabbed the few bits I needed and left it at that. Thanks for the help. |
|
| Back to top |
|
|
BradleyGTE
Samba Member
Joined: May 20, 2025
Posts: 10
Location: Canada
|
| Posted: Sat Jun 14, 2025 3:27 pm Post subject: Re: Bradley GTE Electric - Build thread and VW-related questions |
|
|
I've been neglecting this thread. THE RULE OF FORUMS states that advice is not free, your payment is giving people updates so that they can see that their advice made a difference.
Braking Stuff:
- Bought a cheap $15 ultrasonic cleaner (for jewelry), to see if it'd help with smaller car parts. Ehn, pretty weak, not sure it made a difference.
- Mixed up some DIY Evaporust. (1L of water, 100g of citric acid, 63g of baking soda, splash of dawn dish soap). Soaked master cylinder.
(surface rusts in seconds because it's so perfectly clean).
- Reassembled it, lubed it with brake fluid. It works but, ehn, maybe sticks a little bit? Cup seals look good. Noted that I didn't disassemble the spring part on the secondary piston, ehn, fine...
Okay, had some rust on there, maybe wasn't sliding perfectly. I think I'll still reassemble and see if it holds pressure before I order everything else.
- What's that? BETTER JUST KEEP RESTORING A 50 YEAR OLD CAR? OKAY. I mean it's just brakes, shouldn't cut corner on brakes that've been sitting for 22 years in a humid state. I guess I'll just double check that the wheel cylinders are fine...
They're like $20 each. Probably just throw some in on my next order. But at least let's practice taking them apart...
Pistons look good. I can see pieces missing from the cups. Bores feel... I dunno, fine-ish. Fine on the outside. The inner part where the springs are that the pistons never reach might be a bit galled. I'll clean 'em up anyways, but, ehn, cheap, they'll probably just get replaced. Might as well. ("Might as well" is how a $2000 car becomes a $10,000 car... I know).
- Hey while we're at it, let's soak the rest of the brake hardware:
And we're done for brakes. Done disassembling anyway... of the rear brakes.
- Front wheels I can just barely move by twisting the discs. The master cylinder is gone, so that means either calipers are crusted tight, or the flex line is swollen tight. Or both. Calipers are like $100 each. Flex lines are like $10. fingerscrossed
- Front brakes are not from a VW Beetle (drums). They're from a Karmen Ghia (discs). What generation? Who knows, there were 3 generations and this doesn't match any of them. Looks like Varga aftermarket ones. Zinc-chromate plated. And pads look brand new (any guesses why on a series-wound DC motor? ... Foreshadowing...).
I dunno if I'll go further. The pistons retracted smoothly to their max (Whew, so it was just the flex lines that were swollen shut). I'm guessing the second owner bought these new when he did the front disc conversion in 1996, so, only 29 years old, not 55.
Done with brakes. So far.
...
- Just poking around down there, noticed the passenger MacPherson is... kinda... oily. sigh. It will not stop me from driving the car, so, it does not need to be addressed now. YOU HEAR ME CLASSIC CAR REBUILDERS? I DO NOT NEED TO DROP AND REBUILD THE ENTIRE FRONT AND REAR SUSPENSIONS (yet). I JUST WANT TO DRIVE MY CAR. THIS WAS SUPPOSED TO BE MY SHORTEST PATH TO DRIVING AN EV.
- While I'm under there with the wheels off... the wheel wells are downright CAVERNOUS. I'm not a small guy and I could easily climb into them. Up on the driver's side, the wiring harness casually passes between engine bay and, I dunno, dash or quarter panel. Maybe some bare wires there. No big deal.
- Passenger front wheelwell, has two access panels (driver's does too), and the panel isn't even placed high enough to cover the hole. Am I going to have to do fiberglass work here? (Answer: I better not).
- Upper ball-joint. Driver's side? Castle nut and cotter pin. Passenger side? Two castle nuts, no cotter pin. Well that's twice as good as only one castle nut!
- Look at this absolute dogsh!t wheelwell design. The wheel throws water... everywhere. "Everywhere" is normally just the wheelwell. There is none. Nothing is protected. The goddamn headlight bulb is open and accessible like 3" from the tire spray.
Likewise on the rear of the car...
The blue is a piece of styrofoam that protects the battery, otherwise the battery is like... right there. That angle iron is the tray it sits on.
Who engineered this BS? Was Bradley not aware of the concept of a wheel well? WHAT'S THAT? THEY JUST WANTED A CAR THAT LOOKED LIKE A FERARRI IN FRONT AND AN F-15 FIGHTER JET IN THE BACK AND DIDN'T CARE ABOUT ANYTHING ELSE? THEY WENT OUT OF BUSINESS 45 YEARS AGO YOU SAY? Oh okay. I guess I'm going to have to go to a salvage yard and rip 4 wheelwells out of an old civic or something small (suggestions for anyone who'd know where full coverage wells would be found?), and toss them in there. Which I guess means fiberglassing some bits of angle iron to the inner side of the fiberglass shell so I have something to bolt the wheelwell to.
- The passenger door doesn't lift or stay open unless you help it get all the way vertical. Took both spring shocks off, one feels weaker. Looked them up, they're SL 33 80. SL for Spring Lift, a defunct company (remnants bought and sold several times). 33 I'm not sure, but 80 means 80 lbs lift. Strongest I could find was one an inch too long, fatter, and even that's rated only 56 lbs. The old one I estimated around 40. So I have a very slight improvement. Doesn't lift but will stay up if angled a bit.
It compresses far enough (just barely), but I'll probably unscrew the ball cut it to length and re-thread the shaft. But not today, so then never.
Alternatively, I can probably buy one from a marine supply store. If I wanted to turn $200 into $20. Frankly, it's just the passenger.
- You cannot lock or unlock the car from inside the car. By design. This is not a car you let your kids play in while you shop, I guess.
The door popper (vertical, from above), plunges downwards and moves the metal tab, which releases the ratchet.
Yes, the hoseclamp is required. It's what rotates 180 degrees to contact the metal tab when you unlock the door (from the outside). I'm not sure if this is the 2nd owner's repair or mod, but, the door cards were out and disassembled.
I'd like to have a door lock accessible inside. I'd also like to have powered locks, maybe. No idea what might be compatible. Also, I'd have to sneak a wire up to the door hinge on the roof and then down inside the body, so, maybe not. Maybe power it off an 18650 built into the door, that I occasionally charge via cable. It's only locks. The "windows" that open are the size of a cheeseburger.
- Wheel cylinders cleaned up okay. Feels super smooth on the inside:
Cup seals, ehn. The ends are fine. The walls are pitted. Would they hold? Probably?
I guess it doesn't matter, if I'm placing an order I'm placing an order.
- Master cylinder remaining components came out of the bath clean.
It's hard for me to guess whether I need a new MC or not, and I can't really test it without everything else hooked up. And, shipping is so expensive I want to order it all at the same time. Hmm. |
|
| Back to top |
|
|
BradleyGTE
Samba Member
Joined: May 20, 2025
Posts: 10
Location: Canada
|
| Posted: Sat Jun 14, 2025 3:44 pm Post subject: Re: Bradley GTE Electric - Build thread and VW-related questions |
|
|
Brake Down:
- I ordered parts! A complete brake line kit, two rear drum flex hoses, two front Karmen Ghia disc hoses, two wheel cylinders. Calipers looked great so reusing those. No MC, I hope my master cylinder rebuild was good enough. If not, it'll be another order. Spent about $140 CAD, which is more than double what it would've been from the US, but, US suppliers wouldn't ship to Canada.
- Front hardlines don't match (a kit is either a classic Beetle or Ghia, not both), but the front lines looked a lot newer anyways.
- Now let's just take the brake hoses off. Looks pretty simple, you just... ... THE BRAKE LINES RUN THROUGH THE PASSENGER COMPARTMENT? WHY?
Great, so, I have to take the seats out, to get to the brake line. And then snake the whole damned thing through the entire car, twice, and it has multiple 90 degree bends at either end, outside of the interior.
- Seats out, and... Hey! The missing seat adjustor the previous owner swore was on the side of the seat. I thought he was gaslighting me, there was clearly no adjustor there. It's a block of plywood that wasn't even visible or reachable by hand with the seat installed. But it is in fact there:
- Lift up the carpet, and the brake line is....
... under the center console. Which is attached with two flat head wood screws at the back and then, I'm not sure, bolted to the dash in the front.
I HAVE TO DISASSEMBLE THE GODDAMN CAR TO CHANGE A BRAKE LINE?
I can't even see how to get to the bolts that hold it down.
I can maybe, just maybe, get to the clips that hold the brake line, by carefully prying away the sides of the center console.
But wait, the original fabricator has replaced the original brake line hose clips (which is just a flap of sheet metal folded over the line). Did they remove the old ones because they might eventually abrade and puncture the line? No, they appear to have ripped the sheet metal away with pliers, leaving jagged edges in contact with the lines. Then they replaced them all with new pieces of rubberized sheet metal held in with a screw, a half inch higher, that I can't get to. But what kind of a screw?
... a rivet. And it goes through BOTH SIDES of the sheet metal, forming a complete loop. So there's no way to remove it or pry it out of the way. This one I can see (it's in the footwell), the other 3 or 4 are completely inaccessible without disassembling the kit car itself.
TO CHANGE A BRAKE LINE!
Also I think I have to remove the entire pedal assembly, I can't see how I could possibly snake it through there. It follows something like this path underneath it all:
- While the seats were out, I noticed about 40 little perforations through the floorpan. Must've been for holding down carpet around the original seats or something. I guess while the seats are out I should just fire up the welder and tack all of those closed, right? Might as well, right? I'll later regret not doing it, right?
rage intensifies
...
The main brake line probably isn't rotted out, especially considering it's inside the car, right? Maybe I just flush it with Evaporust on a circulation for a half hour, and then leave it be? It won't be that corroded, without oxygen in there, right? Guys? Maybe? Then I won't have to disassemble the car to put the new brake line in?
...
Got the rest of the fittings off. Y'know, the ones outside the car, where brake lines belong. One snapped the tube instead of spinning the tube nut, but that's fine, I'm replacing it anyways:
...
I don't want to rebuild a volkswagen. I just want to drive my car.
...
One other stray thought. The junkyard had that superbeetle there. I was looking at the seats, and the space behind the seats in the GTE, and, I can't think of why they didn't leave seats in the back. They built this giant high shelf over the rear suspension for no apparent reason. I'm half thinking of sawzalling the seat base out of the Beetle, cutting away the fiberglass in the rear of the GTE, and at least letting child-sized seats go in the back (now that I can move the seats forward maybe). It's just a bit weird to be only able to drive one person around at a time. All my friends have kids.
Could use some advice, kit-builders, if that's feasible, or even a good idea or not. |
|
| Back to top |
|
|
Letterman7
Samba Member
Joined: March 14, 2004
Posts: 3230
Location: Downingtown, PA
|
| Posted: Sun Jun 15, 2025 3:09 pm Post subject: Re: Bradley GTE Electric - Build thread and VW-related questions |
|
|
Obviously you've never worked on a VW before. Yes, brakelines have always run through the interior of the car. Why, I've never understood either except maybe it was for protection from the elements. If it isn't broke, don't fix it. If there isn't any obvious signs of corrosion on the main line, let it alone. If there is, then you can just cut it into sections and pull it out of the clamps. Those clamps are just that - clamps. Not full circle. And yes, it looks like a p.o. cut the OE clapms away, which are usually welded in place. If you want to run the new line outside of the passenger compartment, you can. I've done that on a number of my kits. Bring it down under the m/c though one of the holes and straight back, clamping it to the tunnel bottom.
As for cutting away fiberglass to make room for a seat.. yeah, don't do that. That "giant shelf" is a structural member for your car. Cut that away and the only thing supporting the rear are the side pieces. You'll crack the fiberglass in weeks. |
|
| Back to top |
|
|
BradleyGTE
Samba Member
Joined: May 20, 2025
Posts: 10
Location: Canada
|
| Posted: Sun Jun 15, 2025 10:39 pm Post subject: Re: Bradley GTE Electric - Build thread and VW-related questions |
|
|
| Letterman7 wrote: |
| Obviously you've never worked on a VW before. |
I've hardly worked on any vehicle before. A VW, correct, never. Never even driven or been inside one.
| Quote: |
| If there isn't any obvious signs of corrosion on the main line, let it alone. |
I really don't want this to be "ask for opinions until you get 15 or 20, by which point someone will have endorsed the same thing you were wishing someone would recommend to you, and now you can justify it as a good decision because someone suggested it". But... it is nice to hear you suggest the thing I was hoping you'd suggest.
I've heard "never take chances with brakes, replace everything", and "you've already got the lines, don't be lazy, rip it all out", and "No, they were run that specific place for a reason, don't change it". Also all good advice.
I'm most tempted to run brake cleaner through the main line and see if looks like a diaper blowout. If not, leave well enough alone.
| Quote: |
| Those clamps are just that - clamps. Not full circle. |
OEM clamps, correct, just folded around the line. The replacement ones? Nope. Both layers of sheet metal are pinned with those rivets.
If I do replace the line I'll probably just cut one layer of the sheet and turn it into the folded kind.
| Quote: |
| As for cutting away fiberglass to make room for a seat.. yeah, don't do that. That "giant shelf" is a structural member for your car. Cut that away and the only thing supporting the rear are the side pieces. You'll crack the fiberglass in weeks. |
Good to know.
I was thinking, cut fiberglass, restore sheet metal seat, then reattach metal to fiberglass higher up. What's the difference? Ohh... I get it, the tall vertical is beam/bulkhead. The original beetle would've had other structure there, but this doesn't, and I can't turn a 10" vertical into a 3" vertical and retain the strength. |
|
| Back to top |
|
|
|


