| Author |
Message |
MV Seamus
Samba Member
Joined: May 02, 2025
Posts: 12
Location: WV

|
 Posted: Wed May 14, 2025 11:15 am Post subject: Sunny Syncro Thread Posted: Wed May 14, 2025 11:15 am Post subject: Sunny Syncro Thread |
 |
|
Hello all! I (not so) recently acquired a Vanagon Syncro and have decided to start a thread to document all my work. Hopefully it will be useful for others, and maybe I can learn a thing or two from the more seasoned folks.
I purchased this van in great condition as it is essentially rust free and already had a Bostig engine conversion. To my knowledge, it was originally a west coast van from Oregan, and the previous owner purchased and brought it to PA around 2012. The previous owner maintained the van very well and clearly never drove it during the winter. I believe the Bostig conversion primarily was done with an early version of the kit (V2 G6), but it looks like there are some things that were updated after the initial installation.
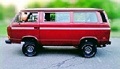
The van is a 1987 sunroof Syncro with a Westy interior. I realized I don’t even have any good shots of the van in action yet. So enjoy this mediocre picture for now.
My goal is to make the van as reliable as possible so I am able to travel long distances. I won’t be permanently living in the van, but I work remotely so I plan to take weeks/month long trips around the US. I know these vans are not known for being reliable. I am not in denial about that, and I have no issue with occasional excitement (aka breakdowns). However, I am fairly mechanically inclined so I am confident that I will be able to make it reliable enough for my needs.
I am starting this thread a little late – I have already been working on the van and have made quite a bit of progress. I am going to start this thread out by documenting what I have already done to the van. Once I get caught up, I will do my best to stay up to date.
I am going to upload this piecemeal to make it a bit more digestible. Here is a quick “Table of Contents” if you will:
• Routine maintenance (engine oil change, transaxle & diff oil change, coolant flush)
• Headliner removal
• Sunroof tune-up
• PCV issues
• Bostig conversion intake upgrade & ECU relocation
• Rear disc brake conversion and drivetrain upgrades
• New/upgraded Bostig conversion motor mounts
Stay tuned!
Last edited by MV Seamus on Wed May 14, 2025 12:10 pm; edited 1 time in total |
|
| Back to top |
|
 |
MV Seamus
Samba Member
Joined: May 02, 2025
Posts: 12
Location: WV
|
| Posted: Wed May 14, 2025 11:20 am Post subject: Re: Sunny Syncro Thread |
|
|
Routine Maintenance
The first things I did to the van were just routine maintenance activities. The previous owner hadn’t driven the van much in the last two or so years, so I wanted to get fresh fluids in everything.
First step was changing the engine oil. My Zetec engine has the high-capacity oil pan installed along with the extremely beefy skid plate. This makes it a little awkward to drain the oil as the drain plug drains the oil directly into the skid plate. But it’s a pretty simple fix to avoid making a mess. I just grabbed an old “Posted” sign and used it as a funnel. Any old piece of thin/flexible plastic will work for this (sorry for the poor quality photo, but you get the gist).
I refilled the engine with full synthetic 10W-40 oil. From my understanding, the Zetec engine originally called for 5W-30, and was later updated to 5W-20. However, Jim recommended 10W-40 in the actual conversion manual so that is what I went with.
Next up was the transaxle and front differential fluid. These are pretty straightforward – the only potential challenge is finding/accessing the fill plugs. Just make sure you remove the fill plugs BEFORE you drain the fluid; otherwise, you may be stuck with a dry transaxle.
While doing this I replaced both fill plugs with external 17mm hex plugs from Gowesty. Both for better ease of use and for the additional magnet.
I refilled both the transaxle and front diff with SWEPCO 202. I did a lot of research here on the Samba and I can confidently say I am happy with the results. Before changing the gear oil, shifting from 1st to 2nd and from 3rd to 4th would sometimes grind. The grind pretty much went away once the gear oil warmed up, but after filling with SWEPCO 202 the grinding is 99% gone even when the gear oil is not warmed up.
I also replaced the spark plugs and wires just to be thorough. The plugs appeared to be in fine shape which I expected.
I flushed the entire coolant system with Thermocure as I have heard good things about it. Overall, flushing the system was pretty simple. The first step is to pop off the upper and lower grille to get access to the bleed valve and where coolant hoses connect to the radiator.
Based on advice from the samba (and common sense considering the position of the radiator bleed valve) I parked the van on a steep hill with the front facing down. This helps with draining and refilling the coolant system.
I drained the system by removing both hoses from the radiator. I also attached a shop vac to the coolant lines to help suck out as much coolant as possible. Then I repeatedly refilled the coolant reservoir until the coolant lines drained completely clear (make sure to always use distilled water for flushing/filling the coolant system).
I then filled it up with the correct amount of thermocure (one bottle) and drove it for a couple days/ hundred miles. After that, I redid the flush process a few more times until I was satisfied that all the thermocure was out of the system, and finally filled it up with the proper coolant mixture.
I never had any trouble getting the coolant system bled and refilled. I think the most important thing is to make sure the van is parked so that the radiator bleed valve is below the height of the coolant fill reservoir. Once it’s parked downhill, simply fill the system until the fill reservoir is full, then bleed the radiator until a steady stream of coolant begins to come out of the bleed valve. Top off the coolant reservoir again, and then go drive around for a while. You may need to top off the reservoir one or two more times so just keep an eye on it.
Just a side note – my van does not have a rear heater core. It’s possible that having one might make refilling a little tougher, but I think the procedure should still work.
It probably wasn’t necessary to flush the coolant, but it is nice peace of mind to know that the system is clean.
After doing all this maintenance I decided it was time to start enjoying the van. I took it out on several trips and thoroughly enjoyed every one (and my dog loves it as well).
But, driving it did bring forward a few more concerns. The first issue was vibration and noise at certain rpm’s/speeds. I wasn’t sure what the source was, but it sounded and felt like it was coming from the driveshaft. The second was the amount of wind and road noise in the cockpit of the van. Together, these made for a somewhat unpleasant driving experience at speeds greater than about 45 mph. I didn’t expect it to drive like a BMW, but I wanted to make sure it was reasonably quiet so I can comfortably drive long distances.
I didn’t take any immediate action on these issues since it wasn’t a huge deal for local trips. I was trying to pinpoint the source so I could fix it, until one day I pulled into a campsite and was suddenly unable to get the van into reverse. Fortunately, I was already at camp, so we just pushed the van into our spot and decided to deal with it in the morning.
The next morning inevitably arrived, and I crawled under the van to inspect the linkage. I knew it wasn’t a transmission issue as it was shifting fine just before getting to camp. It was also only shifting into 3rd and 4th gear which made me think that, for some reason or another, the linkage was not translating side to side movement of the shifter.
I couldn’t see anything immediately wrong with the linkage, and home wasn’t too far away, so I decided to just drive it home. It was a bit of a challenge starting out in third gear, but fortunately there weren’t too many places where I “had” to stop.
As luck would have it, I made it all the way to my driveway before the shifter decided to completely fall apart. My driveway is a steep hill, so I tried to maintain momentum to make it up. But third gear simply wasn’t going to cut it, so I backed down to a wide spot where I could park the van out of the way. Literally as I was backing in to park, the shift lever went completely limp and had clearly disconnected from the linkage entirely. I crawled under the van and sure enough, the bolt that connected the shift rod to the linkage, inside the box under the front of the van, had come loose and fallen out. I managed to find the bolt, but the nut was lost.
I cleaned up everything and then went to Lowes to get a replacement nut (nylock this time). After regreasing and putting everything back together it shifted perfectly.
This made me realize that I should address the vibration issue sooner than later, since it seemingly caused my shifter linkage to shake apart. So, I went ahead and pulled the driveshaft out to see how that would impact things. It was immediately obvious that both U-joints were bad – they were extremely crusty and stiff. Upon further research, I realized that the stock driveshaft had U-joints which are not serviceable/hardly worth the effort to replace (weird decision VW?), so I ordered a new driveshaft from van café.
The driveshaft was definitely the largest contributor to the vibration issue, but after driving without the driveshaft I noticed that there was still some vibration present. It was coming from the motor at RPMs between 4-5k. I decided the first step to address it would be new motor mounts and potentially addition of the third rear motor mount that Jim sells for the Bostig conversion. But, I didn’t feel like doing that yet, so I decided to just use the van without the driveshaft for a while. |
|
| Back to top |
|
|
MV Seamus
Samba Member
Joined: May 02, 2025
Posts: 12
Location: WV
|
| Posted: Wed May 14, 2025 11:26 am Post subject: Re: Sunny Syncro Thread |
|
|
Headliner removal
The next thing on my list was to fix up the headliner. The headliner was relatively new, but it was installed a bit sloppily. I decided to just rip the whole thing out. It wasn’t too bad to get it out, but it did reveal lots of old adhesive and insulation that I wasn’t too keen on. Cleaning up all this was an absolute pain in the rear. I went through a lot of different products to clean up the adhesive but ultimately settled on goo gone. Here is a list of what I tried and some notes on efficacy:
• 3M adhesive remover: worked very well but also stripped the paint
• Acetone: did not work well; still stripped the paint
• Iso alcohol: did not work well; did not strip the paint
• Goo gone: Worked reasonably well; did not strip the paint
Time and heat are your friends here. With goo gone, I found that you the best method was to spray a small area to work on and let it sit for several minutes to absorb into the adhesive gunk. Then, scrub thoroughly with shop towels and repeat until it is clean. Doing it on a hot day helped as it seemed to work better when the metal was warm.
Removing the insulation from the roof was equally painful. I have no idea what the stuff was made of, but it seemed nasty and created quite a bit of dust. So, I opened all the doors, ran a fan, and wore a respirator when I was working on it.
The first thing I did was rip out as much as I could by hand. You can pull a good bit of it off in a sheet if you do it slowly and gently. I then aggressively scrubbed it with the shop vac hose until I had removed as much as I could. Lastly, I went over it several times with a brass brush to sand it down as much as possible.
I tried all of the adhesive removers I mentioned before, but none were effective. I also tried steel brushes and sandpaper, but these scratched the paint which I wanted to avoid.
All this combined removed about 90 percent of the insulation. All that was left was a thin layer of extremely hard insulation/adhesive and I decided that was good enough. I think I came across a post that said steam cleaning worked well to remove the final layer, but I did not have the equipment or motivation to try this.
I then cleaned the surface with alcohol and covered the panels with Resonix CLD for sound deadening. My plan is to cover it with CLD and then a layer of insulation.
I haven’t decided what type of insulation I am going to use, or how I am going to do the headliner. I was thinking of using some type of veneer for the headliner. If anyone has any ideas, I am open to suggestions! |
|
| Back to top |
|
|
MV Seamus
Samba Member
Joined: May 02, 2025
Posts: 12
Location: WV
|
| Posted: Wed May 14, 2025 11:28 am Post subject: Re: Sunny Syncro Thread |
|
|
Sunroof tune-up
While working on the roof I realized that the cloth headliner on the sunroof looked pretty tired and unsightly as well. I decided it would be as good a time as any to take it apart and clean it up.
There are a couple of good threads about the Vanagon sunroof, and the Bentley also has pretty detailed instructions for removal/disassembly. I am not going to repeat all of that but here are the resources I used:
• https://www.thesamba.com/vw/forum/viewtopic.php?t=604183&postorder=asc
• https://www.thesamba.com/vw/forum/viewtopic.php?p=7081536
• Bentley manual
I thoroughly cleaned all of the sunroof parts including the rails, sliders, and cables, and regreased it with what I believe is factory VW grease for this type of sunroof. After aligning everything, this made a huge difference, and the sunroof operates MUCH smoother now.
Then it was finally time to get back on the road! We went on a weekend trip to a state forest that is a few hours away and the van did great, until we were about to leave. While sitting in a parking lot the van suddenly started to bog down and idle erratically. I could keep it running by feathering the throttle but, If I did nothing, the engine would eventually bog down and die. After a few minutes, the check engine light also came on. |
|
| Back to top |
|
|
MV Seamus
Samba Member
Joined: May 02, 2025
Posts: 12
Location: WV
|
| Posted: Wed May 14, 2025 11:31 am Post subject: Re: Sunny Syncro Thread |
|
|
PCV Issues
I had no clue what the issue was, but the van seemed to run fine while driving and we made it home without any issues. I started investigating the idle issue and the fault code was P0320. One of the first things that popped up as a cause was a faulty crankshaft position sensor. Interestingly enough, the van has had an intermittent issue where the engine will crank forever but won’t start. The only way to get it to start is to unplug/replug the CKP sensor. The previous owner had actually told me about this and said he could never find the source of the problem.
It seemed like more than a coincidence, so I thought the CKP sensor was likely the source of the issue. Unfortunately, it was not. After replacing the sensor I still had the idle issue. I then started digging around looking for vacuum leaks since this seemed to be the next most likely source; especially since the issue was only during idle. Lo and behold I came across a disintegrated PCV hose.
It looks like the hose had deteriorated from heat exposure. It is right next to the exhaust manifold, so I am not too surprised. I went ahead and replaced both the hose and the PCV valve.
I also realized that the other PCV hose was loose on the fitting. As in, you could literally slide it on/off the nipple with ease. I was able to find a silicone version of this hose and I added a hose clamp to both ends to secure it (The new hose is the red one).
This fixed the issue entirely. It also made the van run much better – I’m sure this has been an issue since I’ve owned the van, so I never knew how it was actually supposed to run until I fixed this. I would highly encourage anyone with a bosting conversion to check the PCV valve and hoses to make sure they are in good condition and free of any leaks. The small elbow connected to the PCV valve seems especially susceptible to degradation due to heat from the exhaust manifold.
While replacing the CKP sensor and digging around for vacuum leaks I realized that the wiring harness was in rough shape, as parts of it had been melted by heat from the exhaust manifold. I guess I should also mention that I still had the intermittent starting issue, so I decided to just pull the whole wiring harness and splice in new connectors to repair the sections that had been damaged/melted. I replaced the CKP sensor and the O2 sensor connectors, since they both had been damaged. I also took the time to organize and clean up all the wiring to satisfy my OCD.
Miraculously enough, this resolved the intermittent starting issue. No longer do I randomly have to crawl on the ground to unplug and replug the CKP sensor! |
|
| Back to top |
|
|
WestyandaSprinter
Samba Member
Joined: February 14, 2023
Posts: 29
Location: California
|
| Posted: Wed May 14, 2025 11:32 am Post subject: Re: Sunny Syncro Thread |
|
|
Is this your syncro? Great youtube videos from the Previous Owner if so.
Link
|
|
| Back to top |
|
|
MV Seamus
Samba Member
Joined: May 02, 2025
Posts: 12
Location: WV
|
| Posted: Wed May 14, 2025 11:35 am Post subject: Re: Sunny Syncro Thread |
|
|
Bostig conversion intake upgrade & ECU relocation
While I had the wiring harness pulled, I decided to relocate the ECU so I could upgrade my intake to the newest version. My ECU was currently behind the driver’s side taillight. Since my wiring harness is older, I didn’t have the length to relocate it under the bench seat like the current Bostig setup does, so I decided to put it underneath my rear cabinet. I actually really like this location as it is totally protected, out of the way, and will allow me to easily wire up an ultragauge.
Anyways, my engine still utilized the old intake setup that wrapped around the back of the engine and had the intake on the exhaust side. I didn’t like this setup for many reasons, so I bought the kit from Bostig to upgrade to the newest intake setup.
Installing the new intake was pretty simple. The only part that was a little difficult was installing the new throttle cable, but the instructions were pretty clear.
The intake upgrade along with fixing the PCV system really improved the performance of the engine. It now idles perfectly, and the throttle response and power improved significantly. Granted, most of it is probably due to fixing a vacuum leak, but it sure is nice to feel the results of my work! |
|
| Back to top |
|
|
MV Seamus
Samba Member
Joined: May 02, 2025
Posts: 12
Location: WV
|
| Posted: Wed May 14, 2025 11:37 am Post subject: Re: Sunny Syncro Thread |
|
|
| WestyandaSprinter wrote: |
Is this your syncro? Great youtube videos from the Previous Owner if so.
Link
|
Sure is! And yeah, Craig has put out a ton of good videos on Syncros. Nice to know the van was in good hands. |
|
| Back to top |
|
|
MV Seamus
Samba Member
Joined: May 02, 2025
Posts: 12
Location: WV
|
| Posted: Wed May 14, 2025 11:51 am Post subject: Re: Sunny Syncro Thread |
|
|
Rear disc brake conversion and drivetrain upgrades
By the time I had finished all this it was late fall and WV decided to cake the roads in salt. So, I moved the van into the garage in anticipation of some more projects. My main goal was to install a rear disc brake conversion kit. Over the summer there were several situations where my brakes started to overheat and fade while going down a massive hill. The front discs held on just fine (they are already upgraded to G60s), but I didn’t like the idea of worrying about my brakes overheating. It’s pretty much impossible to avoid hills in WV, so I decided to just swap to disc brakes in the rear too.
I found a barely used Burley rear disc brake conversion kit for a pretty good discount and decided I might as well get new bearing housings and wheel bearings as well. I followed the video from ThatBaldwinLife and it served as an excellent resource. Overall, the conversion wasn’t terribly difficult.
However, I inevitably found other things to fix while I was working on the brakes. I pulled the axles out and decided I may as well rebuild the CV joints. Then, I ultimately decided to just upgrade to 930s (I know, completely unnecessary, but I wanted to anyways). I also realized that the transaxle drive flanges were leaking, so I installed new seals. Last but not least, I decided to refurbish the trailing arms and make them look pretty.
It was a major project, but here are some snapshots from it.
Drums and bearing housing removed.
Old bearing housing and axle
I found some pitting on the outer cage of the CV joints. Nothing too bad, I kept them to have as spares for the front.
New bearing housings with the bearings and seals pressed in.
I cleaned up the trailing arms with various tools. An angle grinder with sanding discs, wire wheel on a drill, sandpaper, etc. I will say that this took a massive amount of time and effort to get these cleaned up (and now I want to purchase a sand blaster). Probably not worth it but it is a labor of love I suppose.
I started with two solid coats of a 2k epoxy primer and let that cure for about a week. I then scuffed it up with 80 grit sandpaper and applied two coats of 2k urethane primer. I let that cure for another week and then scuffed it again with 80 grit. Finally, I put on three thin coats of Durabak-18 bedliner, waiting about 3 hours between each coat.
It seems to have turned out really well. The Durabak feels extremely tough and durable, but time will tell.
I also refurbished the parts from the rear disc brake kit since they were used. They were in pretty good shape though and cleaned up nicely. I just used Rustoleum epoxy primer and paint for these.
Here are the hubs after hitting them with the wire wheel and prepping them for paint.
And here are the caliper adapter brackets after cleaning them up.
And finally, here are the hubs and brackets after painting (ignore the trailing arms here, this was before I applied the Durabak).
Next up was changing out the transaxle drive flange seals (and upgrading to 930 flanges).
The first step was to remove the retaining circlip. It can be a bit of a nuisance, but it wasn’t too bad to get out with a pair of circlip pliers and a small flathead screwdriver.
It seems like the flange should then just slide right off, but one of mine was solidly stuck on. I ended up getting the VW Drive Flange Oil Seal Remover / Installer Tool (VW 391) which made it easy to pull off. You could easily fashion something up yourself, but this tool has come in handy several times now so it’s well worth the 100 bucks in my opinion. Once you get the flange off, you’ll see the plastic lock ring held on by two Philips heads.
The screws and plastic locking rings were pretty grungy. I grabbed an impact and popped the screws out as I was afraid I would strip them with a screwdriver. I tried several ways to pull the old seals out. What ended up working for me was a small cat’s paw. I used it to pry the seal and slowly rotated it to help unseat the seal. This worked surprisingly well, and I managed to pop both seals out without much fuss.
I went ahead and ordered new plastic rings, screws, circlips, etc. just to clean things up. Here are all the part numbers:
• Circlip for CV Joint Flange: 014-311-317
• Transmission Side Locking Plate: 091-301-197
• Washer plate for Side Lock: 113-301-195
• Philips screw for Side Lock: N-090-173-3
I got all these parts from Weddle, but there are plenty of other suppliers as well.
Next up was figuring out how to press in the new seals. I got everything nice and clean first to make sure no grime got in the seal.
I ended up using the puller tool I mentioned earlier (VW 391) and fabbed up some custom rings to press the seal back in. For the “custom rings” I just traced the seal and cut wooden donuts out of 5/8 plywood. I cut several rings for the spacers, and then cut one ring with a smaller center hole to use as the “backing plate.” The backing plate with the smaller center hole was tight against the nut on the puller tool, so when I tightened the nut, it would press the seal in until it was flush. This made the job extremely easy. If you don’t have/want to buy the tool you could accomplish the exact same with the right size bolt, nut, and washers (and still use the same wooden rings). I prefer this method vs hammering the seal in as it is much smoother and less likely to damage the seal. Would be a shame to damage the seal during installation and waste all that hard work…
Here are the wooden spacers. I cut out 4 spacers (top) and one backing plate (bottom). However, I only ended up using two of the four spacers.
This is how I set up the tool. The backing plate is on the left side, seated against the nut.
This shows how the tool is set up for pressing the seal in. First, start the seal by hand so it stays in place. Then, make sure you have the backing plate and spacers set up correctly on the VW tool. You can then thread the tool into the end of the transaxle output stub and start tightening down the nut.
Grab a wrench and continue tightening the nut until the seal is fully seated.
Voila, the seal is now installed.
Install the plastic locking ring.
And finally, the 930 flange.
Installing the circlip that retains the trans side CV flange proved to be a bit challenging due to the design of my circlip pliers. Unfortunately, the circlip does not have holes for the pins on circlip pliers. I tried using the flat part of my pliers, but then the pins protruded too far out and blocked me from getting the circlip seated. So, I ended up chopping those pins off my pliers so I could use the flat end and had room to fit the circlip.
You can see the pins that prevented me from installing the circlip.
So, I just chopped them off with a hacksaw and then I was able to get the circlip fully seated.
The rear disc conversion requires longer wheel studs. I don’t have a hydraulic press, so I used some washers, a lug nut, and an impact wrench to pull the wheel studs in. It is a very easy way to install these if you don’t have a press.
From this point it was pretty much just a matter of bolting things together. I put new bushings in the trailing arms (Urethane bushings from burley) and bolted them back up to the van. The bushings come in two halves, so they are very easy to install. Getting the old ones out was a bit difficult. I ended up just drilling them out until enough material was removed that they could be hammered out.
I also got all new hardware from T3 Technique – trailing arm bolts, bearing housing bolts, lower and upper shock bolts, and spring perch pads (I like to be kind to my future self).
For some reason the Burley rear disc kit does not come with dust shields, so I bought a set from GoWesty. I thought I might need to modify them a bit to fit, but it turns out they fit perfectly with the burley kit too. So, if you have the burley kit and need dust shields, look no further!
|
|
| Back to top |
|
|
MV Seamus
Samba Member
Joined: May 02, 2025
Posts: 12
Location: WV
|
| Posted: Wed May 14, 2025 11:56 am Post subject: Re: Sunny Syncro Thread |
|
|
New/upgraded Bostig conversion motor mounts
As I mentioned earlier, there were some NVH concerns that I wanted to address, and I thought the motor mounts would be a big help. The first thing I did was install the two new side motor mounts. It was a little tight to access the bolts to remove and install the mounts, but it is certainly doable with a little creativity. Obviously use a jack to support the motor. I accessed the passenger side mount bolts through the engine bay from above the motor, and accessed the driver side mount bolts from underneath the van. For the passenger side I did have to disconnect a coolant hose to get good access to the bolts.
I then installed the third rear mount. This one wasn’t as bad as I feared since I already had a skid plate installed. Having the skid plate allowed me to use the same mounting holes rather than have to drill new holes. However, after mocking up the fit I realized that the mount and serpentine belt were too close for comfort. There is a little adjustment room available, but I decided to file down the motor mount to increase the clearance. I believe it is aluminum, so it was very easy to file down.
I also cut out a small portion of the van frame around the license plate hole to make more room for the mount. I used a small hacksaw for this, smoothed it up with a metal file, and then hit it with some touch up paint.
I will say, the upgraded motor mounts and third rear mount seem to have made a huge improvement in NVH. The vibration issues I had have been completely resolved and the van is SO MUCH MORE COMFORTABLE to drive. That said, I made a lot of changes all at once, so it is hard to isolate the individual impact of each upgrade. But I would absolutely recommend upgrading the mounts and/or adding the third rear mount if you are having any NVH issues.
There we go, I think I have finally caught up. I apologize for the long post; I am going to try to make regular updates, so I don’t have to write a novel every time (and so you don’t have to read it)! However, I am planning on driving the van this summer to enjoy all my hard work, so hopefully I won’t be posting about too many projects.
Anyways, here is one final picture (I saved the best for last). You can see the refurbished trailing arm, new 930 axle, disc brake, and new motor mount all in one shot! Beautiful!
I will say – despite how long this post is – it is actually quite an abbreviated version. If anyone is working on the same or similar projects feel free to drop any questions and I would be happy to provide additional details and pictures. I have plenty more! |
|
| Back to top |
|
|
MV Seamus
Samba Member
Joined: May 02, 2025
Posts: 12
Location: WV
|
| Posted: Wed May 14, 2025 12:02 pm Post subject: Re: Sunny Syncro Thread |
|
|
To wrap things up I have a couple of questions for you folks.
The first one is about the headliner. I am not a big fan of the stock cloth headliner and I also don’t want to attempt to install one myself. Has anyone found a good material for the headliner? Or made a headliner out of something like birch veneer? Just curious to hear what others have done.
Second – when I upgraded to 930 axles I had to remove the gearbox output speed sensor. On the stock CVs it consisted of a toothed tone ring that was mounted to the trans side CV joint (see picture).
And the sensor itself was mounted via a bracket on the transaxle
As you can see, the 930 CVs are too large to fit the tone ring and sensor mount. Has anyone come up with a crafty solution to mount this to 930 CVs? Worst case scenario, I suppose I could splice in a length of wire and install it on the front CV. |
|
| Back to top |
|
|
Sodo
Samba Member

Joined: July 06, 2007
Posts: 10527
Location: Western WA
|
| Posted: Wed May 14, 2025 1:49 pm Post subject: Re: Sunny Syncro Thread |
|
|
Syncro Driveshaft vibration is a fairly "identifiable" resonance that comes in at ~45mph and leaves at ~50.
Driveshaft vibration will ruin the nosecone on the gearbox. They are NLA, and good used nosecone can cost $1000.
Unbolt the driveshaft immediately if you have the characteric vibration at 45-50mph. (45-50 is for a USA van with 4.86 gearing, it's @40-45mph for 5.43 gearing). And don't sustain 45-50mph if you have this vibration. Imbalance is never good, but it informs you when it's "the worst".
Vibration at 55-60 can be the front differential bearings getting loose. Its not as pronounced as the driveline
The Viscous coupler can leak silicone fluid into the gear oil somewhere between 100k and 200k miles.
The silicone fluid 'ruins' your gear oil.
Many miles with ruined gear oil ruins the pinion and carrier bearings,
which then ruins the (NLA) ring & pinion.
It's practically a Vanagon custom to "forget" maintaining the gearboxes, i think because the VW owners manual says you don't have to do it. And (in the Bentley repair manual) the service intervals all end at the 90,000 vehicle lifetime.
Consequently most Vanagon gearbox plugs come out for the first time after the gearbox is making noise (in hospice  ) )
Non-maintenance becomes double-risky on a Syncro.
A Syncro has a 'skid bar' that totally covers the gearbox drain plug, offering somewhat unnecessary rock protection on the outside....
that further impedes maintenance to the inside.
It's not good. Nobody ever breaks the outside but now you can't just replace bearings, syncros, seals and hubs. You need to buy new shafts and gears too, and only aftermarket are available.
And the front diff is assumed to last forever, for various reasons (perhaps valid), except the assumption doesn't take into account the VC leaking and degrading the lubricant.
If your front drain magnet has a "black coating" then your VC has leaked into your oil, so shed a tear if it's been a long interval, because new front R&Ps are "NLA".
Should change the front diff oil often for that reason. It's only $20 of oil to keep clean.
For the front diff it makes some sense to choose a "clearish" oil that's easily inspectable for blackening.
If you have the Bentley repair manual on .pdf you can search and confirm there is not even one word about changing gear oil on Vanagons. I suspect the procedure was prohibited by VW. The owners manual stated that "gear oil need not be changed".
I made this in 2022, 31 years after the last Syncro was produced.
It's un-edited, because nobody has offerred any critique.
I don't even know if anyone even uses it, but you might find some useful info.
==================
===== Simplified ==========
Drain both gearboxes on the level FIRST.
There are 'features' inside each gearbox to retain oil at the front for extended uphill driving.
These features prevent a quick drain, so allow a couple hours (?).
Then drive the front up onto ramps and continue draining/dripping "for awhile".
=========
I don't know if it takes 20 minutes or 2 hours longer, but the drain flow reduces to a trickle which goes on "for awhile". But just reducing to 'drips' doesn't mean it's done. I've done a basic drain, then put a glass jar under for 'the drips' and I think I recall 2/3 quart "of drips" over a few hours.
In the front (level) gearbox there's a little oil withheld because the drain outlet is above the bottom, and you may want to get that out if you suspect there's silicone fluid contaminating the remaining oil.
OK there's some stuff to worry about now that you're a Syncro nut 
Don't worry, there's more !!
_________________
'90 Westy EJ25, NEW oil rings (!) 2Peloquins, 3knobs, pressure-oiled GT mainshaft, filtered, cooled gearbox
'87 Tintop w 47k 53k, '12 SmallCar EJ25, cooled filtered gearbox
....KTMs, GasGas, SPOT mtb
Last edited by Sodo on Thu May 15, 2025 11:51 am; edited 9 times in total |
|
| Back to top |
|
|
sanchius 
Samba Member

Joined: May 03, 2007
Posts: 1550
Location: IN
|
| Posted: Thu May 15, 2025 2:47 am Post subject: Re: Sunny Syncro Thread |
|
|
Wow, what an introduction!
It's clear you know what you are doing with your careful "fix it once and fix it right" approach. You will appreciate this level of photo documentation as the years go by.
Though, I must admit that my old preOBD mind is still having a tough time wrapping itself around the luxury of being able to pull engine codes in a Vanagon.
And I think I just found my new favorite Vanagon color.
Well done!
_________________
The Syncro years (2005-16) - The 2WD years (2017-23) - In Hoosierland (2023-now)
Westy & WBX rebuild spreadsheet - Sanchius & Tuna: The Video
Your gold star membership keeps this awesome list going! |
|
| Back to top |
|
|
dobryan
Samba Member

Joined: March 24, 2006
Posts: 17038
Location: Brookeville, MD
|
|
| Back to top |
|
|
tjet
Samba Member
Joined: June 10, 2014
Posts: 3716
Location: Az
|
| Posted: Thu May 15, 2025 7:29 am Post subject: Re: Sunny Syncro Thread |
|
|
Looking good,
I'm really interested in your head liner plans.
Will keep an eye on this. |
|
| Back to top |
|
|
zululep
Samba Member
Joined: August 13, 2016
Posts: 35
Location: Portland, ME
|
| Posted: Thu May 15, 2025 9:52 am Post subject: Re: Sunny Syncro Thread |
|
|
Looks like you found a good spot for the ECU using the older style wiring harness with the cobra head intake system. It is possible to put the ECU under the rear bench seat if you build a fuel injector harness extension, as shown in the second pic. All the other plugs and connectors reach with the ECU under the seat. I thought about putting the ECU where you did when I did my Bostig conversion a couple of years ago, but ended up putting it under the rear seat. I was installing a new, never-used 2010 kit but, like you, wanted the new-style intake. Enjoy your van!
_________________
1984 Westfalia with Bostig Zetec |
|
| Back to top |
|
|
MV Seamus
Samba Member
Joined: May 02, 2025
Posts: 12
Location: WV
|
| Posted: Fri May 16, 2025 6:35 am Post subject: Re: Sunny Syncro Thread |
|
|
| Sodo wrote: |
Syncro Driveshaft vibration is a fairly "identifiable" resonance that comes in at ~45mph and leaves at ~50.
Driveshaft vibration will ruin the nosecone on the gearbox. They are NLA, and good used nosecone can cost $1000.
Unbolt the driveshaft immediately if you have the characteric vibration at 45-50mph. (45-50 is for a USA van with 4.86 gearing, it's @40-45mph for 5.43 gearing). And don't sustain 45-50mph if you have this vibration. Imbalance is never good, but it informs you when it's "the worst".
Vibration at 55-60 can be the front differential bearings getting loose. Its not as pronounced as the driveline
The Viscous coupler can leak silicone fluid into the gear oil somewhere between 100k and 200k miles.
The silicone fluid 'ruins' your gear oil.
Many miles with ruined gear oil ruins the pinion and carrier bearings,
which then ruins the (NLA) ring & pinion.
It's practically a Vanagon custom to "forget" maintaining the gearboxes, i think because the VW owners manual says you don't have to do it. And (in the Bentley repair manual) the service intervals all end at the 90,000 vehicle lifetime.
Consequently most Vanagon gearbox plugs come out for the first time after the gearbox is making noise (in hospice )
Non-maintenance becomes double-risky on a Syncro.
A Syncro has a 'skid bar' that totally covers the gearbox drain plug, offering somewhat unnecessary rock protection on the outside....
that further impedes maintenance to the inside.
It's not good. Nobody ever breaks the outside but now you can't just replace bearings, syncros, seals and hubs. You need to buy new shafts and gears too, and only aftermarket are available.
And the front diff is assumed to last forever, for various reasons (perhaps valid), except the assumption doesn't take into account the VC leaking and degrading the lubricant.
If your front drain magnet has a "black coating" then your VC has leaked into your oil, so shed a tear if it's been a long interval, because new front R&Ps are "NLA".
Should change the front diff oil often for that reason. It's only $20 of oil to keep clean.
For the front diff it makes some sense to choose a "clearish" oil that's easily inspectable for blackening.
If you have the Bentley repair manual on .pdf you can search and confirm there is not even one word about changing gear oil on Vanagons. I suspect the procedure was prohibited by VW. The owners manual stated that "gear oil need not be changed".
I made this in 2022, 31 years after the last Syncro was produced.
It's un-edited, because nobody has offerred any critique.
I don't even know if anyone even uses it, but you might find some useful info.
==================
===== Simplified ==========
Drain both gearboxes on the level FIRST.
There are 'features' inside each gearbox to retain oil at the front for extended uphill driving.
These features prevent a quick drain, so allow a couple hours (?).
Then drive the front up onto ramps and continue draining/dripping "for awhile".
=========
I don't know if it takes 20 minutes or 2 hours longer, but the drain flow reduces to a trickle which goes on "for awhile". But just reducing to 'drips' doesn't mean it's done. I've done a basic drain, then put a glass jar under for 'the drips' and I think I recall 2/3 quart "of drips" over a few hours.
In the front (level) gearbox there's a little oil withheld because the drain outlet is above the bottom, and you may want to get that out if you suspect there's silicone fluid contaminating the remaining oil.
OK there's some stuff to worry about now that you're a Syncro nut
Don't worry, there's more !! |
Thanks for all the information Sodo! I have come across many of your posts already and I must say that I greatly appreciate all of your contributions to the syncro knowledgebase. It would be tough to keep these vans on the road without people like you.
I did get a new driveshaft from van cafe, and after replacing the motor mounts and installing the new driveshaft, my vibration issues have fortunately been resolved.
But that is good to know about the VC fluid potentially leaking into the front diff. I will inspect the fluid closely next time I change it to make sure all is well. |
|
| Back to top |
|
|
MV Seamus
Samba Member
Joined: May 02, 2025
Posts: 12
Location: WV
|
| Posted: Fri May 16, 2025 6:55 am Post subject: Re: Sunny Syncro Thread |
|
|
| sanchius wrote: |
Wow, what an introduction!
It's clear you know what you are doing with your careful "fix it once and fix it right" approach. You will appreciate this level of photo documentation as the years go by.
Though, I must admit that my old preOBD mind is still having a tough time wrapping itself around the luxury of being able to pull engine codes in a Vanagon.
And I think I just found my new favorite Vanagon color.
Well done! |
There's nothing I hate more than fixing something twice because I failed to do it right the first time. Though it happens more than I care to admit.
I have not had the pleasure of working on a pre OBD vehicle (or engine rather), but it sure is nice to have access to fault codes!
| dobryan wrote: |
Awesome posts! Looking forward to more.
I too am in the middle of rehabbing a $yncro... |
Looks like you have made great progress on your own syncro (or $yncro rather). I just found your thread and will have to take a look through it!
| tjet wrote: |
Looking good,
I'm really interested in your head liner plans.
Will keep an eye on this. |
I am hoping to get something in place this summer. I'll certainly keep you posted.
| zululep wrote: |
Looks like you found a good spot for the ECU using the older style wiring harness with the cobra head intake system. It is possible to put the ECU under the rear bench seat if you build a fuel injector harness extension, as shown in the second pic. All the other plugs and connectors reach with the ECU under the seat. I thought about putting the ECU where you did when I did my Bostig conversion a couple of years ago, but ended up putting it under the rear seat. I was installing a new, never-used 2010 kit but, like you, wanted the new-style intake. Enjoy your van!
|
That's a clever solution for the ECU relocation. I didn't even consider the possibility of extending the wiring harness. I'll see how the new location serves me and if it doesn't work out I may be stealing your idea  |
|
| Back to top |
|
|
|


