| Author |
Message |
dumptuck
Samba Member

Joined: May 24, 2015
Posts: 240
Location: BC

|
 Posted: Thu Feb 20, 2025 7:11 pm Post subject: Re: The '71 Deluxe Posted: Thu Feb 20, 2025 7:11 pm Post subject: Re: The '71 Deluxe |
 |
|
| Shonandb wrote: |
| Looking good! |
Thanks  very happy with the result. very happy with the result.
_________________
Erik |
|
| Back to top |
|
 |
soissisc
Samba Member

Joined: April 04, 2007
Posts: 756
Location: Western Pennsylvania
|
| Posted: Fri Feb 21, 2025 7:43 am Post subject: Re: The '71 Deluxe |
|
|
That is cool!
_________________
Mark
68 Westy
92 Jetta (oh it is retired)
99 Eurovan
05 NBC
06 Audi A3
72 Westy (I am going to fix it up) |
|
| Back to top |
|
|
dumptuck
Samba Member
Joined: May 24, 2015
Posts: 240
Location: BC
|
| Posted: Fri Feb 21, 2025 5:03 pm Post subject: Re: The '71 Deluxe |
|
|
Does anyone know where I can source a blanking plate for these rear floor ducts? Or what it looks like upon removing them? Maybe I can fabricate my own. Not going to hook up the ducting and they are in an awkward spot as they are.
Thanks in advance
_________________
Erik |
|
| Back to top |
|
|
dumptuck
Samba Member
Joined: May 24, 2015
Posts: 240
Location: BC
|
| Posted: Sat Mar 08, 2025 1:25 pm Post subject: Re: The '71 Deluxe |
|
|
Installed my blazecut, not entirely sure about this routing, but was the best I could I come up with right now. It covers the perimeter of the engine, while also having good coverage around the center, as well as behind the fan shroud. The gauge is easily visible from the hatch. Please ignore the uncut cable ties, forgot to bring my flushcuts this trip (the perils of not having the bus at home  ). Unfortunately the blazecut is not very pliable out of the box, so it likes to keep its coiled up shape. Its a bit floppy still, so I may pick up some sticky mounts for the front and back of it to hold it up a bit better. ). Unfortunately the blazecut is not very pliable out of the box, so it likes to keep its coiled up shape. Its a bit floppy still, so I may pick up some sticky mounts for the front and back of it to hold it up a bit better.
Also forget if I have a picture already, but saw another bus with this so I adopted it too. A beetle hood emblem fits perfectly within the blank gauge pod in the dash, nice and flush. Looks clean 
The bus in its current concrete home, an underground parking garage... itching to be free 
_________________
Erik |
|
| Back to top |
|
|
dumptuck
Samba Member
Joined: May 24, 2015
Posts: 240
Location: BC
|
| Posted: Sun Mar 23, 2025 8:08 am Post subject: Re: The '71 Deluxe |
|
|
Rebuilding the bed this weekend... inside its just some old plywood but the visible front face will be finished birch ply. Stay tuned...
If anyone needs some old bagged out wood bed parts to use as a template for a full width bed, you can have my old ones for free. But you have to pick them up with an aircooled 
_________________
Erik |
|
| Back to top |
|
|
dumptuck
Samba Member
Joined: May 24, 2015
Posts: 240
Location: BC
|
| Posted: Sun Mar 23, 2025 3:31 pm Post subject: Re: The '71 Deluxe |
|
|
Here it is completed. Likely won't install it in the bus until April
When I was buying the aluminum trim, I saw these beaded seat covers 40% off at Canadian Tire... was hard to resist them 
_________________
Erik |
|
| Back to top |
|
|
dumptuck
Samba Member
Joined: May 24, 2015
Posts: 240
Location: BC
|
| Posted: Mon Mar 31, 2025 6:26 pm Post subject: Re: The '71 Deluxe |
|
|
Repainted my emblem again to better match the deluxe trim
Before
After
_________________
Erik |
|
| Back to top |
|
|
Shonandb 
Samba Member

Joined: January 12, 2019
Posts: 2083
Location: Vancouver, BC
|
| Posted: Mon Mar 31, 2025 9:05 pm Post subject: Re: The '71 Deluxe |
|
|
| dumptuck wrote: |
Here it is completed. Likely won't install it in the bus until April
When I was buying the aluminum trim, I saw these beaded seat covers 40% off at Canadian Tire... was hard to resist them
|
Looking good! Are those beaded seat covers comfortable?
_________________
*******************************
76 Westy with a 2.5L Subaru SOHC + Vanagon (010) Automatic Transaxle
Build & Trip Thread: https://www.thesamba.com/vw/forum/viewtopic.php?t=758760
Previous 1973 Panel Bus:
Click to view image |
|
| Back to top |
|
|
dumptuck
Samba Member
Joined: May 24, 2015
Posts: 240
Location: BC
|
| Posted: Mon Mar 31, 2025 9:37 pm Post subject: Re: The '71 Deluxe |
|
|
| Shonandb wrote: |
| dumptuck wrote: |
Here it is completed. Likely won't install it in the bus until April
When I was buying the aluminum trim, I saw these beaded seat covers 40% off at Canadian Tire... was hard to resist them
|
Looking good! Are those beaded seat covers comfortable? |
They actually are, I was a bit surprised. Definitely feels much cooler than sitting right on the vinyl, airflow or some such something
_________________
Erik |
|
| Back to top |
|
|
dumptuck
Samba Member
Joined: May 24, 2015
Posts: 240
Location: BC
|
| Posted: Mon May 19, 2025 7:00 pm Post subject: Re: The '71 Deluxe |
|
|
Had a good weekend of bus work. Been trying to get it ready to bring over to my new home since I'll have a parking spot now. Messed around with leaky brakes, replaced my fuel lines again, cut out my foam for the bed/bench, and started the process of replacing my left-side vent wing windows with a solid rear window and a slider in the middle. When I pulled the leaky vent wings I found some light rust bubbling underneath so spent today treating it and painting.
For my cushions I got 2 ikea twin size mattresses on sale to cut up. If you follow my footsteps here, know that Ikea lies on the packaging - the mattress is only 37" so barely too short for making both bench cushions out of one mattress. Oh well, I'll have to make do with an inch shorter bed The foam cut great with this rockwool knife, which is basically a breadknife.
I decided I'll put my spare tire up on the roofrack so I made the cushion the full width of the rear deck. Also decided I'll velcro the bench cushions on rather than staple the fabric to the wood. Probably some more photos in a couple weeks when covers are all sewn up and I've bolted the bed down.
_________________
Erik |
|
| Back to top |
|
|
dumptuck
Samba Member
Joined: May 24, 2015
Posts: 240
Location: BC
|
| Posted: Sun Jul 20, 2025 11:04 pm Post subject: Re: The '71 Deluxe |
|
|
Here are the bed cushions made up. Something to note - I accidentally put the "egg carton" texture of the foam facing downwards, but found that the fabric looks much neater on the top now as a result. The underside looks a bit lumpy.
Installed windows back in the left side, accidentally tore the seal on the inner side of sliding window due to impatience should stil seal though. The other window went in like butter however. Hoping that I don't get any more leak issues.
Also installed vapor barrier on my front doors, used some leftover material from a reno. I bought rivnuts to put in the original clip holes in the door, for when I install wood panels in there.
Also been figuring out my starting issue, drained the old bad gas out and put some fresh stuff in with a bottle of cleaner additive. Popped the top off my 34pict3 and did some light cleaning. After some persuasion it starts now, but will only idle if I hold the gas pedal down. Will be pulling my idle/power jet to blow some air through it when I come back in a few weeks. Been working up in the Yukon and Northwest Territories so progress is slow but happy to get anything done really.
_________________
Erik |
|
| Back to top |
|
|
dumptuck
Samba Member
Joined: May 24, 2015
Posts: 240
Location: BC
|
| Posted: Sat Aug 09, 2025 6:58 pm Post subject: Re: The '71 Deluxe |
|
|
First drive in quite a few years
Won't idle unfortunately, feathering the gas at the stop lights
Pulled the idle jets and poked them out with a wire and some carb cleaner but no luck so far
Seems to run well otherwise. It was a beautiful day
Any tips?
_________________
Erik |
|
| Back to top |
|
|
dumptuck
Samba Member
Joined: May 24, 2015
Posts: 240
Location: BC
|
| Posted: Sat Aug 09, 2025 10:56 pm Post subject: Re: The '71 Deluxe |
|
|
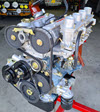
Well... after some messing around, I got a hunch its my manifold boots leaking. They're all cracked and actually seem to peel away when I poke at them, notice the slightly damp spot right underneath too... sketchy.
That sorta messes up my hope of taking my bus home this weekend, I hear these can take some time to replace unless you go for the split boots. Anyone in the lower mainland BC area have a set of split boots around? Long shot I know.
_________________
Erik |
|
| Back to top |
|
|
richparker
Samba Member

Joined: November 24, 2011
Posts: 7550
Location: Durango, CO
|
|
| Back to top |
|
|
SGKent
Samba Member
Joined: October 30, 2007
Posts: 42750
Location: at the beach
|
| Posted: Sun Aug 10, 2025 12:11 pm Post subject: Re: The '71 Deluxe |
|
|
the red silicone ones last longer than black rubber. No idea who has them but they should be out there.
_________________
"Most people don't know what they're doing, and a lot of them are really good at it." - George Carlin |
|
| Back to top |
|
|
dumptuck
Samba Member
Joined: May 24, 2015
Posts: 240
Location: BC
|
| Posted: Sun Aug 10, 2025 2:34 pm Post subject: Re: The '71 Deluxe |
|
|
Agreed, I'd like to do it correctly as well. I'm ordering some silicone ones to install when I get home. The split ones would just be to get me to there.
I've heard some varying information on how much needs to be removed to access them - if I remove the 2 fasteners at the outboard end of the manifold and loosen the center mount, does that allow enough movement of the outboard sections to get boots on?
Thanks in advance
_________________
Erik |
|
| Back to top |
|
|
dumptuck
Samba Member
Joined: May 24, 2015
Posts: 240
Location: BC
|
| Posted: Sun Aug 10, 2025 5:45 pm Post subject: Re: The '71 Deluxe |
|
|
More photos cause that's the best part of any thread. Also just happy to have my bus out in the sun again
Happened to be at the recycling station dropping off oil and found this little toolbox upside in the scrap metal pile. Some good stuff in there - mostly old Canadian-made tools. Will make for a good bus box, although I'll need to add some items. Been collecting parts and tools over time regardless for this purpose.
Kinda neat!
_________________
Erik |
|
| Back to top |
|
|
dumptuck
Samba Member
Joined: May 24, 2015
Posts: 240
Location: BC
|
| Posted: Mon Aug 11, 2025 1:43 pm Post subject: Re: The '71 Deluxe |
|
|
Some photos from the trip home, organized my parts and put my curtains back in. The fabric has faded a lot but I sorta like them that way. Roof rack is back on too.
Sealed up over top of the manifold boots with some dirtbike innertubes for the trip home. Made it despite having no idle. The bus will now rest while I wait on parts...
Sometimes we get free halon fire extinguishers at work so I put one in the cab. Gotta figure out some sort of mount for it though. Maybe a clamp on the central duct under the dash? (I realize that Halon is dangerous in confined areas, but its effectiveness gives me peace of mind).
_________________
Erik |
|
| Back to top |
|
|
dumptuck
Samba Member
Joined: May 24, 2015
Posts: 240
Location: BC
|
| Posted: Sat Aug 16, 2025 6:31 pm Post subject: Re: The '71 Deluxe |
|
|
Added the temporary floor, but it turned out so nice I may just leave it that way for a while. We found a roll of this old carpet material above the paint booth at work, was just barely enough for the bus! I stuck it to the original rubber mat with some spray adhesive and called it good for now. Will probably still upgrade later but pretty happy with this.
Also worked on the rear bench, used 3/4" birch for the seat base and back. Still have to install the L shaped supports, and drill into the rear deck for some rivnuts. Very happy so far though. Plywood has gotten really expensive however 
That's probably it for this weekend. Going to the Great Canadian Volkswagen Show tomorrow which should be fun! Leaving the bus at home however as my parts keep getting delayed in shipping. Oh well, not much a show bus anyhow.
_________________
Erik |
|
| Back to top |
|
|
richparker
Samba Member
Joined: November 24, 2011
Posts: 7550
Location: Durango, CO
|
|
| Back to top |
|
|
|


