| Author |
Message |
bart44
Samba Member
Joined: May 06, 2012
Posts: 18
Location: Selkirk, MB

|
 Posted: Wed May 30, 2012 8:09 pm Post subject: Posted: Wed May 30, 2012 8:09 pm Post subject: |
 |
|
nice build man, wish my bug was that good and not so rusty. i hope your welding got better  lol. Nice job with the sand blasting but next time soda blast it the heat from the sand warps the metal lol. Nice job with the sand blasting but next time soda blast it the heat from the sand warps the metal  u can see the blue flame when u blast at night! Anyways nice project man! looking good! u can see the blue flame when u blast at night! Anyways nice project man! looking good! |
|
| Back to top |
|
 |
19-VW-74
Samba Member
Joined: June 28, 2009
Posts: 847
Location: Utah
|
| Posted: Wed May 30, 2012 8:48 pm Post subject: |
|
|
| bart44 wrote: |
| nice build man, wish my bug was that good and not so rusty. i hope your welding got better lol. Nice job with the sand blasting but next time soda blast it the heat from the sand warps the metal u can see the blue flame when u blast at night! Anyways nice project man! looking good! |
Oh yeah, I wish I could have learned that lesson a little earlier...  There was quite a bit of warping, especially in the roof. Luckily, I realized the damage we were doing early enough to just strip the doors with chemical stripper. Wouldn't want those to warp... It was a SERIOUS chore to smooth out the roof. Lot's of hammer and dollying to get rid of the little "oil-canning" popping in and out of the roof when you press on it. There was quite a bit of warping, especially in the roof. Luckily, I realized the damage we were doing early enough to just strip the doors with chemical stripper. Wouldn't want those to warp... It was a SERIOUS chore to smooth out the roof. Lot's of hammer and dollying to get rid of the little "oil-canning" popping in and out of the roof when you press on it.
BTW. I haven't given up on this project. I have made quite some progress since the last update. The goal is to be finished by the 4th of July! 
I will report back with progress when I get the body off this week to put in the new floor pans. See ya. 
_________________
-Austin
My 1974 Standard Beetle Build:
http://www.thesamba.com/vw/forum/viewtopic.php?t=492617 |
|
| Back to top |
|
|
69 Jim
Samba Member

Joined: September 27, 2004
Posts: 6264
Location: Chickengeorge's Neighbor
|
| Posted: Thu May 31, 2012 8:15 pm Post subject: |
|
|
| Good luck. |
|
| Back to top |
|
|
AirDirect
Samba Member
Joined: November 03, 2010
Posts: 431
Location: Powderly TX
|
| Posted: Thu May 31, 2012 9:33 pm Post subject: Paint |
|
|
Austin,
You car is looking awesome! It won't be long before you will be taking a spin in it. Love the paint job. |
|
| Back to top |
|
|
19-VW-74
Samba Member
Joined: June 28, 2009
Posts: 847
Location: Utah
|
| Posted: Sat Jun 09, 2012 12:37 am Post subject: |
|
|
Hey, everybody! Remember me? Well, it's been far too long since my last update, and there's no good excuse for it.
I blame these for sidetracking me:
I had to put some money into reupholstering the seat on my Honda and some maintenance items... Still need to buy new tires... goodbye $$  And my mom just picked up a 1985 Honda Nighthawk 700 S in MINT CONDISH. All I had to do was remove the carbs and clean them, taking care not to damage any of the original hardware, as it was untouched. I was the first to remove the carbs since the bike was new! And after dialing it in, that bike is a GRIN MACHINE. And my mom just picked up a 1985 Honda Nighthawk 700 S in MINT CONDISH. All I had to do was remove the carbs and clean them, taking care not to damage any of the original hardware, as it was untouched. I was the first to remove the carbs since the bike was new! And after dialing it in, that bike is a GRIN MACHINE.
I finally decided to go through my camera again and organize, resize and upload all of my pictures and post them up on here. So here's what I've got done in my absence.
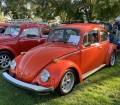
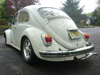
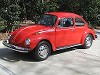
With the car almost completely done wet-sanding (I have only one quarter panel left to sand. HATE wetsanding. SO tedious.), I re-indexed the rear torsions (1 inner spline... I think It's a bit too much drop for the look I want) and I put some ratching tie-downs around the front beam to pull the trailing arms up and artificially lower the car. Just to get some Ideas.
Here are a few shots:
That taillight is just sitting on the fender for looks right now.
I'm definitely going to have to narrow my front beam. Think 2" will get the wheel to tuck just behind the fender lip? I don't want to narrow more than 3" because I want this car to HANDLE. I don't want the wheel to sit lurking way under the fender. It should be just flush. And I want my fender gap to be 1.5-2" max. I may need to invest in some drop spindles so I can maintain ride quality.
I also discovered that my front passenger door trim holes are lower than my rear passenger quarter trim holes. Weird. That's the factory passenger door...
On another note, I was pretty pissed at how poor the German body moulding mounted to the clips on the body. The clips were either to big or the trim was too wide by maybe half a millimeter. I may just need to wrap the clips in some cellophane to make the trim snap on as it should.
Anyways, on a more positive note, I have completely finished all of the seat upholstery for all of the seats! I was pretty stoked at how well the junkyard seats transformed into some fresh new buckets.
My car was missing the drivers seat when I first got it (don't remember why) and the passenger seat was in pretty poor shape with a bad recovering job. The rear seat was in complete original covering and padding, including the fiberboard flaps on the seatback. But they were looking very sorry. So I set out to find a new driver seat to reupholster and I was on my way!
I ended up taking both the front seats out of a '74 SunBug in the local Pick'n Pull, paid $20 a piece. The covers were horrible but I only needed the frames anyway. I took my existing passenger seat and new passenger seat and took the best parts of the two and mixed them together to make a nice solid seat frame.
Here's one of the junkyard seats (the other looked identical):
I pulled all of the crappy upholstery and padding off of the seat frame. I also tossed all of the plastic side covers off (I have new ones from Wolfsburg West in the mail). Once I was down to the frames, I pulled the frames completely apart and wire brushed them to get ride of all the old foam remnants, rust, glue, etc. I then pressure washed all of the crap out of the nooks and crannies. And with the frames perfectly clean, I primed and painted them gloss black, and got them ready to be upholstered again.
Here are the frames for the front driver seat (I did the passenger seat in the same way).
(sorry it's sideways )
What I first did, was add an extra spring to the center of the seat to keep it from bottoming out against the rails. (I got several springs from the local upholstery shop that matched the originals perfectly). I then saturated every single spring joint with spray lithium grease. It will keep the seats from squeaking and rusting.
These are the springs I bought:
On the passenger seat, I replaced all three front springs with new ones as the originals were fatigued and distorted. They fit perfectly and the passenger seat is nice and firm.
By the advice of the Jbugs Interior Video, I laid down two layers of burlap on the seat bottom and attatched with hogrings. I then layed a layer of high-density 1" foam on top of the burlap. This foam is TOUGH. Flexible and resilient, but FIRM. I got it on closeout at a local upholstery shop. I glued it in place with 3M Super 77. Great stuff.
I then saturated the TMI seat foam with spray glue and kneaded it around the edges of the frame, like shown in the Jbugs Video. The TMI pads fit excellent, but this photo makes it look a little wavy.
The next step was the upholstery! Time to tug, stretch, and cramp your knuckles. The cover fit very well and I imagine will settle in once I start driving the car around on hot days.
I then moved to the front seat-back. I saturated all of the spring joints with grease and then soaked mechanisms on both sides of the seat that allow it to fold forward. All of the cables and levers operated smooth as butter.
The 73-76 seats all seem to have an issue with the bar that goes across the back of the seat. That flat stamped steel bar seams to always crack or completely split down the middle. So I made a bar out of scrap metal and pop-riveted it to the frame to give it some strength. I didn't want to weld and cause the springs to harden.
I again laid the seat down onto two layers of burlap, cut it to size and hogged it to the frame.
And I cut some 1" foam to place directly over the burlap.
Then I placed the TMI foam over that and glued it all into place with the 3m Super 77.
There's a little slit that needs to be cut in the burlap to allow for the upholstery to go through and fit tight around the headrest.
Then slide the little rods through the pocket in the upholstery and slip it through the seat foam and over the hooks.
And after some serious hair-dryer action and LOTS of Super 77, the upholstery hugs the seat foam nice and tight.
I slipped cardboard into the back of the seat-back to give the upholstery something to sit on but it looks bad. So I have some fiberboard reinforcement backing panels coming in the mail from Wolfsburg West, along with all new plastic side covers.
I'll update tomorrow with the rear seat bottom and seat back. I'm way too tired right now 
_________________
-Austin
My 1974 Standard Beetle Build:
http://www.thesamba.com/vw/forum/viewtopic.php?t=492617 |
|
| Back to top |
|
|
jhicken
Samba Member
Joined: October 24, 2003
Posts: 9479
Location: Fallbrook, CA
|
| Posted: Sat Jun 09, 2012 5:00 am Post subject: |
|
|
Looking good Austin. Before you change your beam, look at 4.5" sport wheels in the front. They'll tuck nicely and you'll have that classic big/little look. This way you only need to get the dropped spindles. As for the trim not lining up, you got a different year door on there. I see that time to time on finished cars. To bad it didn't get noticed before the paint 
One more thing, the CB550 Rocks, totally classic 70's [1975?], not a big fan of the Nighthawk but the CB is sweet!!
-jeffrey
_________________
Der Kleiner Kampfwagens |
|
| Back to top |
|
|
19-VW-74
Samba Member
Joined: June 28, 2009
Posts: 847
Location: Utah
|
| Posted: Sat Jun 09, 2012 9:42 am Post subject: |
|
|
| jhicken wrote: |
Looking good Austin. Before you change your beam, look at 4.5" sport wheels in the front. They'll tuck nicely and you'll have that classic big/little look. This way you only need to get the dropped spindles. As for the trim not lining up, you got a different year door on there. I see that time to time on finished cars. To bad it didn't get noticed before the paint
One more thing, the CB550 Rocks, totally classic 70's [1975?], not a big fan of the Nighthawk but the CB is sweet!!
-jeffrey |
I hear ya about the big/little wheel combo, but I've always loved the ET26 sport bug wheels (favorite 4-lug) and I wanted big beefy tires and deep-dish looking wheels all around. It's just a look that I've never seen before, but it looks muscular and I like it. I will be throwing some stainless 15" beauty rings on to enhance the dished look and add to the 70's muscle car style I'm kinda going for.
And that door is the original one. It's marina blue and it has the big side reinforcement inside that VW started doing in 1974. I know because my driver side door is from a '73 and it doesn't have that reinforcement. But the trim lines up perfectly. I seem to recall reading in a thread on here somewhere that Glenn had the same problem with his trim not lining up on his '74 standard. But it came from the factory that way and he decided to leave it be.
And thank's for the compliments on my CB! I love that bike probably a bit too much. After the bug is done I will be saving up my pennies to do a full restoration on that bike and maybe buy some stock 4 into 4 exhausts ($900) .
_________________
-Austin
My 1974 Standard Beetle Build:
http://www.thesamba.com/vw/forum/viewtopic.php?t=492617 |
|
| Back to top |
|
|
19-VW-74
Samba Member
Joined: June 28, 2009
Posts: 847
Location: Utah
|
| Posted: Sat Jun 09, 2012 10:33 am Post subject: |
|
|
Alright, as promised, here are pictures/steps to reupholstering the rear seat.
Seat bottom:
Before:
After removing the cover and foam, I wire brushed all of the rusty junk off of the frames and cleaned with Simple Green. Then I sprayed them with some Rustoleum Primer and two coats of gloss black. I then sprayed all of the spring joints with lithium grease to get rid of any squeaks.
Wrapped with two layers of burlap:
Laid the seat frame over the 1" high density foam and cut it to shape:
When the foam was ready, I sprayed it down with 3M Super 77 and laid it down on the burlap:
The TMI foam fit like a glove.
The seat upholstery went on very smoothly with a little hair dryer action and some spray silicone.
Hogringed to the frame. The hogrings worked well, but as you can see I got some nasty grease and goo on the cover. A little paint thinner cleaned it right up.
After pulling the drawstring tight, I tied it to the frame snugly and the seat is finished!
Seat Back:
Before:
I started pulling off the cover and insulation. I really didn't want to because the insulation was so full of the "VW" smell and I'll probably keep alot of it so I have that smell somewhere in the car.
Down to the frame, and painted with Rustoleum gloss black.
Wrapped with burlap and hogringed.
Then glued and hogringed the TMI foam directly to the burlap and frame. I didn't add a layer of 1" foam at the advice of the Jbugs Video.
I then wrapped the top of the seat with a cap of Saran wrap and soaked the saran wrap with silicone spray to help the cover slip on. It helped immensely.
I bought some 5/16" Tempered hardboard from Home Depot and cut it to the shape of the new TMI carpet for the behind the seat. I then contact cemented the panels to the carpet and let them sit overnight with a heavy box on them for good contact. The TMI carpet kit didn't directly match the original carpet dimensions, but I think they'' work just fine when the new headliner is installed.
I was even able to cut a hole in the carpet and hardboard and reuse the original grommet for the seat strap.
Upholstery done.
After cutting holes for the seat latches. That was a pain. Also, the carpet and hardboard is installed now. Fits perfectly and the flaps work as original.
And it's DONE!
_________________
-Austin
My 1974 Standard Beetle Build:
http://www.thesamba.com/vw/forum/viewtopic.php?t=492617 |
|
| Back to top |
|
|
19-VW-74
Samba Member
Joined: June 28, 2009
Posts: 847
Location: Utah
|
| Posted: Sun Jun 10, 2012 12:22 pm Post subject: |
|
|
Made a trip to fasteners, inc. in Spokane and picked up a bunch of new stainless hardware! I'm replacing the door hinge screws and all of the visible hardware in the door jambs with flathead stainless allen screws. I also have stainless bolts for the fenders and to bolt up the floor pans. Not bad for $45.
_________________
-Austin
My 1974 Standard Beetle Build:
http://www.thesamba.com/vw/forum/viewtopic.php?t=492617 |
|
| Back to top |
|
|
Glenn 
Mr. 010

Joined: December 25, 2001
Posts: 79417
Location: Sneaking up behind you
|
| Posted: Sun Jun 10, 2012 12:33 pm Post subject: |
|
|
| 19-VW-74 wrote: |
I also discovered that my front passenger door trim holes are lower than my rear passenger quarter trim holes. Weird. That's the factory passenger door...
|
My car has the exact same misaligned trim. When I had the body work done they asked if I wanted to correct it. I told them, no, that's the way it came from the factory.
_________________
Glenn
74 Beetle Specs | 74 Beetle Restoration | 2180cc Engine
"You may not get what you pay for, but you always pay for what you get"
Member #1009
#BlueSquare
עַם יִשְׂרָאֵל חַי |
|
| Back to top |
|
|
19-VW-74
Samba Member
Joined: June 28, 2009
Posts: 847
Location: Utah
|
|
| Back to top |
|
|
pitterpat
Samba Member
Joined: September 10, 2003
Posts: 626
Location: Indianapolis, IN
|
| Posted: Sun Jun 10, 2012 5:53 pm Post subject: |
|
|
| Nice job Austin!!!! You do good work. Thanks for detailing the seat upholstery, I've got some to do. |
|
| Back to top |
|
|
Joel
Samba Member

Joined: September 04, 2006
Posts: 11099
Location: NSW Australia
|
| Posted: Sun Jun 10, 2012 6:28 pm Post subject: |
|
|
Looks like you could adjust the door catch in the pillar upwards slightly which would make the problem stand out less.
Notice how the body swage line above the trim also doesn't line up either on both yours and Glenns bugs?
May make the door a little harder to shut though, people often adjust them lower and lower as the door hinges start to sag making the door easier to shut.
Gotta watch for paint chipping too.
Very impressive work on the seats, just goes to prove with some time and patience you can do just as good job at home as the pros.
_________________
Quick little bug, you got a Porsche motor in that?
1974 Germanlook 1303 2.5 Suba-Beetle |
|
| Back to top |
|
|
flyboat
Samba Member
Joined: April 21, 2010
Posts: 2752
Location: Bath NC
|
| Posted: Sun Jun 10, 2012 6:47 pm Post subject: |
|
|
Yep, lookin good. I like your color choices. Your upholstery work looks very nice. The devil is in the details.
_________________
79 super Vert
62 Ragtop Bug
66 tintop Westy
Porsche 914
09 Z06 Vette track car |
|
| Back to top |
|
|
19-VW-74
Samba Member
Joined: June 28, 2009
Posts: 847
Location: Utah
|
| Posted: Sun Jun 10, 2012 10:01 pm Post subject: |
|
|
| pitterpat wrote: |
| Nice job Austin!!!! You do good work. Thanks for detailing the seat upholstery, I've got some to do. |
Yeah, I figured somebody could make some use of all of the pictures I took so I tried to do sort of a write-up to help some folks out.
And Joel I was planning on lifting up the door a little bit when I install my new stainless hardware, but I don't know if it will go up much, as the door gap is pretty uniform all around. And my hinges have no slop in them, either. The passenger door has original hinges in perfect tight shape, and the driver hinges were removed from a donor car at a junkyard with low miles.
Thanks for the compliments btw.
_________________
-Austin
My 1974 Standard Beetle Build:
http://www.thesamba.com/vw/forum/viewtopic.php?t=492617 |
|
| Back to top |
|
|
EXJAY
Samba Member
Joined: October 04, 2009
Posts: 1109
Location: Myrtle Beach, SC
|
| Posted: Mon Jun 11, 2012 4:25 am Post subject: |
|
|
excellent work 
_________________
EXJAY
'74 Superbeetle (Family owned since new)
'73 181 Thing (sold) |
|
| Back to top |
|
|
PatterBon
Samba Engine Connoisseur

Joined: September 27, 2008
Posts: 3461
Location: Poulsbo, WA
|
| Posted: Mon Jun 11, 2012 11:32 am Post subject: |
|
|
Kick ass job!
_________________
PNW Dub Folk & Kitsap dub Folk (KdF)
Austin Aircoolers VW Gang
2020 Ford F-150
1973 Standard Beetle
1969 Cessna 172K Airplane
US Army CH-47 Chinook Helicopter Repairer November 2013 - July 2024 |
|
| Back to top |
|
|
19-VW-74
Samba Member
Joined: June 28, 2009
Posts: 847
Location: Utah
|
| Posted: Thu Jun 14, 2012 10:06 am Post subject: |
|
|
So my shipment from Wolfsburg West came yesterday with my new plastic side panels and my fiberboard reinforcement panels for my front seats. I was impressed by the quality of both of them. I also got some German OE tarboard for the engine bay, some new fresh air hoses (I crushed mine taking the engine out.  ), WCM dashboard, a bunch of different rubber bits, and real nice glossy catalog from WW. ), WCM dashboard, a bunch of different rubber bits, and real nice glossy catalog from WW.
Here's what the seat side covers and fiber boards looked like:
They appeared to be vinyl on one side, and paperboard on the other. They are probably 1/8" thick. Really sturdy but flexible and forgiving. I did have to take a horse rasp and deburr the corners so that the sharp edges wouldn't poke through the seat cover, but it was no big deal.
Before WW fiberboard panels:
After WW fiberboard panels:
Makes the seat look much more professionally done, and the covers fit better all around. Total price paid? $10 bucks for the pair. Worth every penny.
And here's a quick comparison of the new WW side covers and the OG VW side covers:
As you can see from the pictures, the grain and sheen are a little different (not a big deal, imo) and the shape isn't quite as sharp as the originals, but very close. The WW ones don't have any of the webbing molds that the OG ones have, but you'll see in the last picture that the WW ones are nearly twice as thick as the originals. The new ones are also much less brittle and a bit more forgiving. They seem to be a very high quality part.
Here they are installed on the (finished!) seats:
They really complete the look of the seats.
Total price paid: $54 for the set. Whatever you do, don't buy them from Cip1, or you'll pay about $96 dollars for the same set.
_________________
-Austin
My 1974 Standard Beetle Build:
http://www.thesamba.com/vw/forum/viewtopic.php?t=492617 |
|
| Back to top |
|
|
a.wilson
Samba Member

Joined: January 11, 2007
Posts: 2033
Location: Georgia
|
| Posted: Fri Jun 15, 2012 9:58 am Post subject: |
|
|
Thanks for your much better pics on those side plastic covers, Austin!!
Lol.. mine sucks compared to yours, so went ahead and added links in a couple of mine just in case someone searched the gallery and wanted some more clearer shots between the new & old versions. 
http://www.thesamba.com/vw/forum/album_search.php?...r=a.wilson
Your seats turned out nice!
_________________
Be kind to all critters. America's "H8TERZ" can drink sludgy used Motor Oil!
oemwolf |
|
| Back to top |
|
|
phazor
Samba Member

Joined: May 02, 2010
Posts: 23
Location: Nashville, Indiana
|
|
| Back to top |
|
|
|


