| Author |
Message |
bstein
Samba Member

Joined: January 17, 2015
Posts: 87
Location: PDX

|
 Posted: Sun Sep 17, 2017 11:47 am Post subject: Re: LT Mirror Installation (Photos and Installation Tips) Posted: Sun Sep 17, 2017 11:47 am Post subject: Re: LT Mirror Installation (Photos and Installation Tips) |
 |
|
| michaeltag wrote: |
Read your excellent write-up but I'm still stumped on something ...
In the picture I'm posting here, the piece on the left is for the lower mount and its fit is really obvious and I've installed the lower mount with it in place, no problem. However, I've tried to line up this upper piece (on the right in the photo) every which way on the right side of the van (it is marked right and was packed with the right side mirror) and it just doesn't work. Is the thick part supposed to sit outside of the mount on the window frame? There is not a hollow void under the mount for thick part to fit into, which was where I thought it went at first.
You didn't mention the orientation of the shims in your write-up. Thanks for the details on rivet nuts, though. I'm going to get those.
Could you give me a tip on that upper shim?
|
Looks like you got it in the next post. IIRC, the top shim can only fit one-way b/c of the holes and how the bevel cut allows it to bend.
Glad you got it figured out!
Brian
_________________
1987 Syncro Wolfsburg Weekender | Triple Knob | SAH 1.8T |
|
| Back to top |
|
 |
Team WorldTour
Samba Member

Joined: September 02, 2010
Posts: 2427
Location: Der Vaterland
|
| Posted: Sat Sep 16, 2017 11:12 pm Post subject: Re: LT Mirror Installation (Photos and Installation Tips) |
|
|
I posted this on your other thread of the same topic. I'm repeating myself here for benefit of this thread.
_________________
1990 Feldjäger Syncro AAZ
Click to view image
H6 Subaru Engine Swap Thread
WV2ZZZ25ZFH094138(x)/ WV2YB0257LH057308(x)/ WV2ZZZ25ZLG113270/
"Where am I going? And what am I doing in this handbasket?" -Nicodemus Jordan
When All Else Fails: Lather, Rinse, Repeat! |
|
| Back to top |
|
|
michaeltag
Samba Member
Joined: August 22, 2015
Posts: 70
Location: SF East Bay, Northern California
|
| Posted: Sat Sep 16, 2017 10:08 pm Post subject: Re: LT Mirror Installation (Photos and Installation Tips) |
|
|
Read your excellent write-up but I'm still stumped on something ...
In the picture I'm posting here, the piece on the left is for the lower mount and its fit is really obvious and I've installed the lower mount with it in place, no problem. However, I've tried to line up this upper piece (on the right in the photo) every which way on the right side of the van (it is marked right and was packed with the right side mirror) and it just doesn't work. Is the thick part supposed to sit outside of the mount on the window frame? There is not a hollow void under the mount for thick part to fit into, which was where I thought it went at first.
You didn't mention the orientation of the shims in your write-up. Thanks for the details on rivet nuts, though. I'm going to get those.
Could you give me a tip on that upper shim?
_________________
'87 Vanagon GL Westfalia Syncro w/ rear locker
• 1.8T engine conversion from Stephan's AutoHaus
• Schwenk Springs, OME shocks, BFG All Terrains on South African 15-inch steel wheels
• GoWesty Plate Steel Bumpers w/ front skid plate & rear swing-away spare carrier
• Big Shot Shifter
• Transaxle rebuilt with taller heavy-duty 4th gear, GoWesty decoupler and oiler plates by Ken at Porter's Precision
* TruckFridge
• Propex Heater
• Vintage Air in-dash A/C |
|
| Back to top |
|
|
bstein
Samba Member
Joined: January 17, 2015
Posts: 87
Location: PDX
|
| Posted: Mon May 04, 2015 8:48 am Post subject: |
|
|
| GypsyDriver wrote: |
| designer wrote: |
| the bottom of mine leave a gap where the old mirror was. Has anybody come up with a good idea to cover that? |
I just blacked out the bottom bolt and reinserted it. Its only a few millimeters and hardly noticeable, in my opinion. |
Same for me.
That would be awesome and a great excuse to open the door for some dynamat while-I'm-in-there.  Thanks for the link to that thread. Thanks for the link to that thread.
Brian
_________________
1987 Syncro Wolfsburg Weekender | Triple Knob | SAH 1.8T |
|
| Back to top |
|
|
GypsyDriver
Samba Member
Joined: November 06, 2012
Posts: 190
Location: Columbus, GA
|
| Posted: Mon May 04, 2015 8:13 am Post subject: |
|
|
| designer wrote: |
| the bottom of mine leave a gap where the old mirror was. Has anybody come up with a good idea to cover that? |
I just blacked out the bottom bolt and reinserted it. Its only a few millimeters and hardly noticeable, in my opinion.
I'm hoping svenakela will 3D print a turn signal cover for the LT mirrors. That bolt hole would be perfect to thread the wiring through. http://www.thesamba.com/vw/forum/viewtopic.php?t=4...;start=320 |
|
| Back to top |
|
|
designer
Samba Member

Joined: November 05, 2009
Posts: 523
Location: Idaho-but just the tip
|
| Posted: Sun May 03, 2015 7:34 pm Post subject: |
|
|
| the bottom of mine leave a gap where the old mirror was. Has anybody come up with a good idea to cover that? |
|
| Back to top |
|
|
bstein
Samba Member
Joined: January 17, 2015
Posts: 87
Location: PDX
|
| Posted: Sun May 03, 2015 2:39 pm Post subject: |
|
|
| GypsyDriver wrote: |
| Looks good. I like the hex nuts. I was looking for those when I did mine, but couldn't find them. What size are they and what was your source? Did you black them out? If I had to do it over, I'd still use the rivet nuts. I feel a little more secure about it with a threaded insert. But I'd use RTV instead of painting. Still ... zero problems so far. |
I found them locally and followed your advice for M6x1.00x25 sizing. Painted them with SEM Black Trim. It's close enough for the screws, though I think they have a glossy version which would match perfect.
Brian
_________________
1987 Syncro Wolfsburg Weekender | Triple Knob | SAH 1.8T
Last edited by bstein on Sun May 03, 2015 11:42 pm; edited 1 time in total |
|
| Back to top |
|
|
GypsyDriver
Samba Member
Joined: November 06, 2012
Posts: 190
Location: Columbus, GA
|
| Posted: Sun May 03, 2015 2:23 pm Post subject: |
|
|
| Looks good. I like the hex nuts. I was looking for those when I did mine, but couldn't find them. What size are they and what was your source? Did you black them out? If I had to do it over, I'd still use the rivet nuts. I feel a little more secure about it with a threaded insert. But I'd use RTV instead of painting. Still ... zero problems so far. |
|
| Back to top |
|
|
bstein
Samba Member
Joined: January 17, 2015
Posts: 87
Location: PDX
|
| Posted: Sun May 03, 2015 9:46 am Post subject: |
|
|
Great write-up and thanks for posting!
I just did this yesterday. My installation turned into a bit of a brief nightmare on both sides b/c I'm a slow learner. All is well, as the mirrors are installed and looking pretty sweet. (The first syncro I test drove had these and the visibility put them on my todo list immediately.)
As stated in the original post be extremely careful on alignment on installation. I thought I was threaded into the nutsert and wasn't. Removing an unseated nutsert in each door made the installed a wee bit longer than expected. 
After fixing that, I ended up opening up the two top outer mounting holes 1mm (using a 7mm bit), masking/painting the bare metal, and reinstalling. The additional play allowed easier alignment; installation is just as solid on both sides. Also I just used RTV on the nutsert vs. masking/painting and decided on hex heads. May none of us experience rust! 
IMHO, I like having threaded mounts in the door now that I'm done with it. Functionally for installation it would be more straight forward and less fraught to use self-taping metal screw for an item that doesn't functionally require frequent removal.
Brian
_________________
1987 Syncro Wolfsburg Weekender | Triple Knob | SAH 1.8T |
|
| Back to top |
|
|
ng
Samba Member

Joined: October 01, 2011
Posts: 116
Location: Edmonton, AB
|
|
| Back to top |
|
|
smurfpike
Samba Member

Joined: April 24, 2010
Posts: 220
Location: Utah
|
| Posted: Tue Apr 08, 2014 6:03 am Post subject: Re: LT Heavy Duty Heated Mirror -- [HEATED] |
|
|
| robertgriner wrote: |
I know I've seen several people inquire about these and I've been on a search myself.
I discovered them on a site in Germany. They're $295 shipped to me in Kansas City. All included except the attaching screw/bolts.
I'm attaching the photo they sent me. The indicated that I would get everything in the picture, with the mirrors swapped for "heated" versions.
Hope this helps those who are looking.
[/img] |
Robertgriner What site did you find them from in Germany with heated mirrors for $295?
_________________
1965 Ottinger Tribute Overland Bus
IG @otter.the.overland.bus
FB Ottertheoverlandbus
IG Westyrestorations
FB WestyRestorations, parts and accessories
1987 Syncro "Big Red", Full restoration thread http://www.thesamba.com/vw/forum/viewtopic.php?t=606596
1978 Westy Camper, Full ground up restoration, restoration thread http://www.thesamba.com/vw/forum/viewtopic.php?t=593413 |
|
| Back to top |
|
|
designer
Samba Member
Joined: November 05, 2009
Posts: 523
Location: Idaho-but just the tip
|
| Posted: Fri Feb 21, 2014 7:34 pm Post subject: |
|
|
Thanks for the heads up on the install to the OP! I followed this pretty much - and I do agree - the heavy duty LT mirrors aren't that HD. But they are cool and i think they'll be just fine. nice view to the rear. Much better than stock.
They look friggin' tight!
I'm not too impressed with the rivet installation - i used the 25/64 bit and i think it was just a tad bit loose for the rivets I bought from GW. They still hold the top of the mirror on well but i just think i either did it wrong, which I don't see how that'd be possible ... but whatever. I know i didn't "waller" the holes out.
Still thanks for the heads up. Oh, the "tool" you buy - don't waste your money.
Thanks!
-cc- |
|
| Back to top |
|
|
ajdenette
Samba Member
Joined: February 15, 2009
Posts: 768
Location: Hope Valley RI
|
| Posted: Sun Feb 02, 2014 11:39 am Post subject: |
|
|
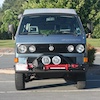
I have had several of the smaller stock manual mirrors break of when getting bumped or rusted in place and unmovable and break trying to adjust them. The LT mirrors have a much more robust pivot and fold in nicely for working on the van in the garage or to keep them out of the bushes on the trail plus the visibility is amazing one of my favorite things about my Syncro.
_________________
1985 2wd Westy with 2000 Subaru 2.2 current driver
https://www.thesamba.com/vw/forum/viewtopic.php?t=685635
1986 Syncro Doka Project next in line
https://www.thesamba.com/vw/forum/viewtopic.php?t=732777
1990 Vanagon Syncro Base awaiting body work |
|
| Back to top |
|
|
DAV!D
Samba Member
Joined: September 10, 2013
Posts: 980
Location: EL CAMINO
|
| Posted: Sun Feb 02, 2014 11:13 am Post subject: |
|
|
Good post on installing them. I'm still not sold on LT mirrors as they look a bit big too me, but after finally getting some drive time on my Westy I can understand the want for bigger mirrors.
I'm not sure I want that much mirror hanging on the side of my van when doing trails, I'm curious what the off road guys think of them? Also is there maybe something between the stock mirrors and there LT mirrors?
_________________
86 Syncro Build - Ecotec Motor Swap - Pop Top Conversion - Camper Build & Syncro Conversion |
|
| Back to top |
|
|
mtnphan
Samba Member
Joined: February 13, 2011
Posts: 46
Location: PNW
|
| Posted: Sun Feb 02, 2014 10:58 am Post subject: |
|
|
Nice tutorial thanks for posting. This is on my to do list for the summer.
_________________
'85 Wolfsburg Westfalia 2.2 Subie |
|
| Back to top |
|
|
tarandusVDub
Samba Member
Joined: August 27, 2010
Posts: 1683
Location: Between Here and There
|
| Posted: Sun Feb 02, 2014 9:23 am Post subject: |
|
|
Let us know how you hook up the heater wiring. I got mine from CIP1 but the non-heated version.
_________________
1990 Syncro 16" DoppleKabine 2.1 DJ 112i
________________________
Sold: 1972 Bay Campmobile; 1984 Westy, base model, 2WD. |
|
| Back to top |
|
|
robertgriner
Samba Member

Joined: July 14, 2012
Posts: 81
Location: Kansas City
|
| Posted: Sat Feb 01, 2014 3:30 pm Post subject: LT Heavy Duty Heated Mirror -- [HEATED] |
|
|
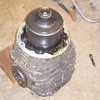
I know I've seen several people inquire about these and I've been on a search myself.
I discovered them on a site in Germany. They're $295 shipped to me in Kansas City. All included except the attaching screw/bolts.
I'm attaching the photo they sent me. The indicated that I would get everything in the picture, with the mirrors swapped for "heated" versions.
Hope this helps those who are looking.
[/img] |
|
| Back to top |
|
|
MsTaboo 
Samba Member

Joined: June 02, 2006
Posts: 4568
Location: East Kootenay, British Columbia
|
| Posted: Sat Jan 25, 2014 10:59 am Post subject: |
|
|
| Solrider wrote: |
I just got a set of these from GW and I'll be heading out to the hardware store to pick up what I need. This is a very clean installation, but a bit more than I bargained for! I have minimum mechanical skills and while I want this done right and I'm not afraid of the challenge, I wasn't expecting to have to go out any buy extra tools for installation.
Have those that have just used the sheetmetal screws had any issues with them coming off or coming loose? Should I just break down and get all these extra parts and do it this way, the first time?!  |
I have had three vans with the LT mirrors mounted with just sheet metal screws. One I bought that way and two that I installed. All three have worked fine. They have never loosened. Just be sure to use stainless steel screws and dab some high quality silicone sealant in the holes and on the screws as you install. There is no need to drill such large holes to get a good install.
If you live in an area of high theft, you might consider using the anti-theft hardware.
_________________
Currently:
'90 Syncro Westy 3 knob w/Zetec
The information age has morphed into the age of disinformation and willful ignorance. Agnotology!
All that's needed for evil to prevail is for good people to do nothing.
Resist Kleptocratic Oligarchy (and Idiocracy)! |
|
| Back to top |
|
|
Solrider
Samba Member

Joined: April 27, 2011
Posts: 199
Location: Phoenix, AZ
|
| Posted: Sat Jan 25, 2014 10:47 am Post subject: |
|
|
I just got a set of these from GW and I'll be heading out to the hardware store to pick up what I need. This is a very clean installation, but a bit more than I bargained for! I have minimum mechanical skills and while I want this done right and I'm not afraid of the challenge, I wasn't expecting to have to go out any buy extra tools for installation.
Have those that have just used the sheetmetal screws had any issues with them coming off or coming loose? Should I just break down and get all these extra parts and do it this way, the first time?!
_________________
Heidi - KF7CKI
85 Vanagon GL 1.6NA - Otto Von Wunderwagen
--------------------------
Gone but not forgotten:
71 Super Beetle - Gretel
92 Jetta GL - Jerry
97 Passat TDI - Penny |
|
| Back to top |
|
|
jrasite
Samba Member
Joined: June 26, 2008
Posts: 8
Location: BFE, Orygun
|
| Posted: Fri Jan 24, 2014 9:03 pm Post subject: |
|
|
| Quote: |
| Good job on the install! Specifically, knowing about those rivet-nuts. I was sad GoWesty didn't include any fasteners with the install. I ended up using sheet metal scews and your method is much, much better! wtg. |
FWIW, vagcat shows the top fasteners as being M5.5 x 22 sheet metal screws. I have the Rivnuts and brand new M6 x 1.0 stainless oval head screws (Fastenal has them) and I think I'll put sheet metal screws to start. If it's a problem, I'll have pilot holes for the Rivnuts!
http://www.vagcat.com/epc/cat/vw/T2SY/1988/59/56/600849/ |
|
| Back to top |
|
|
|


