| Author |
Message |
chrisflstf
Samba Member

Joined: February 10, 2004
Posts: 4247
Location: San Diego

|
 Posted: Wed Mar 12, 2025 9:57 am Post subject: Re: Rusty 65 SC restoration Posted: Wed Mar 12, 2025 9:57 am Post subject: Re: Rusty 65 SC restoration |
 |
|
Cool bumper holder  |
|
| Back to top |
|
 |
70bus 
Samba Member

Joined: July 15, 2004
Posts: 1780
Location: P.O.
|
| Posted: Wed Mar 12, 2025 12:01 pm Post subject: Re: Rusty 65 SC restoration |
|
|
Meticulous as always. That 'just whipped it up' stand is genius; it would have taken me as long to build it as you have on this entire truck... I just used stacks of wood to fool with my bumpers. Only fell on my head once.
_________________
Craig K
70 Neunsitzer
65 Pritschenwagen
"If Von Dutch was alive, he'd walk in there with a pistol and shoot these people." - Robert Williams
Raoul the 65 singlecab
Karl the 70 nine-seater |
|
| Back to top |
|
|
Kb65single
Samba Member
Joined: July 24, 2019
Posts: 351
Location: Obxnc
|
| Posted: Tue Mar 18, 2025 8:04 am Post subject: Re: Rusty 65 SC restoration |
|
|
chrisflstf
Thanks
70bus
Thanks, "only fell on my head once", was what I was trying to avoid. Rear bumper is easier to balance.
While I was at the front of the bus... I always wanted to make the front VW emblem a bolt on thing. I remember trying to get the present one off and it was a bitch. Those clips that Hans and Franz thought were a good idea never had to try to get them off. The more you pull, the harder they want to grab.
First thing was getting it cleaned up. The chalk looking paint seemed to hide a lot of problems, and it did.
Some of the rust damage especially to the pegs. Using those spring clips to reattach it to the bus would be a nightmare. After all the time and effort to restore it, I wanted an easy on and off .
|
|
| Back to top |
|
|
chrisflstf
Samba Member
Joined: February 10, 2004
Posts: 4247
Location: San Diego
|
| Posted: Tue Mar 18, 2025 10:30 am Post subject: Re: Rusty 65 SC restoration |
|
|
I thought about suggesting to buy a better one, but omg $400 to $500!
Maybe welding a new stud on, or a sleeve epoxied over it? |
|
| Back to top |
|
|
Kb65single
Samba Member
Joined: July 24, 2019
Posts: 351
Location: Obxnc
|
| Posted: Tue Mar 18, 2025 1:44 pm Post subject: Re: Rusty 65 SC restoration |
|
|
| chrisflstf wrote: |
I thought about suggesting to buy a better one, but omg $400 to $500!
Maybe welding a new stud on, or a sleeve epoxied over it? |
Yes, they are hard to find at a reasonable price. Went to a swap meet in Maggie Valley N.C. last fall. Found one that I wanted to practice on, rustier than mine, dented and only had 3 studs. He wanted 200$, I offered 100$. When I left the event, he was packing up and the VW emblem was still on the table. Oh my how the times have changed. |
|
| Back to top |
|
|
chrisflstf
Samba Member
Joined: February 10, 2004
Posts: 4247
Location: San Diego
|
|
| Back to top |
|
|
70bus
Samba Member
Joined: July 15, 2004
Posts: 1780
Location: P.O.
|
| Posted: Tue Mar 18, 2025 7:36 pm Post subject: Re: Rusty 65 SC restoration |
|
|
Mine had been tapped for nuts... in 2 different sizes! Looks sketchy but they've held so far.
_________________
Craig K
70 Neunsitzer
65 Pritschenwagen
"If Von Dutch was alive, he'd walk in there with a pistol and shoot these people." - Robert Williams
Raoul the 65 singlecab
Karl the 70 nine-seater |
|
| Back to top |
|
|
karl h
Samba Member

Joined: October 10, 2005
Posts: 656
Location: austria
|
|
| Back to top |
|
|
Kb65single
Samba Member
Joined: July 24, 2019
Posts: 351
Location: Obxnc
|
| Posted: Wed Mar 26, 2025 7:48 am Post subject: Re: Rusty 65 SC restoration |
|
|
chrisflstf
70bus
karl h
Thanks for the potential collection of solutions. Looking at pictures generates ideas and with the internet the possibilities seem endless. Getting the correct hardware to solve the problem is sometimes right in front of your eyes.
My favorite selection of nuts and bolts is my local Ace Hardware because I only have to buy one item and not a 10 pack like Home Depot. The peg measurements that I wanted to get close to.
The peg was 5mm wide but holding a 5mm bolt didn't look big enough and the nuts which would form the bottom spacer that kept the emblem away from the body weren't large/wide/tall enough. Went back home and looked through my assortment of VW nuts and bolts. I opened a tray of used oil change nuts which were thick/wide and tall enough. They have a 6mm X 1.00 thread. 6mm went through the front nose sheet metal a little snug but I didn't have to sort/find/fabricate the spacer. I ground off the top (oval dome) of the nut and ran a tap through it. Increased the spacer to 7mm tall. Sandblasted one clean and hit it with the Mig welder and the weld stuck. You wouldn't believe how many of my assortment of oil change bolts were cross threaded (beware).
I chose 25mm bolts (stainless steel) for the threaded stud (6mm X 1.00). All I had to do was cut off the bolt head with a hack saw. 25 mm is too long, but I needed the extra length to assist with the assembly.
I really didn't know how the pegs attached to the emblem. Didn't find anything in the forums but I suck at "searching". Some initial anxiety on the first one (200-500$ for a replacement) but after that it went well. After removing them I still don't know how they did it. Looking at the pictures will help explain.
The center area had rust in the middle and a welded or fused 1.5mm wide circle around the rusty center. The circle around the center had very defined borders and a consistent thickness. I don't know how you get that result by welding. Anyway, it was a mystery to me maybe someone here can explain.
Cut off the peg. Used a 3-inch cut off disk to cut halfway through on opposite sides. Best to do it going with the circle around the VW, not perpendicular to it.
Grind off the metal until you get to the rusty center.
Marked the center then sandblast, wanted clean metal that wouldn't screw up my weld. On to the rest and start the rebuilding
|
|
| Back to top |
|
|
chrisflstf
Samba Member
Joined: February 10, 2004
Posts: 4247
Location: San Diego
|
| Posted: Wed Mar 26, 2025 10:17 am Post subject: Re: Rusty 65 SC restoration |
|
|
So you are using a modified drain plate cap nut with a 6mm stud attached to it and the cap nut tacked to the emblem? I would use red loctite on the stud
Sounds like a decent fix |
|
| Back to top |
|
|
Kb65single
Samba Member
Joined: July 24, 2019
Posts: 351
Location: Obxnc
|
| Posted: Mon Mar 31, 2025 1:20 pm Post subject: Re: Rusty 65 SC restoration |
|
|
chrisflstf
" So, you are using a modified drain plate cap nut with a 6mm stud attached to it and the cap nut tacked to the emblem." Yes, exactly with a twist.
The modified nut and stud have to get positioned in the body sheet metal exactly. Unfortunately, "Tacking"/welding the nut on the back of the emblem has to happen with the emblem removed. I didn't have a pattern or jig to follow. There had to be some way to lock in the position of the nut/stud on the emblem. The only solution to that was drilling a hole through the emblem. If the position of the stud needed to change, I just enlarged the hole in the emblem. I could then tighten a nut on the outside of the emblem to lock in its position. That's the reason for the 25mm long stud.
Started with the top center location. Kept the other three pegs there until I finished positioning that one. The first one was easy. I hit the correct position the first time. Moved to the bottom center next then on to the left and right. Had to enlarge those emblem holes (0 for 3) to get things to line up. After getting all four positioned correctly I could start welding the modified cap nuts to the back of the emblem.
After welding the first nut on, rechecked the other 3. Cut the threaded rod off with 9mm thread exposed and a 1-2mm recess on the face of the emblem. Followed that sequence (weld then check) for the other 3.
Weld and grind the face of the emblem to lock the stud in. Will use nylon lock nuts with rubber and metal washers to secure. Enlarged the 6mm body holes with a round file to allow easy passage when the nose is painted. I have three of those clips available. 
|
|
| Back to top |
|
|
Kb65single
Samba Member
Joined: July 24, 2019
Posts: 351
Location: Obxnc
|
| Posted: Mon Apr 14, 2025 8:12 am Post subject: Re: Rusty 65 SC restoration |
|
|
On to the rear bumper. A bumper was included with the sale of the bus. It was very rusty but straight. Went to OCTO 10/12/24 and found a better one. A lot less rust but still had a few issues. Only 2 rear slash bumpers present that day. Bumper had some light trailer brackets welded to it. Looked like it was dented in the middle, but someone did a good job of straightening it. Seems like I always see someone doing brake repairs at these events.
We were doing some kitchen improvements to our condo in Tucson AZ. (happy wife happy life) and had to leave the bumper and a front beam purchased two years ago back in AZ.  Flew back home and a couple of weeks later I got an itch to go back and get them. After finishing the front metal work, I knew I would need them soon. I had never driven from N.C. to AZ so that's what I did. Took the passenger front seat and rear passenger back rest out and packed the parts in. Made sure to premeasure beforehand, car is kind of small. There is a lot of nothing in-between those two locations, but the parts were very happy to be in N.C. Gasoline is really cheap in Texas, but the state is way too big. Flew back home and a couple of weeks later I got an itch to go back and get them. After finishing the front metal work, I knew I would need them soon. I had never driven from N.C. to AZ so that's what I did. Took the passenger front seat and rear passenger back rest out and packed the parts in. Made sure to premeasure beforehand, car is kind of small. There is a lot of nothing in-between those two locations, but the parts were very happy to be in N.C. Gasoline is really cheap in Texas, but the state is way too big.
|
|
| Back to top |
|
|
Kb65single
Samba Member
Joined: July 24, 2019
Posts: 351
Location: Obxnc
|
| Posted: Sun Apr 20, 2025 6:51 am Post subject: Re: Rusty 65 SC restoration |
|
|
Rear bumper was a bitch to fit. A lot of parts have to play well with each other for it to set in its proper relaxed place. One bumper blade, 2 rear bumper brackets, 2 bumper splash pans, the splash pan hardware, 2 bumper guards, and 2 towel bars all have to bolt to the frame, the bus sheet metal corners and to each other. Having never done this I decided to pre-fit before paint, and I am really really glad I did. If you have a bunch of old parts that are probably distorted to start with, or using aftermarket parts, working the bugs out beforehand comes highly recommended.
First thing I did was straighten out one of the brackets welded to the blade. One of the welds was broken and the threaded section that the frame bracket bolts too was missing.
Pounded the bracket straight with my framing hammer (body hammers don't faze that thick metal) and welded a threaded 1/4" plate to replace the missing one.
Cleaned up the inside of the bumper and straightened up the bumper blade from the damage done from the broken weld and bent bracket. Welded the bracket to the same location.
|
|
| Back to top |
|
|
Kb65single
Samba Member
Joined: July 24, 2019
Posts: 351
Location: Obxnc
|
| Posted: Sun May 04, 2025 9:32 am Post subject: Re: Rusty 65 SC restoration |
|
|
I had 2 sets of bumper brackets. Both sets were "well used" and their geometry looked vastly different.
Mounting them on the bus made me decide on the white painted one's vs the black painted set. Both sets made the,"slash", point up but the black set was at the extreme end. Both sets cleared the corner bus sheet metal at the bottom of the d-pillar.
White brackets: They had the V cut on the end where it bolts to the frame.
Black brackets: No V cut on the end.
Thought the black bracket ends should be parallel to the brackets inside the bumper blade. Put a level on the black set just to see how far off it was.
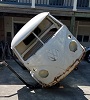
Tried to bolt the bumper to the bus and this is what it looked like. Couldn't even tighten the bolts because the slash point was hitting the bus corner sheet metal.
So that eliminated the black set for now which unfortunately was the straightest looking set. First thing was to get the blade roughly positioned. Did that by stacking a combination of wood blocks to support the ends.
Made the bumper parallel to the load bed and/or the hinge carrier of the engine lid. Center the bumper blade using the bus corner sheet metal. An equal distance from the bumper blade tip to the bus corner sheet metal hopefully will mate up with the bracket ends and the threaded holes in the bumper blade brackets.
With the blade centered, my "well used" brackets didn't mate up to well. The passenger bracket end was positioned outside of where it should be. Moving the end of the bracket 1/2-inch side to side buy brute force only twisted the end. Ended up cutting the bracket on the top and down one side and welded it back together. Little black lines is how far I had to move it for the bolt holes to line up.
Driver's side was the exact opposite. Cut and weld again. The bumper blade now has equal spacing below the louvers on either side of the engine bay.
The end of the passenger bumper bracket was really bent so cut it off, straightened it and tacked it back on. I decided to start tack welding things back together because then things could be changed easier, if need be. I still don't know if I'm headed in the right direction with all this. Might need to study on this a while. The only thing I've done is get the blade centered. All the other parts of the bumper still need to be added.
|
|
| Back to top |
|
|
70bus
Samba Member
Joined: July 15, 2004
Posts: 1780
Location: P.O.
|
| Posted: Sun May 04, 2025 10:25 am Post subject: Re: Rusty 65 SC restoration |
|
|
Too late to save you the trouble... but did you try switching the brackets left/right? That 'Driver's side was the exact opposite' might mean they were how they were supposed to be
stocknazi:
| Quote: |
| When bolted onto the frame the LEFT bracket will angle to the left, the RIGHT will angle to the right following the curve of the bumper. |
https://www.thesamba.com/vw/forum/viewtopic.php?t=802265
_________________
Craig K
70 Neunsitzer
65 Pritschenwagen
"If Von Dutch was alive, he'd walk in there with a pistol and shoot these people." - Robert Williams
Raoul the 65 singlecab
Karl the 70 nine-seater |
|
| Back to top |
|
|
chrisflstf
Samba Member
Joined: February 10, 2004
Posts: 4247
Location: San Diego
|
|
| Back to top |
|
|
Kb65single
Samba Member
Joined: July 24, 2019
Posts: 351
Location: Obxnc
|
| Posted: Sun May 04, 2025 4:16 pm Post subject: Re: Rusty 65 SC restoration |
|
|
| 70bus wrote: |
Too late to save you the trouble... but did you try switching the brackets left/right? That 'Driver's side was the exact opposite' might mean they were how they were supposed to be
stocknazi:
| Quote: |
| When bolted onto the frame the LEFT bracket will angle to the left, the RIGHT will angle to the right following the curve of the bumper. |
https://www.thesamba.com/vw/forum/viewtopic.php?t=802265 |
Yes, I did. The problem was that both brackets shifted the bumper to one side or the other. Not in the center of the bus where I wanted it to be. One bracket wouldn't cancel the effect of the other. My brackets didn't seem to have a right or left because they were well used. Hopefully that makes sense. |
|
| Back to top |
|
|
Kb65single
Samba Member
Joined: July 24, 2019
Posts: 351
Location: Obxnc
|
| Posted: Sun May 04, 2025 4:34 pm Post subject: Re: Rusty 65 SC restoration |
|
|
I believe that the black set that I have are aftermarket (no V cuts) so I didn't think another aftermarket bracket would solve my problem. It's a custom fit with real old parts and I like using as much original parts as I can. I believe the V cut brackets are VW original brackets. I learned that in the 13 bumper pages in the forums.
Ken |
|
| Back to top |
|
|
70bus
Samba Member
Joined: July 15, 2004
Posts: 1780
Location: P.O.
|
| Posted: Sun May 04, 2025 7:01 pm Post subject: Re: Rusty 65 SC restoration |
|
|
I tried an aftermarket set like that, and damaged as my originals are, I still think they made a better fit. The bumper tips facing front bend down a bit, but that's because I am not a welder and so hammered the brackets straight as best I could.
I see now in the parts manual where it just states 'rear bracket' instead of L/R; thanks.
| Quote: |
| I learned that in the 13 bumper pages in the forums. |
I should have known you are obsessive like me and read all the posts about whatever task you are planning. You just actually learn from them!
_________________
Craig K
70 Neunsitzer
65 Pritschenwagen
"If Von Dutch was alive, he'd walk in there with a pistol and shoot these people." - Robert Williams
Raoul the 65 singlecab
Karl the 70 nine-seater |
|
| Back to top |
|
|
Kb65single
Samba Member
Joined: July 24, 2019
Posts: 351
Location: Obxnc
|
| Posted: Tue May 13, 2025 9:36 am Post subject: Re: Rusty 65 SC restoration |
|
|
70bus
Thanks for the comment about your aftermarket bracket attempt. That made me feel like all the head bruises from my bumper brick wall were well justified.
So, the bumper blade is centered in the bus. One plane of a 3-plane position satisfied (xyz). Decided to check out the forums using search word "bumper" and title only checked. Got 13 pages of information. Went through all 13 pages and on page 11 (oilspot 2005) asked the question "My rear bumper brackets got bent to hell by PO. I've got them pretty much straightened out, but I think it's still sitting pretty low. How much clearance should I have between the decklid and the bumper when I open the decklid? I figure that should get me pretty close to the right height." (Buckly) was the only responder. "Mine just clears the bumper. I pinch my fingers every now and then." Out of 13 pages that was the only clue that could guild me to answer my question, how high or low is the rear bumper supposed to be? There were some pictures but the angles at which they were taken made them unreliable. There was a lot of good info in those 13 pages, and I learned a lot. There was a suggestion that said you should assemble all the bumper parts loosely and then gradually tighten them. My original wood block position turned out to be way to low according to "Buckly" and I didn't have all the pieces assembled loosely. My brackets were bent to hell just like "oilspots". I needed a different approach.
Decided to assemble the guards and towel bars. Make sure they fit tight first then I could loosen things knowing that they really do fit. I bought a really nice California steel passenger side bumper guard a couple of years ago at OCTO. It went on easy, and the profile of the bumper matched the guard very well. Used some angle iron and a stick to keep the slash point level.
Had a nice towel bar but previous users crushed the pipe end where the bolt secures it to the guard. Stuck a small bar in the end and pounded the crushed part round again. Did the same thing to the other side while in the pounding mode.
That towel bar fit easy too. It was starting to look like a bus.
|
|
| Back to top |
|
|
|


