| Author |
Message |
WilliamA
Samba Member

Joined: October 08, 2005
Posts: 447
Location: Spooner, Wi

|
 Posted: Thu Dec 08, 2011 8:46 pm Post subject: A Winter's Tale...1973 Pro-Street Fastback Posted: Thu Dec 08, 2011 8:46 pm Post subject: A Winter's Tale...1973 Pro-Street Fastback |
 |
|
It’s fast approaching the winter solstice up here. The wind is howling and the day is but a few hours of light. It’s only appropriate that I borrow from the Bard and call this little story: A Winter’s Tale
This particular tale started a long time ago. Perhaps a couple of years. I’ll introduce you into this story closer to the end than the beginning. Due in part to a hard drive crash, I don’t have any photos of the original and early work we performed. I’ll instead start here in the middle and work both ways....
After a few successful projects together, my friend Neil and I set out to set free a bit of the real visual potential in a 1973 type 3 fastback that he picked up. Neil wanted to do a sort of pro-street project that was both wild and clean. The basic specs were to power the car with a full-tilt 2.3 liter type 1 engine running through a 6 rib bus tranny. The chassis would receive a basic makeover, cleaning and upgrade. The body would go through a facelift Elizabeth Taylor would be proud of.
The car was solid, stock and more or less complete. She didn’t run, but had the potential in her. The stock plant was in there. That was the first to go, along with the transmission. We stripped her down to butt-naked and cleaned up the pan. No problems there. She was solid. A California that found it’s way to Colorado before ending up in Wisconsin. I stripped the pan floor of every bracket, heater control and wire housing. We put the pan away and started the long transformation of the body.
In my mind, if a modification is done correctly, it shouldn't "look" grafted on. It should look like it grew there naturally. Here's the completed rear rollpan with frenched in license plate. This is all steel.
Here's the chassis, all cleaned and de-loused. Lots of suspension tweaking to do yet, but not until the car is farther along. Lowering and alignment will be the last things before final assembly.
Neil pulled out a 54 Chevrolet taillight lens and we started the body modifications there. He also wanted frenched front turnsignals, clean lines with no chrome, no vents, no pignose on the hood, recessed license plates, a new roll pan for the rear and a Karman Ghia decklid vent among other things.
The late type 3 had to have been designed by a committee. A very LARGE committee. There is just no visual focus. The taillights look like they were off a forklift, or possibly an aircraft tug. The front turn signals look like pieces cut from a milkjug. I’m not sure who thought it would be a good idea to graft the nose of a pig onto the front of the hood, but it just had to go. She had more vents in her than a paintbooth.
Now before you all start out to the car with pitchforks and other weapons, I’d like to say that this is a hobby and passion for us. ALL of us. It’s not just for restorations or posterity. It’s supposed to be about taking something that is cool and making it more fun and better looking. It’s about putting our own ideas from thought to metal. That’s what this is about to us at least. I enjoy looking at a well restored car as much as you. But I wouldn’t get out of bed to do a restoration. It’s just not interesting enough to me to undertake. I have great respect for those who do them. It’s a lot of hard work.
Here's the tank-puller 6 rib bus tranny in and tight. Lots of mods and tweaks. She'll run through ultra-strong CV shafts into atomic rear stub axles.
The clean and neat hood and cowl, now de-vented. We removed the standing rib from the hood along with the offensive nose...
Okay. Disclaimer aside and put to bed. Back to the tale.
I’ve sprinkled the introduction with a few pictures so you can see how much of the work has been finished. There is plenty yet to do, but it’s coming along and progress is made daily. I will tackle the modifications in more detail as we go, but I just wanted to get some photos up first.
Here's the power to the people's car. Neil can elaborate on the specs (he's putting it together) but it's a monster... Stock? Not so much... Notice the tasty bowtie engine hanger bar. It's also the home for the crank sensor that drives the DIS brain.
The most difficult part of the body modifications was the taillight area and rollpan. The stock rollpan was designed to fit around the muffler, so with no muffler or rear bumper, it looked pretty sad. We cut the whole of the rollpan off the back and started pretty much from scratch. The new rollpan is done it steel and is nice and smooth. It reflects the curves and lines of the car now. The taillights were....a challenge. I rebuilt them twice by mocking up in steel before we got things looking the way we wanted. Sometimes, you have to just build what’s in your minds eye before you can see it won’t work. I don’t have a problem with re-do’s. It’s not a mistake unless it is still there when the paint goes on.
Here's the finishwork in progress for the taillights. The chrome repro taillight is under all that masking tape. I do the final fit by taping the piece we are actually going to use with tape, then bolting it down into a thin layer of wet fiberglass resin and kitty hair to set in a lip. The gasket will go into the inset. I then fill divots and smooth it out with featherfill right up against the part to get the knife edge-perfect fit.
Detail shot of the frenched-in front turn signals. The technique is to cut a hole, weld in a piece of exhaust pipe, cap the inside end and then spend a thousand hours with a dremel tool to grind out the excess weld. No TV. Nothing else to do.
Continued soon.....
William
_________________
“Whenever you find yourself on the side of the majority, it is time to pause and reflect.”
-Mark Twain
“Do what you can, with what you have, where you are.”
-Theodore Roosevelt
Last edited by WilliamA on Thu Dec 08, 2011 10:38 pm; edited 3 times in total |
|
| Back to top |
|
 |
supaninja
Samba Member

Joined: July 03, 2010
Posts: 4020
Location: houston
|
|
| Back to top |
|
|
Brent
Samba Member

Joined: April 28, 2010
Posts: 1622
Location: San Tan Valley, AZ
|
| Posted: Thu Dec 08, 2011 9:03 pm Post subject: |
|
|
I'm liking this one. Your doing great work William. Those tail lights will be sweet!
Now for the question. What's your plan for getting fresh, cool air to the T1 engine? There's a turbo that AJ Sims built that had kind of a cutaway engine cover and then holes in the sides to get to the vents, but that won't work in this one. Graft your cowl into the decklid? But that kind of defeats the no vent approach.
I dig the wheels too. And there's a growing number of us that don't consider the Fasty ugly. 
_________________
69 Fastback Build
Berg5 Build |
|
| Back to top |
|
|
WilliamA
Samba Member
Joined: October 08, 2005
Posts: 447
Location: Spooner, Wi
|
| Posted: Thu Dec 08, 2011 9:11 pm Post subject: |
|
|
Hi Brent,
The aerodynamics and venting will be covered in detail, but briefly, the cold air system will pull from a giant fresh air gulper under the car behind the passengers seat. It ducts with aluminum cannon stock directly into the fan shroud. Hot air out is handled by the huge Karman Ghia vent grafted into the decklid. The whole engine bay is open underneath, so there will be plenty of airflow back there through thermal convection...Lots to show you all...Stay tuned..
William
_________________
“Whenever you find yourself on the side of the majority, it is time to pause and reflect.”
-Mark Twain
“Do what you can, with what you have, where you are.”
-Theodore Roosevelt |
|
| Back to top |
|
|
WilliamA
Samba Member
Joined: October 08, 2005
Posts: 447
Location: Spooner, Wi
|
| Posted: Thu Dec 08, 2011 9:14 pm Post subject: |
|
|
Ignition is handled by a DIS system with Ford components and single crank trigger. Induction is through sewer pipe fed by twin sheet-rock mud buckets with toilet valves. Just kidding. Twin 48 webers will keep this baby watered...
If you look closely at 4 oclock on the crank pulley, you'll see the crank sensor there bolted to the bracket that's also the bowtie engine hanger. The bowtie has about 37 functions in addition to hanging the engine. It was sort of like building a full scale sopwith camel in your toilet tank. Lots of plumbing to work around.
William
_________________
“Whenever you find yourself on the side of the majority, it is time to pause and reflect.”
-Mark Twain
“Do what you can, with what you have, where you are.”
-Theodore Roosevelt |
|
| Back to top |
|
|
WilliamA
Samba Member
Joined: October 08, 2005
Posts: 447
Location: Spooner, Wi
|
| Posted: Thu Dec 08, 2011 9:21 pm Post subject: |
|
|
Hey Brent,
Neil and I actually think the fasty has some tasty lines. There's a hint of the Henry J lines in these things. It's just the detail work that ruined it late in life. With all the mods, it should be reminiscent of a 50's street rod. Sort of old school, but fresh and tight. Like it was supposed to be... The rumor is true though. I DO tend to get carried away from time to time. Neil had to put a shock collar on me to prevent me shaving the door handles...
William
_________________
“Whenever you find yourself on the side of the majority, it is time to pause and reflect.”
-Mark Twain
“Do what you can, with what you have, where you are.”
-Theodore Roosevelt |
|
| Back to top |
|
|
supaninja
Samba Member
Joined: July 03, 2010
Posts: 4020
Location: houston
|
| Posted: Thu Dec 08, 2011 9:33 pm Post subject: |
|
|
| WilliamA wrote: |
Ignition is handled by a DIS system with Ford components and single crank trigger. Induction is through sewer pipe fed by twin sheet-rock mud buckets with toilet valves. Just kidding. Twin 48 webers will keep this baby watered...
If you look closely at 4 oclock on the crank pulley, you'll see the crank sensor there bolted to the bracket that's also the bowtie engine hanger. The bowtie has about 37 functions in addition to hanging the engine. It was sort of like building a full scale sopwith camel in your toilet tank. Lots of plumbing to work around.
William |
I saw that VR sensor, I got the exact same one in my notch, '89 mustang vr sensor 
I was going to go with EDIS then I figured out how to make my megasquirt direct fire, its allowing me more freedom with the COPs and can do launch control, ign-cut rev limiter, and a shift light.
_________________
http://i5.photobucket.com/albums/y163/chucky1974/ninja.gif
Nick
Megasquirted Type 4 powered Notch http://www.thesamba.com/vw/forum/viewtopic.php?t=427890&postdays=0&postorder=asc&start=0
Blog of Doom http://supaninjanick.wordpress.com/ |
|
| Back to top |
|
|
WilliamA
Samba Member
Joined: October 08, 2005
Posts: 447
Location: Spooner, Wi
|
| Posted: Thu Dec 08, 2011 9:48 pm Post subject: |
|
|
More pics:
Type 1 fuel tank grafted in and forward. Oversized hole has been filled and coated..
Major surgery to graft 54 chev taillights to the existing hole.
Dr Frankenstein is alive and well at Dr Dub. Lots of cuts, fillets and hammering to smooth, then the whole thing gets ground with the angle grinder and flap disc until it's smooth, like butter... Notice in this shot as well, the original rollpan, fertilizer spreader apron pre-surgery..
Here's the new rollpan post graft. I used 22 gauge cold-rolled steel sheets for all body mods. There is a 1/2" 16 gauge steel tubing lip at the bottom of this to make it stiff and smooth where it rolls under...
Frenched in license plate well is tacked in and ready for finish welding and grinding. This is one piece, edge rolled to break at the corners.
A few words about our tools. I do all of this stuff with a small lincoln welder (110 volt with shielding gas), a few pair of aviation snips, body hammers and dollies, and other simple hand tools. We don't have a sheet metal break. I clamp my parts to a bench and break them over with a body hammer. You don't need a million expensive tools to do this stuff. Use your head, learn to use your welder well, and have patience! When I started cutting the new taillight mounts, I had many re-cuts and welds. Just takes time guys. Think it through and walk away when you get frustrated. You don't need Orange County Choppers shop to do this stuff....
To keep from being killed by an angry mob of NOS purists, I include this shot of the Karman Ghia decklid vent. The decklid this came out of had been hit by a meteor. Probably the one that took out the dinosaurs. This was all I could save.
The old Ghia vent grafted into the hole in the decklid. It's tacked and ready to begin the final fitting.
Here's the mostly-finished decklid. Lots of detail work with a rat tail file, but she's in and straight....sort of... Directly behind the vent in this photo, the decklid sort of comes to a sharp break where it rolls over to the bottom. After much discussion, Neil and I decided to soften up the center break-line. I cut and rolled that center of the break to more closely match the outside soft radius. I'll dig around a post a pic of the post, post surgery. Remember, it's a work in progress. And people think we actually have a plan. That cracks me up....
More later
William
_________________
“Whenever you find yourself on the side of the majority, it is time to pause and reflect.”
-Mark Twain
“Do what you can, with what you have, where you are.”
-Theodore Roosevelt |
|
| Back to top |
|
|
VWporscheGT3
Samba Member
Joined: September 01, 2006
Posts: 2192
Location: Gardnerville, NV
|
| Posted: Fri Dec 09, 2011 8:21 am Post subject: |
|
|
| Quote: |
supaninja Posted: Yesterday 7:59 pm Post subject:
--------------------------------------------------------------------------------
Awesome, you won't get any complaints from me, that's the ugly duckling of the type 3 line-up, anything is an improvement. I also agree stock resto's are not my thing either.
I see a trigger wheel, what does neil have in store for that t1 motor? Ign, EFI, or both?
Thats a clever rear hanger too
|
dont listen to nick... he's a fastback racist.  very cool project! im looking forward to seeing more! very cool project! im looking forward to seeing more!
_________________
If you have any questions about Forged ICON 4032 VW pistons just shoot me a line. |
|
| Back to top |
|
|
Bobnotch
Samba Member

Joined: July 06, 2003
Posts: 23517
Location: Kimball, Mi
|
| Posted: Fri Dec 09, 2011 11:07 am Post subject: |
|
|
I'm no "purist" by any means, and I really like what you guys are doing.  What type of light are you going to use in the frenched turn signals? I really do like the Chevy tail light conversion, as it's a bit different than what you normally see. There's definitely a ton of fab work that you've done, and most of it probably won't be noticed the first time around when someone first sees the car. I like that. What type of light are you going to use in the frenched turn signals? I really do like the Chevy tail light conversion, as it's a bit different than what you normally see. There's definitely a ton of fab work that you've done, and most of it probably won't be noticed the first time around when someone first sees the car. I like that.  Have you guys decided on a color yet? Keep up the great work, and post more pics, as I'd love to see them. Have you guys decided on a color yet? Keep up the great work, and post more pics, as I'd love to see them.
_________________
Bob 65 Notch S with Sunroof
71 Notch ...aka Krunchy; build pics here;
http://www.thesamba.com/vw/forum/viewtopic.php?t=249390 -been busy working
64 T-34 Ghia...aka Wolfie, under construction... http://www.thesamba.com/vw/forum/viewtopic.php?t=412120
| Tram wrote: |
| "Friends are God's way of apologizing for relatives." |
| Tram wrote: |
| People keep confusing "restored" and "restroyed". |
|
|
| Back to top |
|
|
supersuk
Samba Member

Joined: December 20, 2010
Posts: 958
Location: Honolulu, Hawaii
|
|
| Back to top |
|
|
Houstonr
Samba Member
Joined: February 01, 2009
Posts: 399
Location: Frisco Texas
|
| Posted: Fri Dec 09, 2011 1:31 pm Post subject: |
|
|
nice purse  |
|
| Back to top |
|
|
dragsters for life
Samba Member

Joined: September 10, 2011
Posts: 1155
Location: MELBOURNE, type 3 contingent
|
| Posted: Fri Dec 09, 2011 3:43 pm Post subject: |
|
|
nice work, happy building
_________________
new t3c merch coming soon |
|
| Back to top |
|
|
WilliamA
Samba Member
Joined: October 08, 2005
Posts: 447
Location: Spooner, Wi
|
| Posted: Fri Dec 09, 2011 6:31 pm Post subject: |
|
|
As I was driving up and down the road today providing an economic stimulus for just about every industry, it occurred to me that my invocation of Shakespeare in the naming of this thread may be a bit too cerebral for the presented material. Before I get into tonights' post, I'll explain. Neil is the owner, floor supervisor and quite often, the guy who's balancing, rotating or siping your tires as well as other myriad tasks. He owns the business, but still has dirt under his fingers daily. So this morning, I slipped into the shop and he was characteristically knee deep in assorted tasks. He didn't say much, but slid a CD across the counter at me. The handwritten title said simply: "Killer Queen".
We always come up with some cheesy but fun working title for the projects. I guess this one is that. There were 80 some photos on the disc, some of which I will be sharing here now. So I quickly reviewed the photos at the house before dashing off on my shopping frenzy. Lots of drive time got me thinking about the rather hectic, non-linear way we always do our projects. In that light, a more appropriate title for the thread would be "Do Androids dream of electric sheep" from the Philip K. Dick novel of the same name. With us, it's always an adventure and it never ceases to surprise us. To say there's no plan would be unfair. Neil is a "plan" kind of guy. That he can put up with me is still the big mystery. Suffice to say we work pretty well together in that Abbot and Costello sort of way. Maybe Beavis and Butthead would be more to the point....
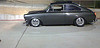
Here's the car the day Neil procured it. She's complete for the most part, and stock.
There was some parking lot rash on the passengers side quarter panel that had been sort of repaired. Rather than remove the panel and fix it, the repairman had drilled 20 or 30 holes in the panel, used a puller to mostly make it shapely, then troweled on the bondo.
Filling the cowl vents
Filling in the bumper wells on the rear quarter panels.
Stock drums and rotors, redrilled for the 5 bolt pattern. They have since been cleaned and machined smooth.
It's somewhere around this photo that a person starts to realize just how long a project like this is going to take. Just the sheer number of modifications gets to be pretty intimidating. Once started, there's no direction but forward. We call this place "the hell of 1,000 sandpapers". A full restoration is more time consuming and my hat's off to anyone who does one.
Someone asked me what the turn signals look like. Here's one. They are pretty simple shallow mount led style. I've no idea where Neil got them and don't very often even ask anymore. It's just best not to know.
Here's the working hardware for the foot controls fabbed up and fitted. True to the pro-street look, the seats and hardware are all moved back about 10 inches or so. Maybe 7 inches. I can't remember....
Here you see the new heads and induction sitting on a handy donor engine/doorstop to test for fit. VW engines are like old Honda motorcycles, you don't buy them in quantities of "each". You usually get them by the pound, or sometimes the truckload...
As you can see, we carved out significant sheetmetal to get these bits stuffed in there. Once I had the surgery completed, I welded 1"x1" thinwall square tubing to the raw edges around the engine cavern to clean it all up.
Here's the obnoxious emblem mount and stiffening rib pre-surgery. You can also see some minor damage on the hood. Even "clean" cars come with their own stories. Lots of cutting lines, scratches and doodling on our projects.
Earlier in the thread, I referred to the knife edge on the decklid. Here's a better photo of that pre-surgery. The center where the license plate bracket and light came to a defined break. I have since taken that out and softened up the radius. I'll drum up a better photo of the post-op work.
Well, that's todays post. If I've missed any questions, just ask again! It's hard to keep up sometimes and I lose track of what I've answered and what I've missed.
William
_________________
“Whenever you find yourself on the side of the majority, it is time to pause and reflect.”
-Mark Twain
“Do what you can, with what you have, where you are.”
-Theodore Roosevelt
Last edited by WilliamA on Fri Dec 09, 2011 9:30 pm; edited 2 times in total |
|
| Back to top |
|
|
WilliamA
Samba Member
Joined: October 08, 2005
Posts: 447
Location: Spooner, Wi
|
| Posted: Fri Dec 09, 2011 6:43 pm Post subject: |
|
|
Neil is closing in on a color scheme, but I can't remember the exact shade. The copper color on the Chevy HHR is pretty close. There will be some insert colors and tasty, but subtle pinstripes as well. I don't get to look at color chips. I can't even SAY the "C" word around the shop. let's just say there were some creative difficulties early on in our car-collusion. Neil saw bright yellow, I envisioned basically what the car would have looked like had Jackson Pollack vomited on it. I don't get to look at colors anymore. If I so much as step into the shop while holding a paint chip, Neil will shoot me in the neck with a BB gun...
_________________
“Whenever you find yourself on the side of the majority, it is time to pause and reflect.”
-Mark Twain
“Do what you can, with what you have, where you are.”
-Theodore Roosevelt
Last edited by WilliamA on Fri Dec 09, 2011 9:33 pm; edited 1 time in total |
|
| Back to top |
|
|
avesondm
Samba Member

Joined: July 12, 2010
Posts: 237
Location: west covina, ca
|
| Posted: Fri Dec 09, 2011 8:35 pm Post subject: |
|
|
I sincerely hope you continue the stories and pictures, it's like reading a good book. My dad had a 74 914 that was painted Saturn Yellow and was just beautiful but you obviously can't suggest that.
_________________
71 Squareback FI "TC"
Fat chicks need love too and I have more frunk space than you. |
|
| Back to top |
|
|
WilliamA
Samba Member
Joined: October 08, 2005
Posts: 447
Location: Spooner, Wi
|
| Posted: Fri Dec 09, 2011 9:35 pm Post subject: |
|
|
Hey, that's not my purse. Mine is sort of a buttery mauve with tasty little chrome spangles hanging off like fringe.....
William
_________________
“Whenever you find yourself on the side of the majority, it is time to pause and reflect.”
-Mark Twain
“Do what you can, with what you have, where you are.”
-Theodore Roosevelt |
|
| Back to top |
|
|
Brent
Samba Member
Joined: April 28, 2010
Posts: 1622
Location: San Tan Valley, AZ
|
| Posted: Fri Dec 09, 2011 9:46 pm Post subject: |
|
|
| WilliamA wrote: |
Hey, that's not my purse. Mine is sort of a buttery mauve with tasty little chrome spangles hanging off like fringe.....
William |
The proper terminology is 'murse'.
_________________
69 Fastback Build
Berg5 Build |
|
| Back to top |
|
|
WilliamA
Samba Member
Joined: October 08, 2005
Posts: 447
Location: Spooner, Wi
|
| Posted: Fri Dec 09, 2011 9:49 pm Post subject: |
|
|
| Brent wrote: |
| WilliamA wrote: |
Hey, that's not my purse. Mine is sort of a buttery mauve with tasty little chrome spangles hanging off like fringe.....
William |
The proper terminology is 'murse'. |
Awesome. I need to be careful around the shop. The guys all think I carry my blueprints in it (they still think I have a blueprint! Too funny!) and Neil rifles through it for paint chips....
Will
_________________
“Whenever you find yourself on the side of the majority, it is time to pause and reflect.”
-Mark Twain
“Do what you can, with what you have, where you are.”
-Theodore Roosevelt |
|
| Back to top |
|
|
luckystiff
Samba Member
Joined: September 28, 2005
Posts: 2252
Location: hickory,nc
|
| Posted: Fri Dec 09, 2011 10:16 pm Post subject: |
|
|
as zack g would say "thats not a purse, it's a satchell"...... hey theres Skittles in there.............
_________________
ITMC
Secret Service |
|
| Back to top |
|
|
|


